Specs Management
- Print
Specs Management
- Print
Article summary
Did you find this summary helpful?
Thank you for your feedback!
Specs Managment is the process of using Specs dynamically in Steelhead to maximize the value they add to your business. The ways in which Specs are employed in your shop depends on your own needs and preferences. Some of the more unusual methods are described here, along with instructions for common tasks.
Related Documents
Specifications (Specs) Overview
Specs Configuration
Spec-driven Processing
Specs from Sensors
Certifications
Specs and Certs Troubleshooting
Contents
Collecting Spec Data on Parts
Viewing Spec Results
Updating/Changing Specs
Editing Params on Quotes and Sales Orders
Update Multiple Params Together
Grouped Spec Inputs on Workboards
Split and Reallocate Measurements
Part Number Geometry Types
Layers Feature for Progressive Geometric Measurements on a Single Part
Table Feature for Multiple Geometric Measurements on a Single Part
Coupons for Material Testing
Specs on Coupons
Part Number Compatibiliy for Coupons
Resolve a Failed Spec Measurement on Multiple Parts
Collecting Spec Data on Parts
Spec data can be gathered by operators as they move Parts out of a Station. This can be done directly from a Work Order page or a Workboard.
When Part Numbers that have been assigned a Spec pass through a Process Node that has been assigned a Spec Field, operators will be prompted to submit input such as measurements as the Parts are worked.
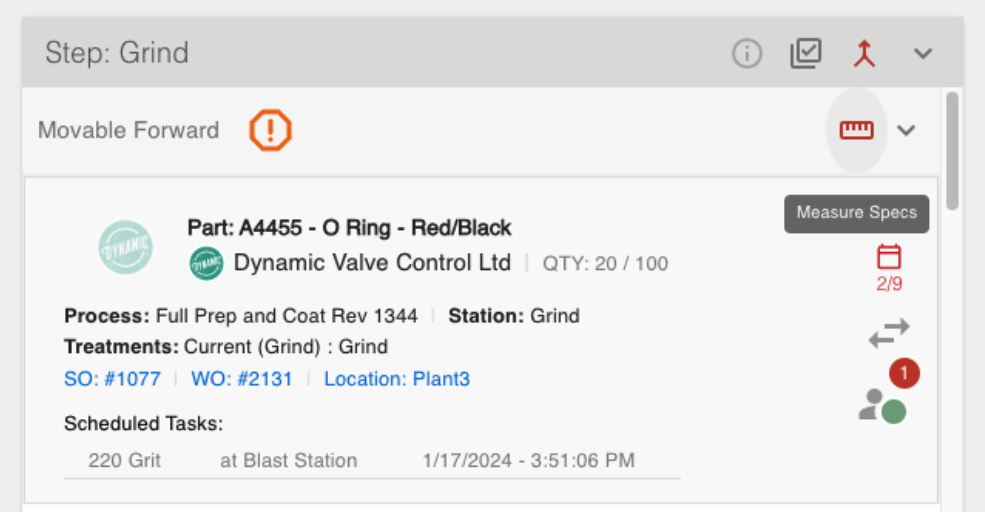
- On Workboards that show Process Nodes with Spec Fields assigned, Part Numbers that have Specs assigned will display a badge to let operators know to input Spec measurements.
- Click the "Work Parts" button to open the sliding Work Parts screen.
- Input measurements for the required Spec Fields.
- Spec result information will be displayed on the Work Order page.
- On Work Orders with multiple Specs which can be entered at one time, opening the Work Order page allows the entry of multiple Spec measurements at one time, and a SUBMIT ALL button to record the values together.
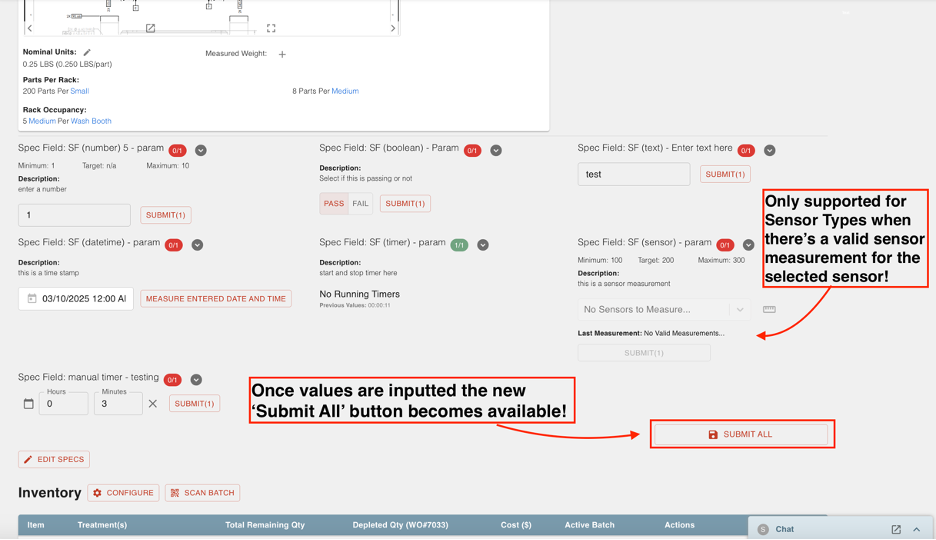
- Previous recorded Spec values are displayed under every measurement entry box:
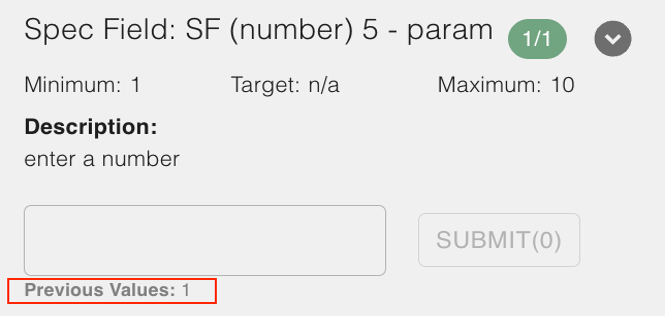
- Multiple value entry is supported for manual timer type Spec Fields, but not for regular Timer Type Spec Fields. Also, Date/Time fields require manual entry, as SUBMIT ALL will not support "current date" auto-entry.
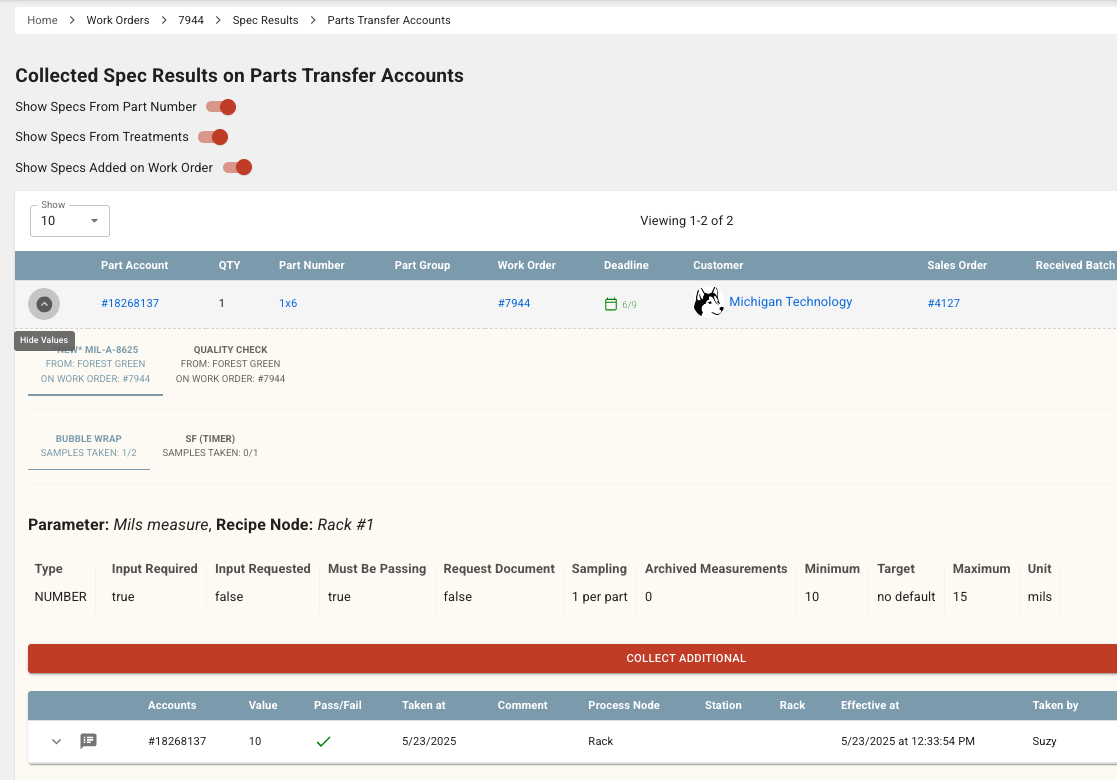
To update/replace a previously recorded Spec measurement:
- Go to the relevant Work Order.
- Scroll down to to Spec Results.
- Select the Part group and the desired Spec.
- Archive the old measurement with the down arrow icon on the far right.
- Click the red Collect Additional button to create a new measurement.
- This functions as checking the box to say the Parts have passed.
- You can also choose to Create Cert on the Work Order page and a new Cert will be generated.
Viewing Spec Results
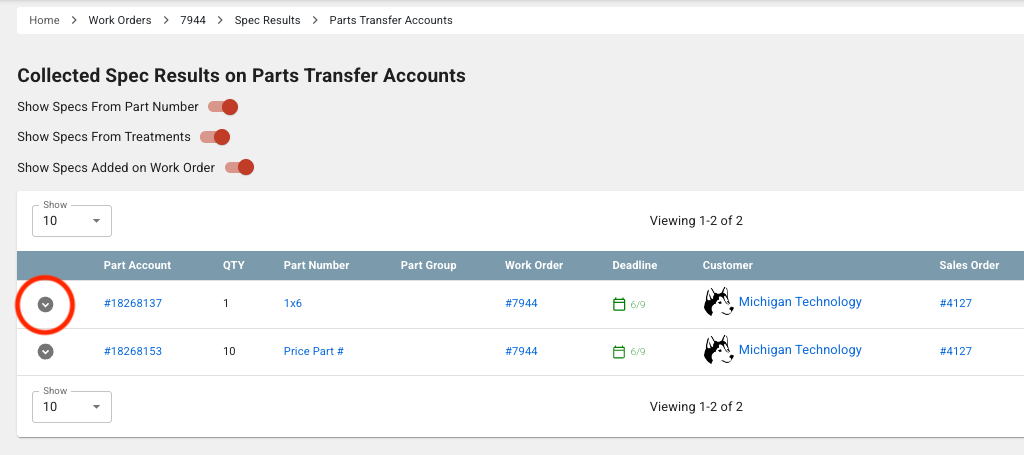
When you open a Work Order which has Specs assigned to its Parts, you can click the SPEC RESULTS button in the title box to review Spec results. Spec results are listed by Part Transfer Account Number, and can be opened with the circled carat Show/Hide icon on the left of each Part Transfer Account row:
If a Cast exists on a Work Order, the Spec Results will be ordered by Cast Number rather than Part Account Number:

Updating/Changing Specs
See also, Specs Configuration for descriptions of Copies, Revisions, and Supersessions.
- If Spec Field Assignment is Generic:
- Parameters can be updated from the Spec and changes will cascade throughout all referenced Params under that Spec Field Assignment.
- If there are multiple Params on a generic Spec Field Assignment, User can define (on a Part Number and Treatment level), which Spec Parameter is the reference. This can be updated at any point.
- IF Spec Field Assignment is Specific:
- Parameters need to be updated at each individual Treatment and Part, wherever the update or change is required.
- If a Spec needs to be revised, i.e. MIL123-A to MIL123-B
- Copy original Spec.
- All Spec Field Assignments and Parameters will be pulled over.
- Assign new Revision Number to relevant Treatments and Part Numbers.
- Archive old Revision Number on Treatments and Part Numbers.
- Parts in process will have Spec inputs updated to reflect the new Spec Revision Number and whatever changes to data collection that dictates.
- Copy original Spec.
Editing Params on Quotes and Sales Orders
Steelhead enables editing of Specs and Spec Field Params when assigning or reviewing Specs on a Quote:
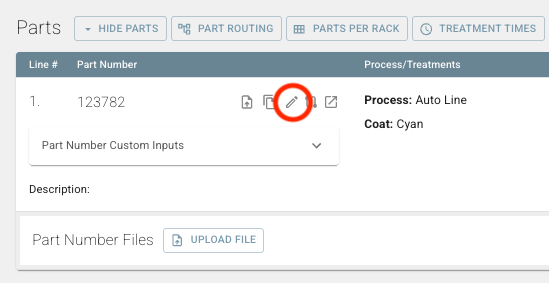
- From a line in a Quote page, click on the edit penclil icon next to the Part Number name to enter the Part Number Page and make changes there.
- To edit Specs that are already attached, click on the hyperlinked name of the attached Spec in the Quote Line Item. This opens the Spec Page itself. Clicking into Spec Fields opens the page to allow editing of Default Spec Field Params.
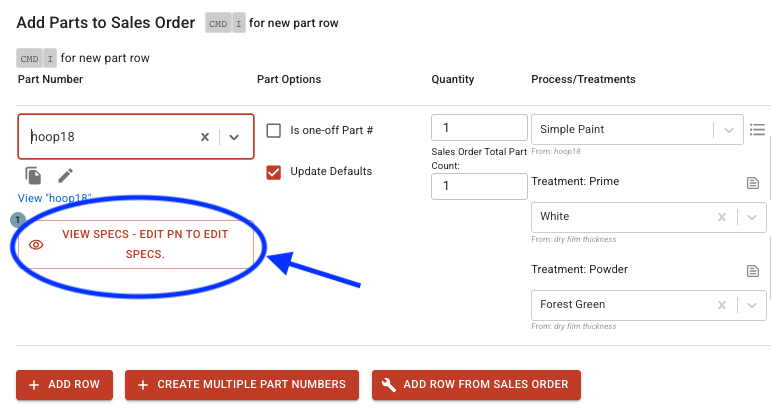
- When you add a Part which has assigned Specs to a Sales Order, there is an option to VIEW SPECS by clicking a link under the Part Number field. Clicking into the applied Spec Field will open the Spec Field Params for editing. You will also be offered a choice to apply the changes to other Processes where that Spec Field is applied, if applicable.
The most straightforward way to adjust Params is in the Part Number page:
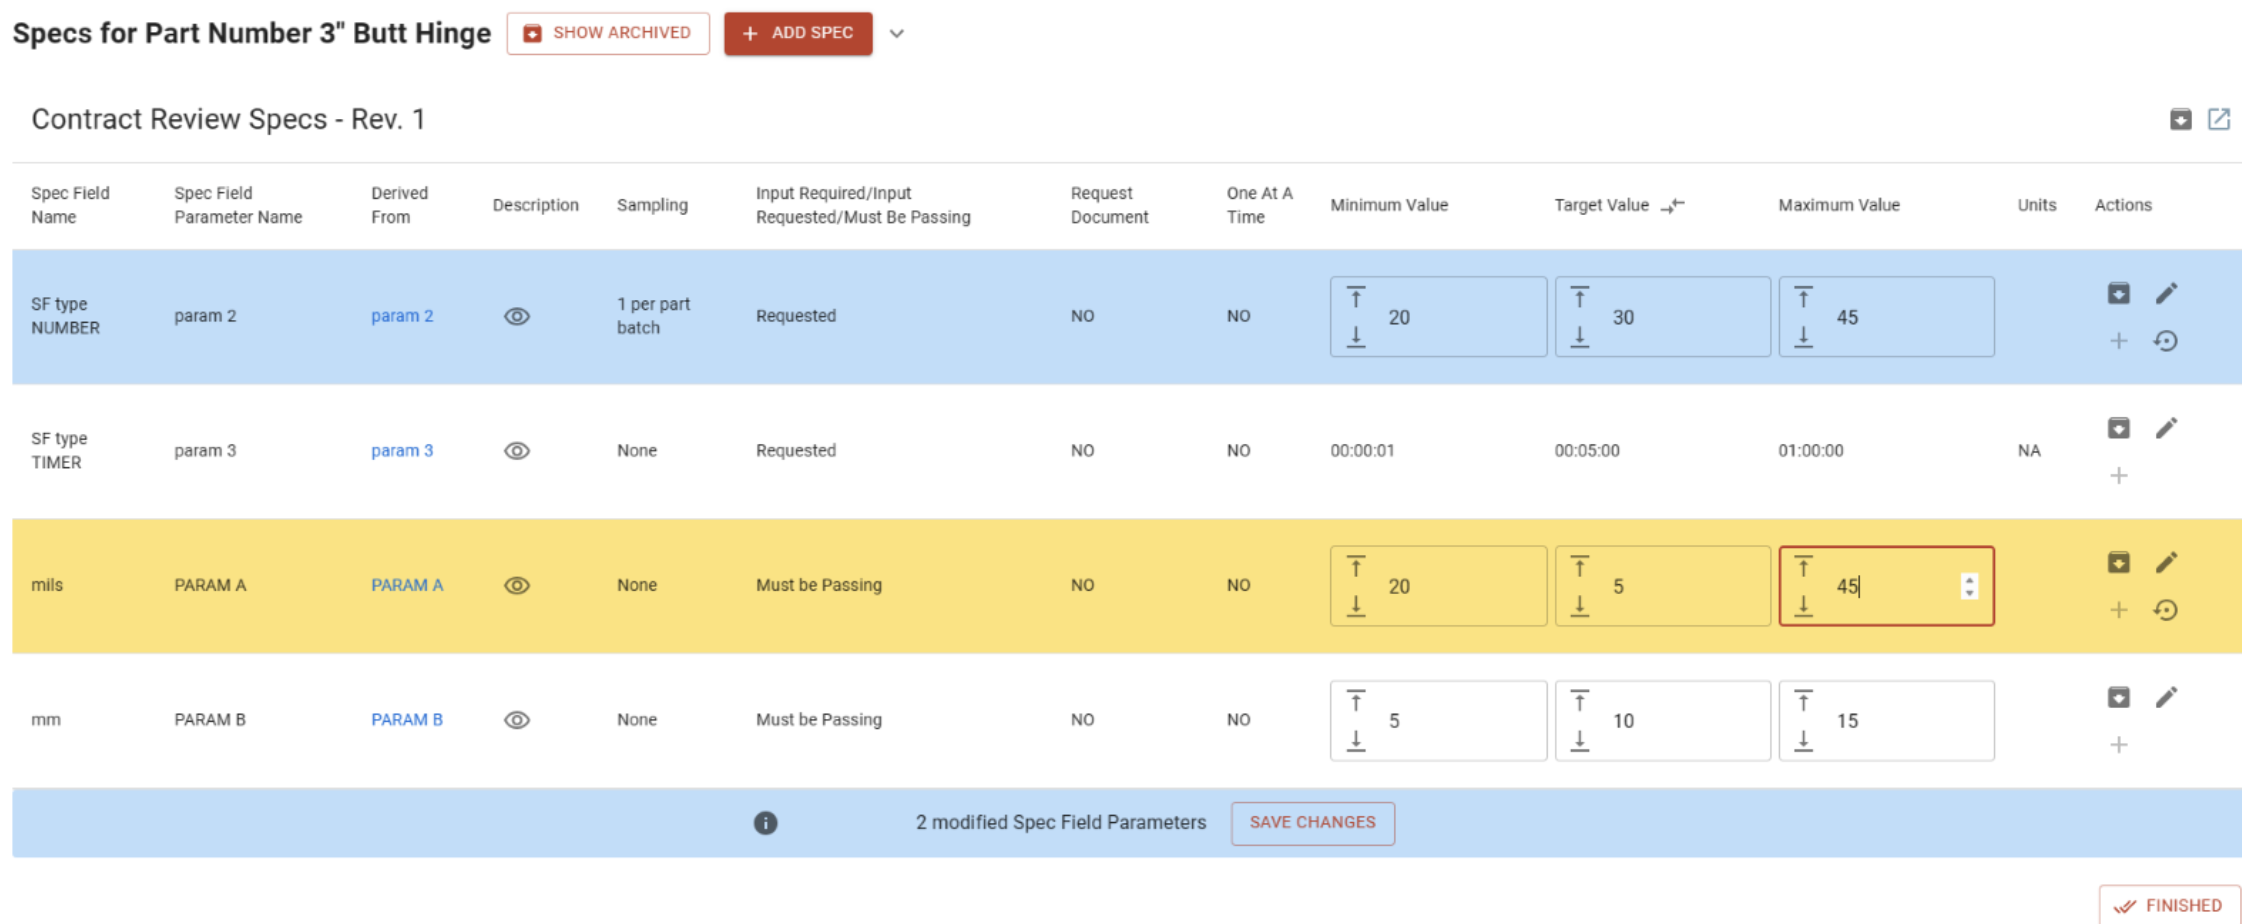
You may trigger alerts to Assign Parameters, like the one shown below:

- When applicable, use the up/down arrows to edit Spec Field Params' Target or Tolerance values. The Min and Max may be based on either.
- Lines highlighted blue have changes that are ordered appropriately and can be saved.
- Lines highlighted yellow have changes that can’t be saved because the target is not within the Min/Max.
- Click Save Changes on the bottom banner and ensure Spec Field Params are saved.
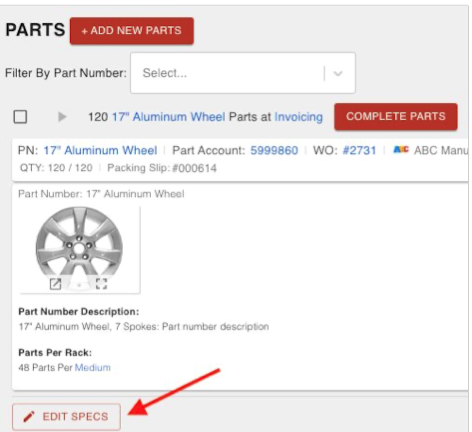
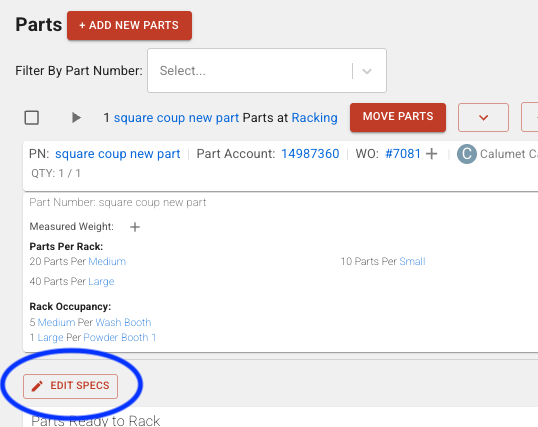
EDIT SPECS button on WOs
- The EDIT SPECS button can be used by those with the "Archive: Spec Measurements" User Permission.
- Use it to review/edit Specs, Spec Fields, and params.
- Editing the Specs of a part from a Work Order will change part Specs/Parameters only for that instance. The changed Specs will not apply to other Work Orders unless changed on the Part Number itself.
- Note: You can view Archived Spec Field Assignments on Work Order Specs, as long as Params exist for that Spec Field Assignment.
Archive/Unarchive Spec Fields
To Archive or Unarchive a Spec Field on a particular Spec, first open that Spec Page in the Specs Dashboard.
- Scroll down to the Spec Fields section.
- On the right of each Spec Field Line is an arrow/file box icon to archive/unarchive, next to a hand icon for ordering the list.
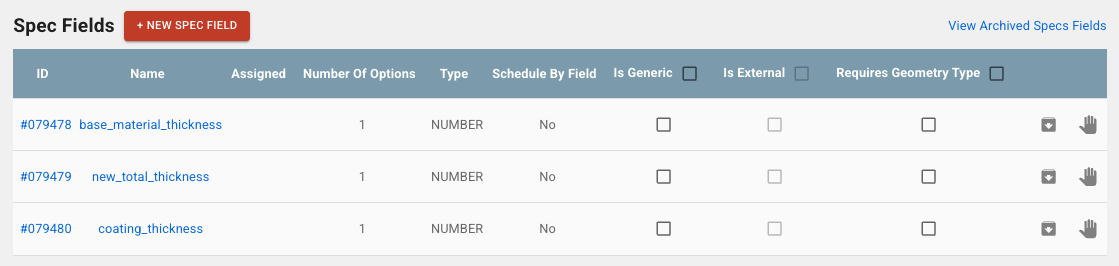
- On the right, you can see a link to "View Archived Specs Fields." Click the link to be able to view and unarchive the previously archived Spec Fields.
- From the archived list, you can click "View Active Specs Fields" to return to the original list.
Update Multiple Parameters Together
In the case of a Part Number, Work Order, or Treatment with many Spec Fields of the same Type within one or multiple Specs: their Params can all be updated at once.
For example, a Part might be assigned a Boolean visual inspection pass/fail at three Nodes during production, but you want to change the sampling rate from 0.1 (one in ten) to 0.3 (three in ten) for all three Nodes:
Open the Part Number page and scroll down to the Specs section. On the right hand side of each Param row, there is a checkbox labeled Actions which functions as a multi-select. You are able to select as many Spec Field Params (checkboxes) as needed of one Type. Then, click the EDIT SELECTED PARAMS button at the top of the section - or the smaller version next to the Action checkbox in each row - and open the "Edit Multiple Spec Field Params" dialog to change any of the shared attributes of the selected Params.
To clear any Param setting (i.e. "Failure Requires Resolution") from all the selected Params, click on the gray "slashed circle" delete icon (Note that the "X" symbol will only clear the input dialog, and not the saved Spec Field Params in the parent table). Once cleared, you can click the pencil icon to "Allow Override" to any of the individual Params within the selected table.
Click SAVE after each change.
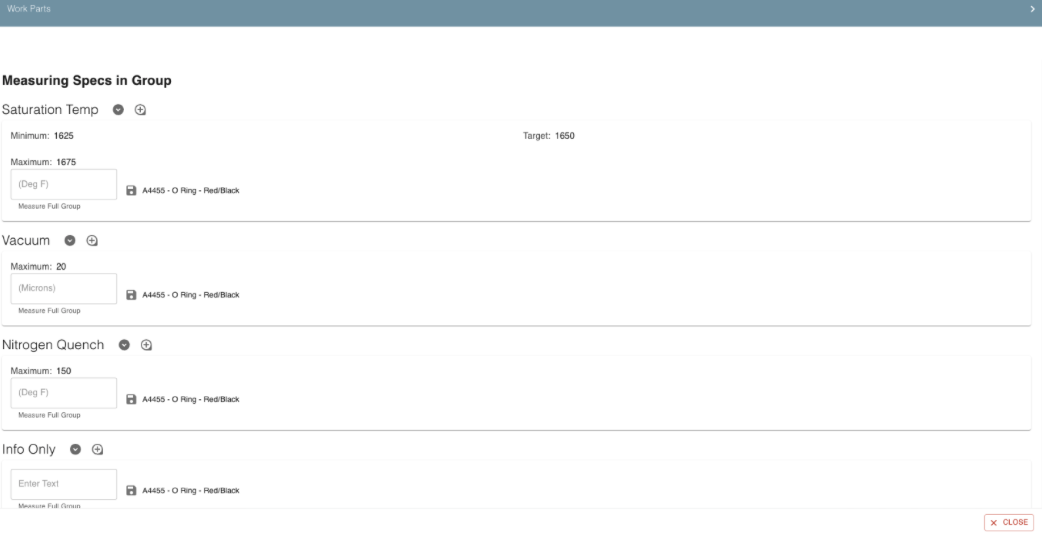
Grouped Spec Inputs on Workboards:
Users may enter Spec measurements for multiple parts on one panel.
They can also temporarily group Parts on a Workboard Card and enter measurements for all Parts that need measurements.
- Find/Create a Workboard.
- Find/Add a Card with numerous parts that have Spec requirements at this stage.
- Select either Group Like Parts or Toggle Multiselect on the Card or global filters.
- Observe that the parts are now in collapsed drop-downs with one at the top that says: "More Measurements Required".
- Click on the "Enter Specs" button.
- Enter the Spec measurements for the Parts. When you close the panel, the Parts should be moved into other groupings and be ready to move.
- Repeat steps 1-4.
- Use the Multiselect toggle to select multiple Parts.
- Click on the "Enter Specs" button in the red row at the top of the Card.
- Repeat steps 6-7.
Split and Reallocate Measurements on Parts
The Split and Reallocate Measurements function allows you to be very specific with your Part Accounts and allocate Spec measurements accordingly. This workflow will allow you to make sure the measurements you recorded stay with the Parts that were measured.
To Split and Reallocate Measurements for Parts, scroll down to the Parts section of your Work Order and click the SHOW DETAILS button next to the Part you want to Split.

Scroll down to click the SPLIT AND REALLOCATE MEASUREMENTS button.

Fill in each field according to how you want the Parts and measurements to be split. Click SAVE.
Click HIDE DETAILS.

You will now see the Parts split into separate rows on the Work Order page. Each row may be moved, worked, and have their Specs recorded independently.

Collect Additional Specs on Part Transfer Accounts
You may need to fill in certain Spec results for Parts that have been split into multiple rows on a Work Order:
From an open Work Order, Click SPEC RESULTS.

Click the drop-down arrow to expand the Parts information.

Scroll down and click the COLLECT ADDITIONAL button.

Fill in the value, add any Comments, select the checkboxes next to any Part Accounts you want to assign the value to, and click SAVE.

Part Number Geometry Types:
Geometry Types are a way to group Spec Fields which apply in common to one type of physical object. Creating Geometry Types in Steelhead gives you a way to organize Specs for those groups and increase the efficiency of setting up and fulfilling Work Orders.
For example, cylindrical geometries like pipes, trash cans and wheel hubs might commonly need recorded measurements of inside diameter, outside diameter, and wall thickness; but a flat die cut sheet product might need thickness and edge finish checks instead.
When you set up a "Cylinder" Geometry Type in Steelhead, it allows you to link any related Part Number you create to the set of Spec Fields (ID, OD, and wall thickness) which fit the characteristics of the part, while prescribing Parameters (target values) based on the particular Part and Customer order.
The same concepts can be extended to precise QC tests in a laboratory setting which apply to certain types of parts. For example springs are regularly load tested and fatigue tested, but the Parameters of the tests change based on material, diameter, coil pitch, length, and so on.
Assigning Geometry Types also makes it easy to track changes in measurements during Work Order processes via table data entry, for example to track gains in thickness.
How to assign Part Number Geometry Types:
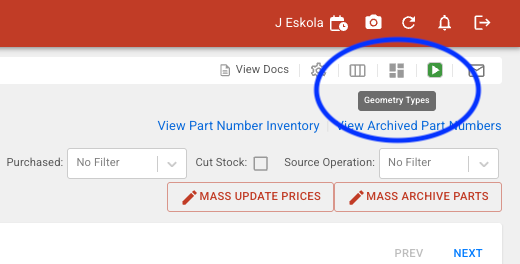
- Go to the Part Numbers page.
- Click the Geometry Types icon in the upper right-hand corner:
- Create a Geometry Type.
- Add Spec Fields to the Geometry Type.
- Choose a Part Number and set its Geometry Type to match.
Layers Feature for Progressive Geometric Measurements on a Single Part
For Geometric Specs that are recorded across multiple Nodes to record data about layers, the Specs Layers feature will calculate differences in measurements (for example, for thickness gained during one Treatment).
Create a Spec with a Geometry Type, e.g. "Paint thickness calc spec."
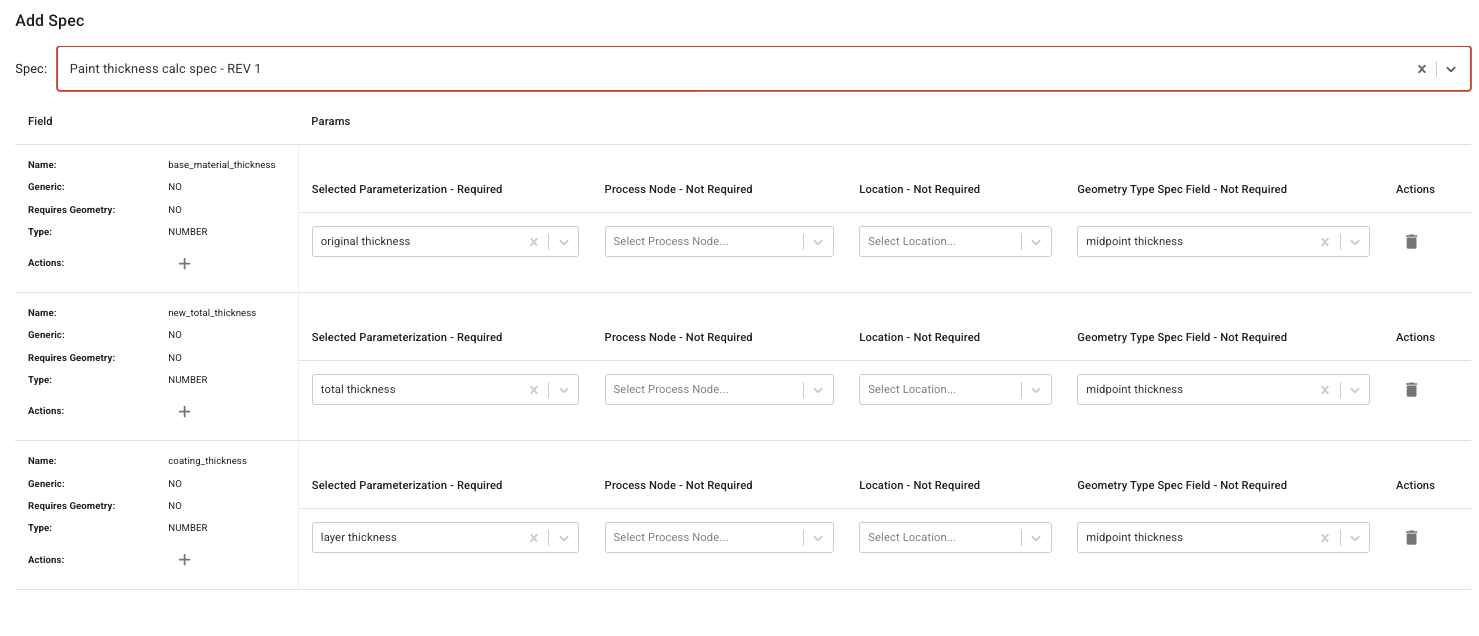
To record a layer, create three Spec Fields: a Referenced Spec Field (e.g., "base_material_thickness"), an Operating Referenced Spec Field (e.g., "new_total_thickness", upon which a mathematical operation will be performed), and a Spec Field which calculates the difference between the two (e.g., "coating_thickness") - when you create this third, enter the above "Referenced Spec Field" and "Operating Referenced Spec Field" in the Create Spec Field dialog box. This data Field will later auto-fill from the references, but the first two must be assigned to the Treatments/Process Nodes where the data will be collected.
After saving these Spec Field Assignments, click on the first of the three Spec Field ID numbers in the Spec page to open it, and click on +CREATE DEFAULT SPEC FIELD PARAMS.
- Name the Param appropriately, e.g. "original thickness."
- Enter a "Sample Count per Batch" of 1.
- Enter a Target Value and Tolerance, or Minimum and Maximum Values, along with your other requirements. Click SAVE.
Repeat the above steps for the second and third Spec Field Assignments, with descriptive names, e.g. "total thickness" and "layer thickness." For the "layer thickness" (third) Referencer Spec Field Param creation, also select an Operation (e.g., "SUBTRACTION"). Click SAVE each time.
Navigate to the Part Numbers Dashboard from the Homepage. Set up a Part Number Geometry via the Geometry Types link icon in the upper right:

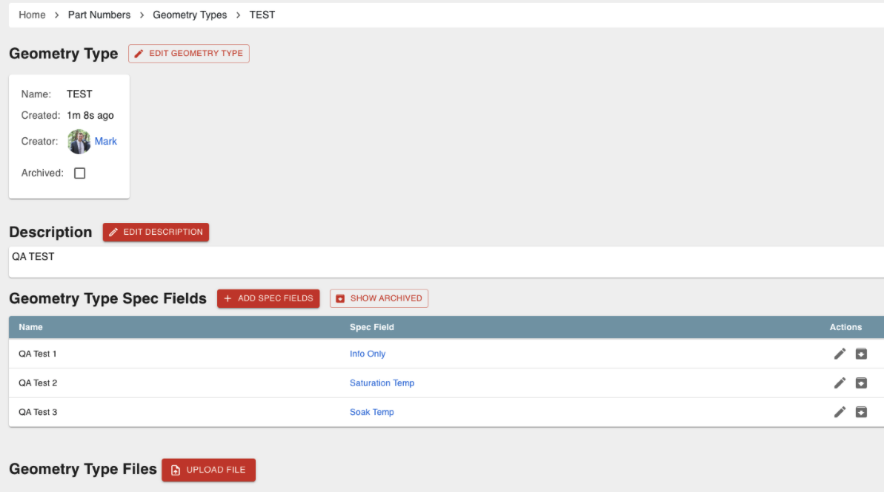
Click +NEW GEOMETRY TYPE and create a new Type for Layers with appropriate settings (e.g., check "Has Height" in the creation dialog). Click SAVE.
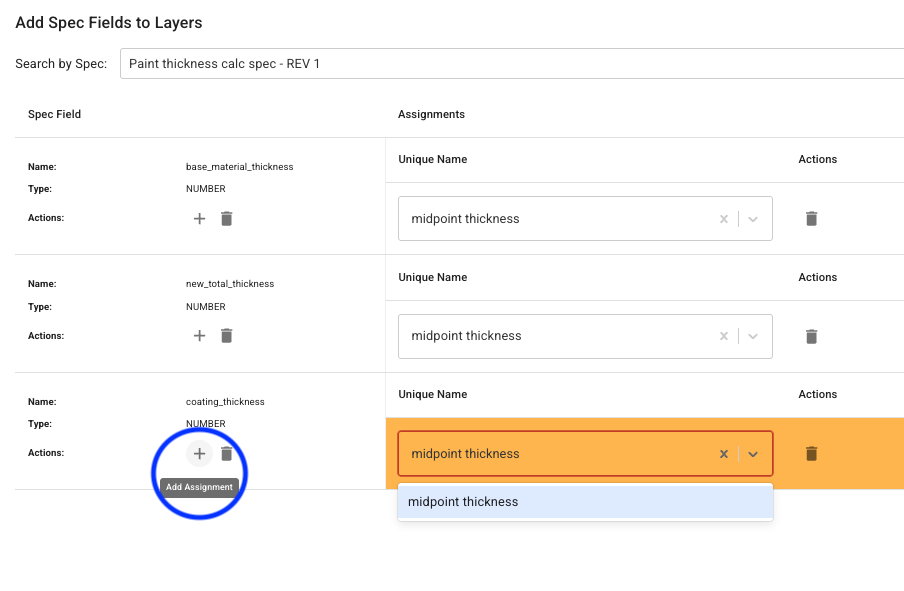
In the Geometry Types Dashboard, click the name of the saved Layers Type to open it, and click on +ADD SPEC FIELDS to add the three related Spec Fields you've created. If you've already created the parent Spec as in the "Paint thickness calc spec" example above, use the "Search by Spec:" search box to find the attached Spec Fields.
In the "Add Spec Fields to spec name" dialog, in each Spec Field row, click the plus sign icon to Add Assignment once for each geometric point you need to measure at each measurement Node. Enter a matching "Unique Name" at each of the three Spec Fields (matching for all three, but unique to the Geometry Type, such as "bottom", "top", "inside diameter", etc.) Assign the first Field to an appropriate Node preceding the layering action. Assign the second Field to a Node following, and the third Field (the Referencer Spec Field) Node assignment must match it to record the operation. Click SAVE.
Navigate to the Part Number, click +ADD SPEC, find the related Spec, and SAVE.
When this Part is worked through the Nodes where the Spec Fields are attached and you record the values, the Spec Field which references the two measurements (the Operation, e.g. "coating_thickness") is preserved for reporting and certifyine purposes as a Spec Field result.
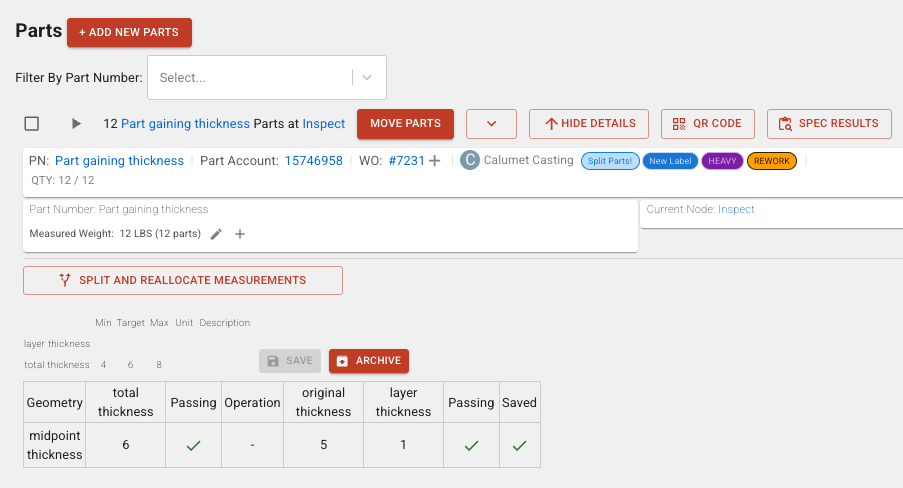
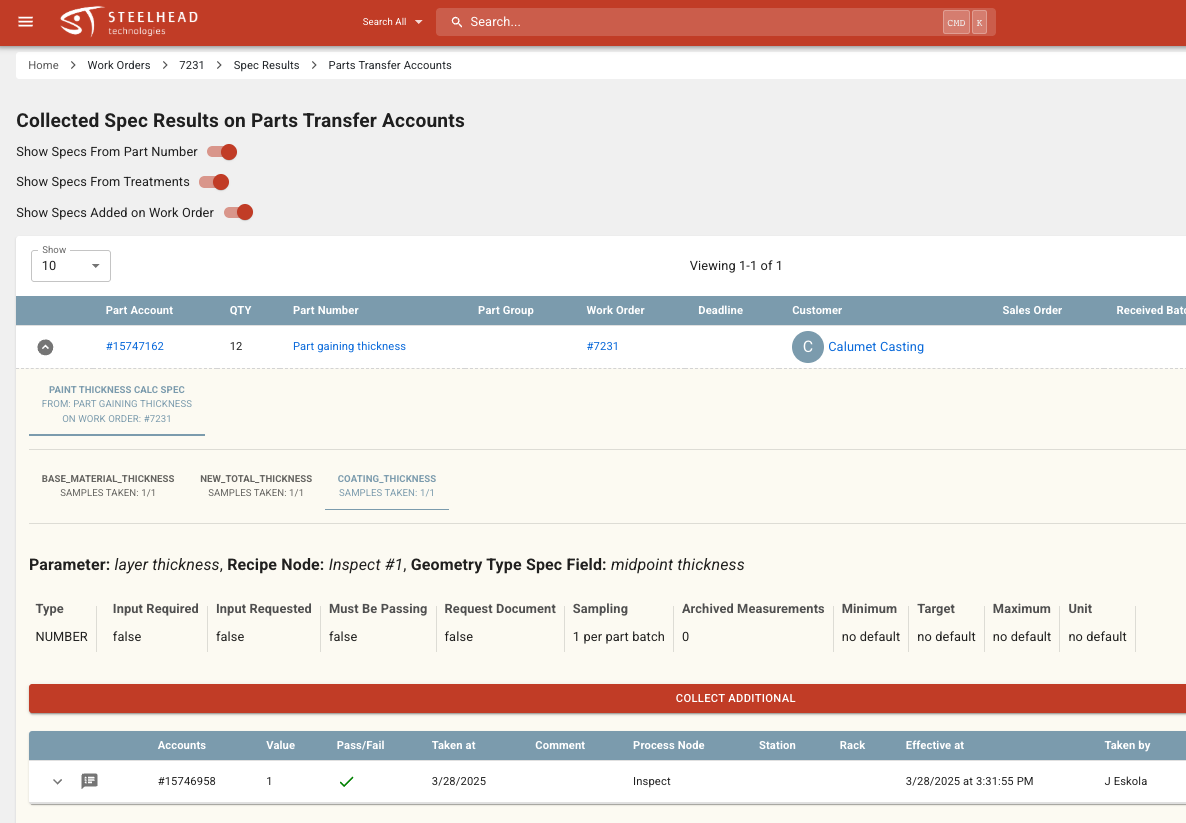
Table Feature for Multiple Geometric Measurements on a Single Part
For Specs that are recorded across multiple Nodes at different geometric points, the Specs Table feature will preserve numerical data entered at previous Nodes for data repopulation, and will calculate differences or sums (for example, for thickness gain during one Treatment) and warn if those changes exceed your set Parameters.
To use the Table feature, create or edit a numerical Spec on a part (a reference), with a distinct name.
Then create a second Spec in the same way (a referencer), with the addition of selecting the name of the reference Spec in the drop-down "Referenced Spec Field."
Both the reference and referencer must have Spec Field Params created with the following characteristics, in addition to your own guidelines:
1. Minimum and Maximum values
2. Sample count per Batch = 1
In addition, the referencer must include an Operation Parameter selection: either addition or subtraction.
Click to the same Part Number's Geometry Type, and click to Geometry Type Spec Field Properties. Click +NEW PROPERTY to create a new measurement Spec Field location. Use specific property names, i.e. "outside diameter", "inside diameter", etc. Each new Geometry Type creates a row on the Spec Field table for that part.
Back out of Spec Field Properties, to the Part's Geometry Type, and use +ADD SPEC FIELDS to attach the multi-Spec Field to the part (or create new designations). Use the "+" icon to assign each property (in this example, "outside diameter" and "inside diameter") to the Spec Fields.
On a Work Order which includes a Part with your Geometry Type multi-measure Spec, add the referenced and referencer Specs to the Nodes where the data is collected, and click SAVE. Move/Work the parts to the first Node/first Spec, and you will see the table you've just created.
Enter the Spec values. The values you enter at each geometric Property will then carry over and display on the table at the next Spec-managed node as the "Past Value." When you then enter "Current Value" for the Spec at the current node, a calculation based on your Operation Parameter will be shown, along with pass/fail information. The calculated values will also be shown when you click on Spec Results for these Parts.
Coupons for Material Testing
A Coupon is a representative sample of a material or product that is taken from a larger batch for testing, quality control, or analysis.
Test Coupons, which will be worked through all or part of a Process in Steelhead alongside production Customer Parts, may be added to a Work Order to keep track of Specs and other Quality Control data.
In order to use the Coupons feature in Steelhead, first contact Customer Support to enable administrative Domain permissions ("Enable Addition of Coupons on Racking"). The following options will become available:
Specs on Coupons
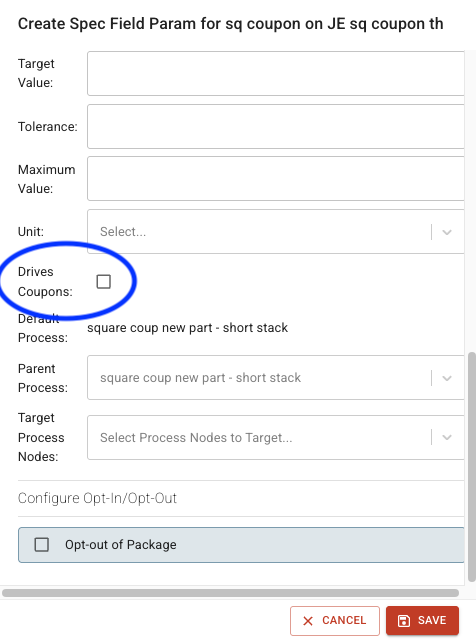
When you enter Params for Spec Fields which are attached to Parts allowing Coupons (described below), you will see the option Drives Coupons. Checking this box will create a new Param for each Spec Field Geometry that the Coupon has on that Spec Field.
Note: This checkbox overrides the default Params for the original Part Number, making them unavailable if you do not run Coupons with that Part.
- Edit Specs from the Work Order:
- Click on the edit pencil to the right of each Spec Field summary line, and verify YES to the question, "Are you sure you want to edit this parameter?":
- Enter the Params and select Drives Coupons before saving the Param:
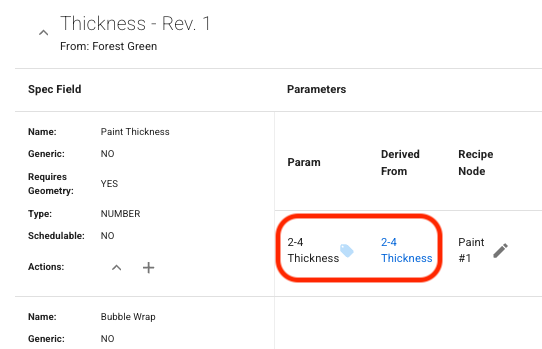
Now when you view the Parameters on the Spec Field, a blue tag icon will show that those Params constrain data collection on Coupon Work Orders:
Moving Parts on the Coupon Work Order through the Process Nodes where Specs are prescribed will then give you a chance to record Spec Field data on the Coupons. Those data will display on the Spec Results page of the Parts the Coupons were racked with, and will be available to be used on Certs in reference to the production Parts they were processed with.
Part Number Compatibility for Coupons
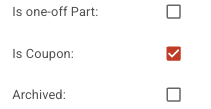
- The Part Number to be sampled must have the Is Coupon checkbox selected on the Part Number Page:
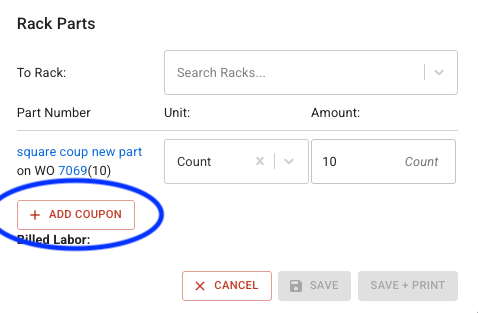
- The Work Order for those Parts must include a Racking Node. Then when you're at the step to Rack Selected Parts from the Work Order or Workboards, the option to add one or more Coupons will appear:
Adding Coupons here will create a new Coupon Work Order for each line created. For example, there might be a line including one Coupon to be pulled for visual inspection, another to continue through additional processing before evaluation, and another line including a quantity of five more Coupons for mechanical tests. The newly generated Recipes for these Work Orders will terminate at the Unracking Node, if there is one in the original Recipe, or at the end of the same Part Recipe otherwise.
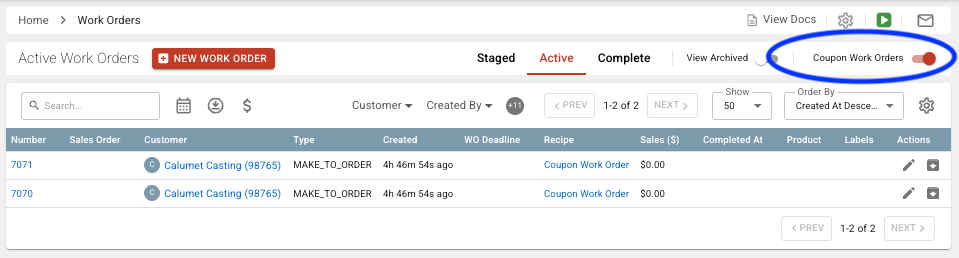
In the Work Orders Dashboard, there is a toggle switch in the upper right which allows you to view Coupon Work Orders separately from all others:
Resolve a Failed Spec Measurement on Multiple Parts
Quality Managers can enter a single Resolution Comment to resolve failed Spec Field Param values on multiple Parts at once, rather than needing to make a unique comment for each Part.
To enter a Resolution Comment for multiple failed Spec Measurements:
From the Quality Management Dashboard, scroll down to see Failing Values and click icon to Create Resolution for Failed Parameter Value for that Parameter.

Fill in your comment and click SAVE. This Resolution gets applied to all Part Accounts associated with that failed measurement.
Spec Review and Sign Off
A Part's Specification results may be reviewed to ensure quality, verify compliance with Customer and industry standards, and help prevent costly Rework by identifying issues before final completion.
To set up Spec review and sign off:
- Enable the Domain setting "Enable Spec Value Sign Off" to allow users to be assigned as those who are allowed to perform Spec review sign offs.
a. Enable the Domain setting "Require Spec Value Sign Off" to make it required for a sign off to be passing before moving the Parts to the next step in the Process.

Note: If these Domain settings are not enabled, Quality Assurance Nodes will still include Spec Review, just without the option to Pass/Fail.
Add a Quality Assurance Node to a Process.
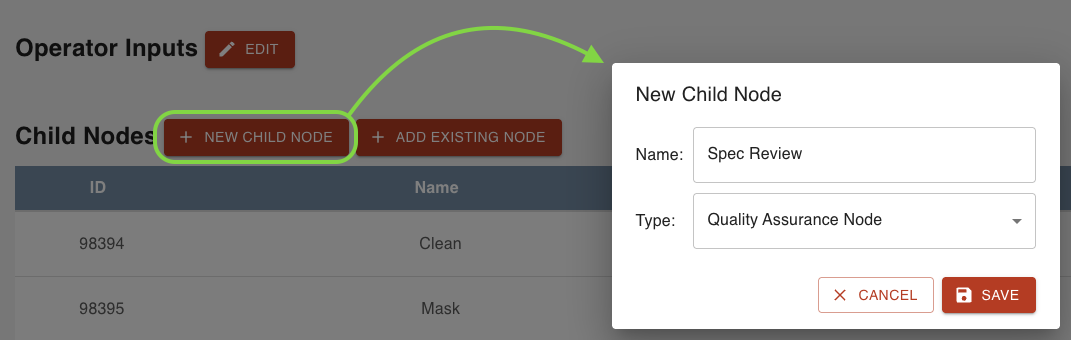
Set Spec Review Users on the Quality Assurance Node and SAVE.
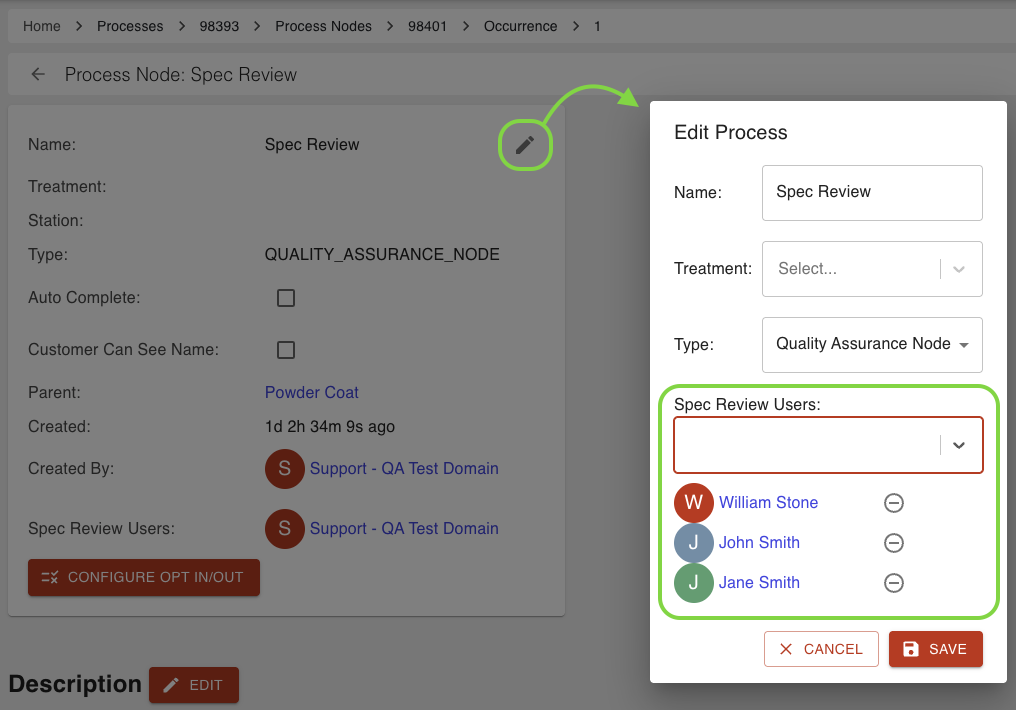
- If there are active Work Order Recipe Nodes derived from this Process Node, but do not have the selected Spec Review Users assigned, a dialog will open that will allow for updating the Recipe Nodes.
Now, when Parts reach the Quality Assurance Node, a Spec Review section will display on the Work Order Part details. Spec Review Users can review the spec values that were collected, and choose to Pass or Fail.
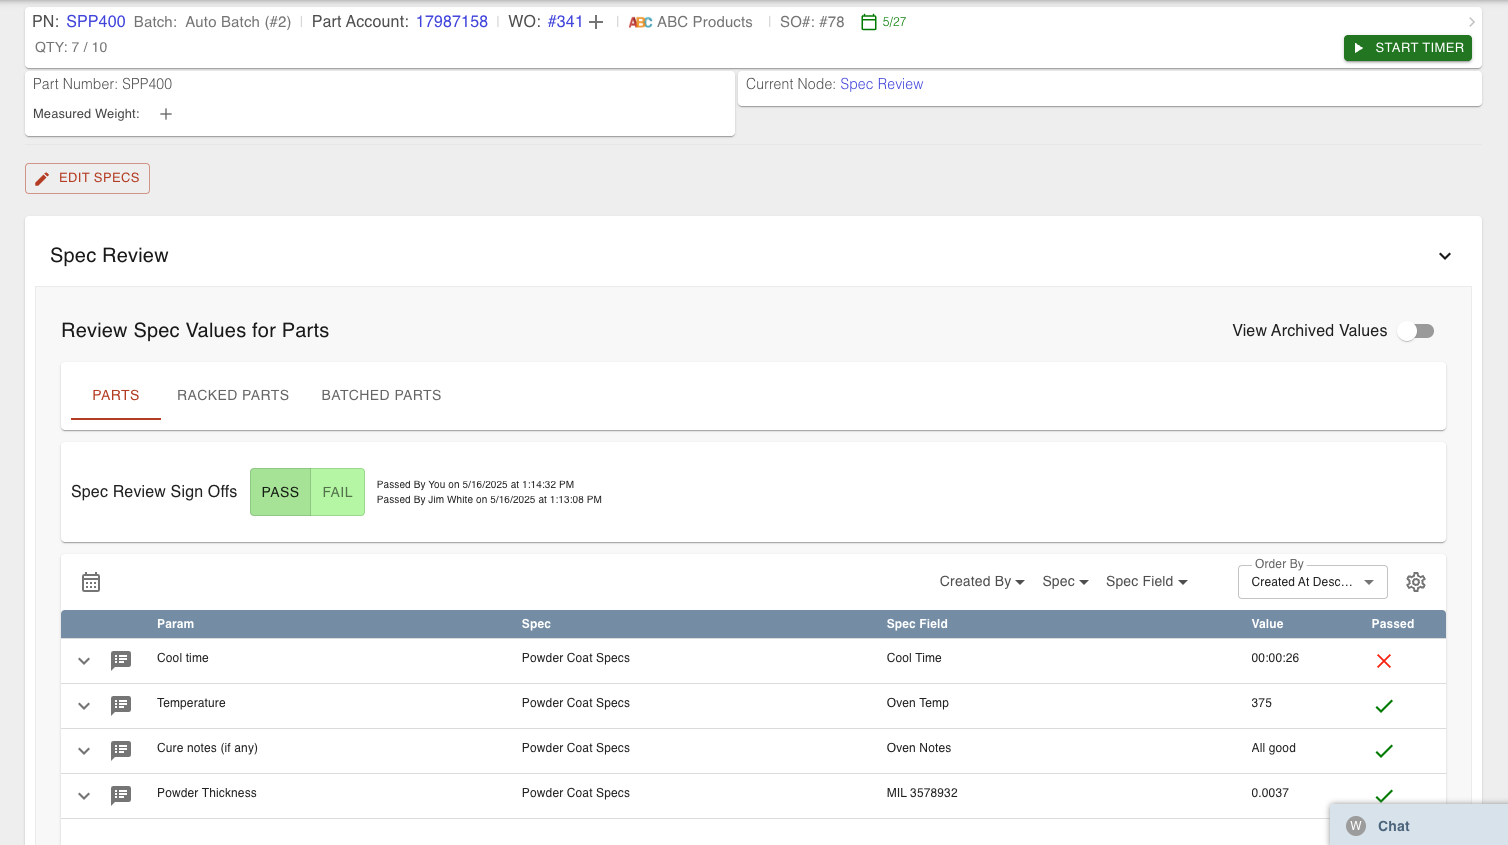
If there are multiple Quality Assurance Nodes within a single Process, Spec values will appear at the next nearest Quality Assurance Node, and will not appear at Quality Assurance Nodes further on.
--
Was this article helpful?