Overview of Purchase Orders
- Print
Overview of Purchase Orders
- Print
Article summary
Did you find this summary helpful?
Thank you for your feedback!
Purchase Orders (POs) are agreements created and sent to Vendors (suppliers), for orders of Inventory or Outsourcing to be completed, and to be paid for by whom is requesting it (the PO issuer).
This Overview includes information to:
- Navigate the Purchase Orders Dashboard
- Create a Purchase Order
- Send, edit, and claim Purchase Orders
- Configure PO Custom Inputs and Stages
Related video: Update to Purchasing (04/17/26) - Time segment 0:25 to 1:30.
Purchase Orders Dashboard
The Purchase Order Dashboard can be accessed by clicking the Purchasing Tile in the Inventory Section of the Steelhead Homepage.

Many actions can be performed on this page:
- Create a new PO
- Filter, order, and page POs
- Use search bar to search PO #
- Filter by Created By, Inventory Item, Vendor, etc.
- Filter by Drafts, Issued, and Fulfilled POs
- Issued and Fulfilled selections allow further filtering by Billing Status (Open/Closed/All)
- Use toggle to View Archived Purchase Orders
- Reach related pages: Receiving and Bills
- Found as links in the top right corner of the page
- Configure PO input schema and PO stages
- Move PO stage
- Edit PO
- Archive PO
- Email PO
- Receive PO items
- Receive Bill
- Reach individual PO pages
Create a Purchase Order
There are a few different locations in Steelhead where you can create a new PO:
Main Purchase Order page

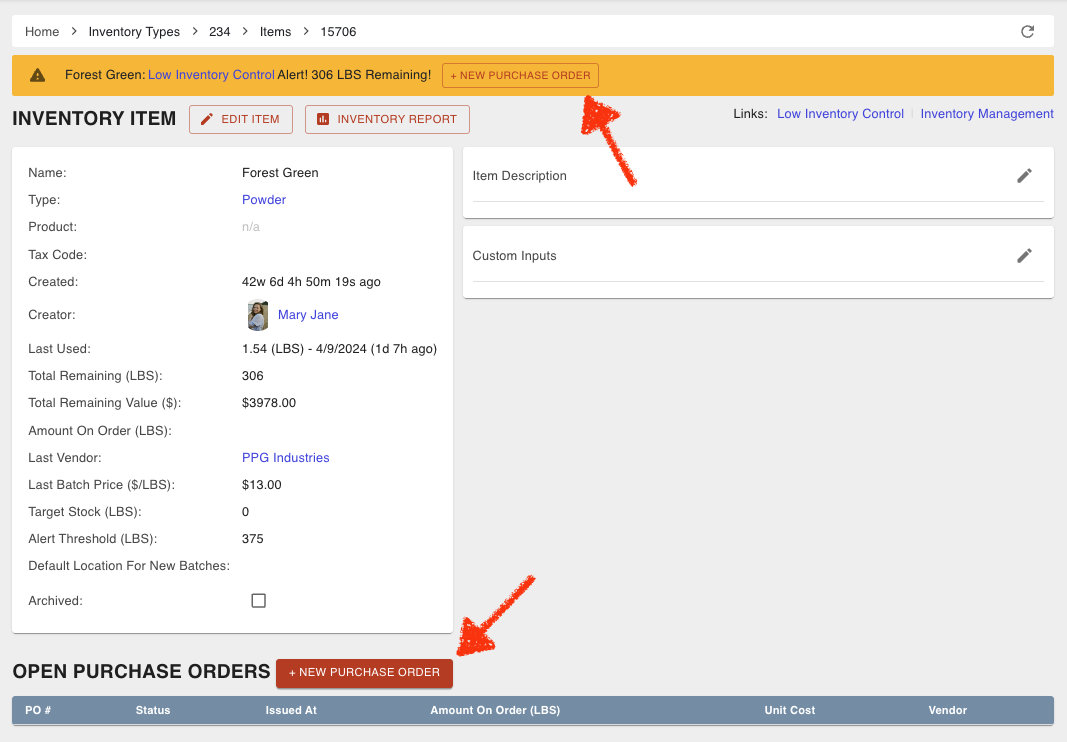
Inventory item pages
Individual Vendor pages


Whichever button from above is clicked, the same "New Purchase Order" dialog will pop up. When creating a PO using option 2, 3, or 4, some fields will auto-populate if the information is already in Steelhead.
Enter Purchase Order Details
The following fields are found in the top portion of the "New Purchase Order" dialog:
- Vendor (only required field to create a PO)
- Vendor Address
- Vendor Contact
- Bill To and Ship To (comes from Company Address in Domain Tile as well as Location Addresses)
- Bill Terms
- Ship Via
- Deadline
- Sales Tax

Vendor and associated details are selected from drop-down lists which are populated by information entered in the Vendors Dashboard, accessible through the Inventory Section of the Steelhead Homepage. They can also be created new in this dialog by typing the name and selecting Create "[entered_text]". Accounting details are established by your individual relationship with your Vendor.
Enter Purchase Order Item Details
The Items portion of the "New Purchase Order" dialog supports the creation of a simple PO, as well as a complex PO.
Purchase Order Lines and Line Items determine what will be billed. When a Bill is created from the PO, any open PO Lines and Line Items will auto-populate.
- PO Lines consist of a Number, Name, Description, and Total.
- PO Line Items consist of a Description, Unit Price, Quantity, Total, Product, etc.
BOM Items (Bill of material Items) are inventory Items to be purchased and received. They are attached to PO Lines which can be tied to PO Line Items. However, BOM Items do not show up on Bill creation. BOM Items cannot be prescribed individual deadlines. Deadline is established by the PO they are attached to.
- BOM Items consist of Inventory Item, Vendor Item Name, Description, Quantity, Unit, and PO lines and Line Items.
A simple way to fill out the Items section of a PO:
- Make sure all Vendor and billing information has been selected.
- Select the Inventory Item(s) to be purchased.
- Click the Show/Hide Lines icon or the row to open the attached Purchase Order Line and review/adjust any details.
a. Quantity of the inventory Item(s) to be purchased
b. Unit Price of the inventory Item(s) to be purchased - Verify all information that is available has been entered and SAVE.
After a PO is saved, it may be edited.
Example: I need to order black powder. I have the pricing from my Vendor. Here is what my PO might look like:

A more complex way to fill out the items section of a PO:
- Perform steps 1-3 from above.
- Enter any additional Inventory Item details on the BOM item line:
- Vendor Item Name (SKU)
- Description
- Quantity
- Unit
- Enter any PO Line details:
- Name
- Description
- Enter any PO Line Item details:
- Description
- Quantity
- Unit Price
- Unit
- Product
- Tax Code
Additional actions:
Click + Add BOM Item to add any additional Inventory Items to the PO.

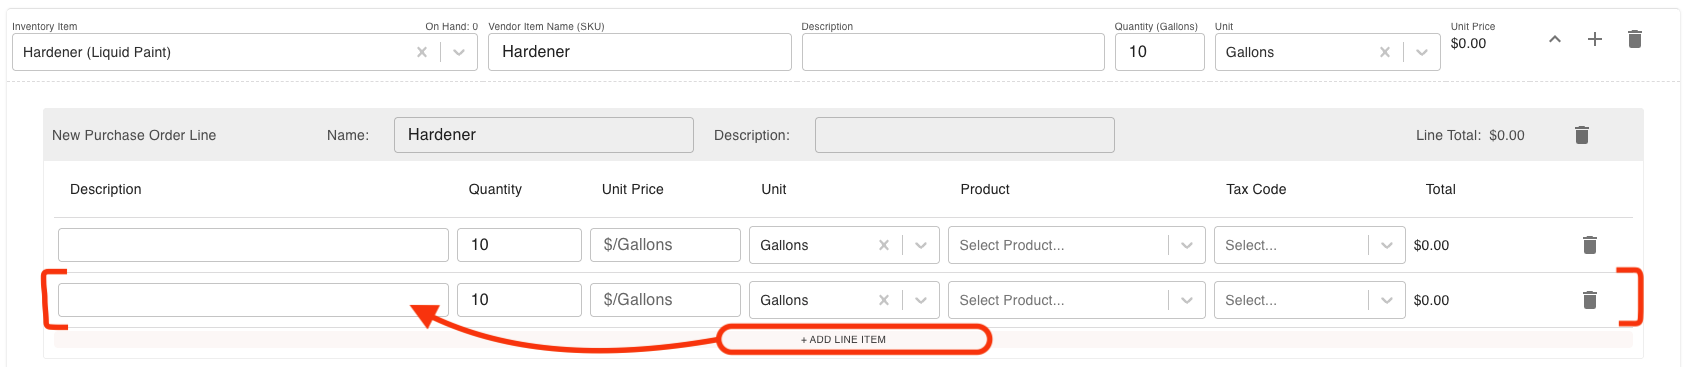
Click the Add Line icon on the Inventory Item row to add any additional PO Lines.

Click the Add Line Item button within a PO Line to add any additional pricing lines.
Example: I need to order modified black powder. I have the pricing from my Vendor, along with additional costs and shipping. Here is what my PO might look like:

The Purchase Order BOM items may be selected from the drop-down list of all Inventory Items. Any Item Names (SKUs) attached to the Vendor in your database will auto-populate. The "Item Description" on an Inventory Item, if any, will auto-populate the "Description" on your PO. This description may be edited.
PDF Notes
Your Purchase Order Line Description may appear in the "Notes" field of PO PDFs. To change the Notes on these PDFs, you would need to change the PO Line Description.
Purchase Order Actions
All created POs are found on the Purchase Orders Dashboard. To view a particular PO, click on the PO # link.
On individual Purchase Order pages, there are many details/actions:
The top section includes multiple PO actions that can be performed.

- EDIT DETAILS - Allows editing of general Vendor and PO details
- VIEW HISTORY - Displays PO movement and email logs
- SEND EMAIL - Allows sending of PO PDF through email, along with a custom message
- VIEW PDF - Opens the PDF for the PO with options to print or download
- RECEIVE ITEMS - Opens the "Receive Purchase Order" dialog where receiving of PO items can be recorded. Checking off item(s) that are received opens a dialog to "Create Receiver for Inventory Item" or "Create Multi-Item Receiver" to fill in the details.
- RECEIVE BILL - Opens the "Create Bill" dialog that auto-populates PO information and can be adjusted
- MOVE STAGE/REQUEST REVISION - Allows the PO stage to be moved forward or backward (to request revision)
- The three dots include the options to Revert from Active and Archive PO.
The general PO details section organizes PO information such as vendor, billing, and creation details. Many of these details can be edited with the Edit Details button from the section above.

A section near the top of the page displays what stage the PO is currently at.

The Files section includes all files associated with the PO and the ability to upload new file(s). Click the UPLOAD FILE button to upload a new file to the PO. Files can be deleted with the red trash icon.
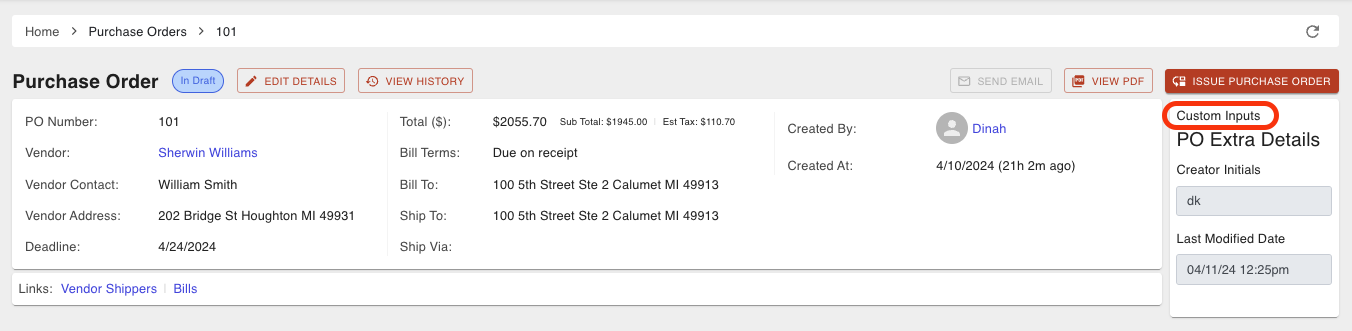
The Custom Inputs section makes it easy to view all entered custom inputs specific to the PO.
- The Generated PDFs section includes the links to the PO PDFs that were sent out in an email.
The Emails section includes a log of emails sent out, associated with the particular PO.
The Related Links section makes it easy to jump to other pages and apply a filter with the desired PO.
- The "Audit Log" link opens a page that includes all creation and edit details associated with the PO.
The BOM Items section allows you to Add, Edit, Claim, Receive, and Archive Inventory Items associated with the PO.

- A PO must be active in order for Inventory Items to be received.
- To add another Item to the already created PO, click Add BOM Item and fill out the necessary details.
- To edit an Item on the PO, click the Edit pencil icon and make any desired adjustments such as adjusting the quantity.
- The Inventory Item details along with the linked Line Items can be edited.
- Check the "Complete BOM Item" checkbox if all Items have been received. Uncheck the box if there is more to receive. This can be changed after saving.
The Purchase Order Lines section displays all Lines and Line Items associated with the PO.
- Click the Add Line button to add more PO Lines.
- Click the Add Line Item plus icon to add another Line Item to PO Line.
- Click the Edit pencil icon to edit PO Lines and Line Items.
- Check "Close Billing" box if the line item does not need to be billed.
- Click the Archive icon to remove the line or line item.
- Click the "View Linked BOM Item" icon to view the BOM Items linked to Line Items.
- From here, BOM items can be linked, unlinked, or viewed.

- From here, BOM items can be linked, unlinked, or viewed.
The Bills section includes all Bills associated with the PO and the ability to create new Bills. When a new Bill is created here, all open PO Lines and Line Items will be added to the Bill.
Send a Purchase Order
A PO must be issued in order to be emailed. When the PO is ready to send, complete the following:
1. Click the Send Email icon from the Purchase Order Dashboard OR the SEND EMAIL button on the individual PO page.
2. Confirm the recipient's contact information.
3. Add or confirm your message. This includes subject, attachments, company logo, etc.
4. Click Send when the email is ready to go.
To view a Purchase Order PDF before printing or emailing to a customer:
- Click the VIEW PDF button on the PO.
OR - Click the Click to View Purchase Order button on the PO email preview.
Purchase Order Claims
Users can make claims against items on POs.
- Attach Sales Order Part Numbers to Purchase Orders.
- View who the Inventory is being purchased for.
- It can assist with Margins and Costing.
To make Claims:
Select a Purchase Order with an Inventory Item.
Click the Add/Edit Claims icon in the Actions column of the Item.

From the "Purchase Order Claims" dialog, you can add or edit Claims.
a. Click + ADD NEW CLAIM to attach the Item to a Part Number on a Sales Order.

b. Click the Edit pencil icon to the right of a Claim to edit the Claim amount.
c. Click the trash can icon to delete the Claim.
To fulfill Claims:
- Receive Inventory Items (that have been claimed).
- Determine which of the received Items should fulfill each Claim and enter a quantity.
a. Claims can be fulfilled partially and in multiple Containers. - Determine if the Claim is fulfilled and should be closed. Toggle the "Close Claim" switch on.

To view low Inventory on order that is claimed/unclaimed on a Sales Order:
- Open the Sales Order of choice.
- Click Show Alerted Items on the yellow Low Inventory Alert banner at the top of the page.
- View Inventory on order as well as Claims associated.

Adjust Purchase Order Quantity and Pricing
Purchase Orders allow for a variety of adjustments to be made, even after the PO has been created or issued. This is because mistakes can be made or details may not be available on creation. Instances where PO quantity or pricing might need to be adjusted:
- The price from the Vendor was not available on PO creation, and now it is available.
- The price from the Vendor changed.
- The quantity available to be received from the Vendor changed.
- The originally ordered quantity changed.
To adjust a Purchase Order quantity or pricing:
- Click the Edit pencil icon on the BOM item row.

- Adjust the BOM Item quantity/unit or any other desired details and SAVE.

View/Consolidate Purchase Order Lines
To change the view of items on your PO, click Purchase Order Lines in the left hand menu. From the Purchase Order Lines view:
- BULK PRICE will overwrite all Lines and Line Items to create one line, for BOM items.
- MERGE LINES will create a single line containing the distinct Line Items of all selected lines.
- CLEAR ALL removes all lines.

Adjust Quantity Received on Purchase Order
There may be instances where the PO Item quantity received needs to be adjusted, for example:
- The User accidentally entered the wrong received quantity.
- Some quantity was missed when the Items were entered into Steelhead.
To add to quantity to a Batch that was already received:
- Click RECEIVE on the BOM item with the missing received quantity.
- This may be done from the Receiving Dashboard as well.
- On the "Create Receiver" dialog, enter the quantity that was missed originally.
- Select the Batch where the quantity was missed, found to the right of "Receive to Existing Batch?"
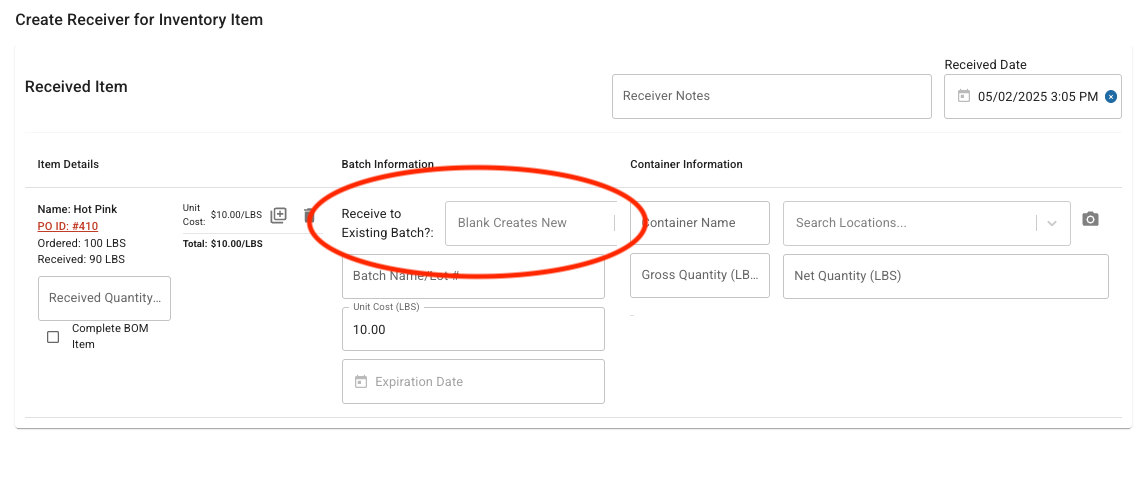
- The Container must be named in order to SAVE. If there is no known Container name, placeholder text such as "Parts Missed" could be used.
Need to receive more of a BOM item but can't?
If a BOM item has more quantity to be received, and there seems to be no way to receive the item on the PO, there are a few options:
- Reopen the BOM item.
- Click the Edit pencil icon.
- Uncheck the "Complete BOM Item" box and SAVE.
OR
- Add a new BOM item.
- Click ADD BOM ITEM.
- Select the Inventory Item and fill out all other desired details
- If this BOM item should be linked to an existing PO Line, delete the the PO Line to be created, and SAVE.
- Click the View Linked BOM Item icon on the PO Line.
- Add the newly created BOM item.
Accidentally marked an Item as Received?
The "Complete BOM Item" checkbox is editable even after "receiving" an Item. If necessary, open a PO Line for editing and uncheck the "Complete BOM Item" box. Click SAVE.
Configure PO Custom Inputs & Stages
Found in the top right corner of the Purchase Orders Dashboard, you are able to configure both PO Custom Inputs and Stages.

Purchase Order Custom Inputs
Configuring Input Schemas for POs is just like configuring Input Schemas in many other places in Steelhead. Configured Input Schemas will display as Custom Inputs when entering PO details. Entered Custom Inputs will be saved upon saving a PO and will appear on the individual PO page. These inputs could be any details that should be included that may not provided by the default PO fields.
Purchase Order Stages
It is common for companies to have an approval step for Purchase Orders. Someone will create a PO draft, and then it will be reviewed and issued by someone else. In Steelhead, you can add Purchase Order Stages and you can set permissions on which Users can issue Purchase Orders.
To set up Purchase Order Stages:
Click on the Configure Stages icon in the top right corner of the PO page.
Click Configure Purchase Order Stages and edit the Stages.

- Make sure Enable Staged Purchase Orders is toggled on.
- Click Add Stage to add an empty Stage.
- Manipulate a Stage:
- Click the plus icon to add a sub Stage.
- Drag and drop with cursor over the clickable hand icon to move the Stage up or down.
- Click the minus icon to remove the Stage.
- Name and give the Stage a description.
- Change the Label Color.
Close the dialog.
- Click Cancel to clear all changes made.
- Click Update Current Revision to save changes to the current version, which will apply to all POs with this version of Stages.
- Click Create New Revision to create a new version of Stages that will apply to all future POs.
To allow/disallow a user from issuing POs:
- Navigate to the User permission page.
- Check/uncheck the 'Issue: Purchase Order' permission box.

Purchase Order Statuses
PO Status is different than PO Stage. Here are the statuses that a PO can have:
- Created (In Draft) - The PO has just been created.
- Active (Issued) - The PO has been issued and can be emailed.
- Expired - The PO deadline has passed.
- Fulfilled - The items on the PO have been received from the vendor and no deadline was set.
- Fulfilled On Time - The PO items were received before the deadline.
- Fulfilled Behind Time - The PO items were received after the deadline.
- Email Sent - An email for the PO has been sent.
- Email Opened - An email for the PO has been opened.
- Needs Revision - The PO was moved to a previous stage.
Turn Off Quote Stages
If custom Purchase Orders Stages will no longer be used, and "Draft" and "Active" Stages are to be used instead, do the following:
1. Edit Stages.
2. Turn "Enable Staged Quoting" off.
Video: Purchasing, Receiving, Bills (04/11/2024) (Note: This was recorded before the existence of PO Lines, Line Items, and related functions. However, many of the details explained in the video still apply.)
--
Was this article helpful?