Invoicing
- Print
Invoicing
- Print
Article summary
Did you find this summary helpful?
Thank you for your feedback!
Invoicing
Invoicing in Steelhead is managed through the Invoicing Dashboard.
Sales Orders, Work Orders, and Packing Slips appear in the Invoicing Dashboard when they are created. Sales Orders will appear here as soon as they are created and are sorted based on the Sales Order creation date. When the parts arrive at the Invoicing Process Node, the "Ready to Invoice" and "Parts Ready to Invoice" status is activated.
Invoicing Dashboard
The default view of the Invoicing Dashboard is a list of active Sales Order on the left and Invoices on the right.
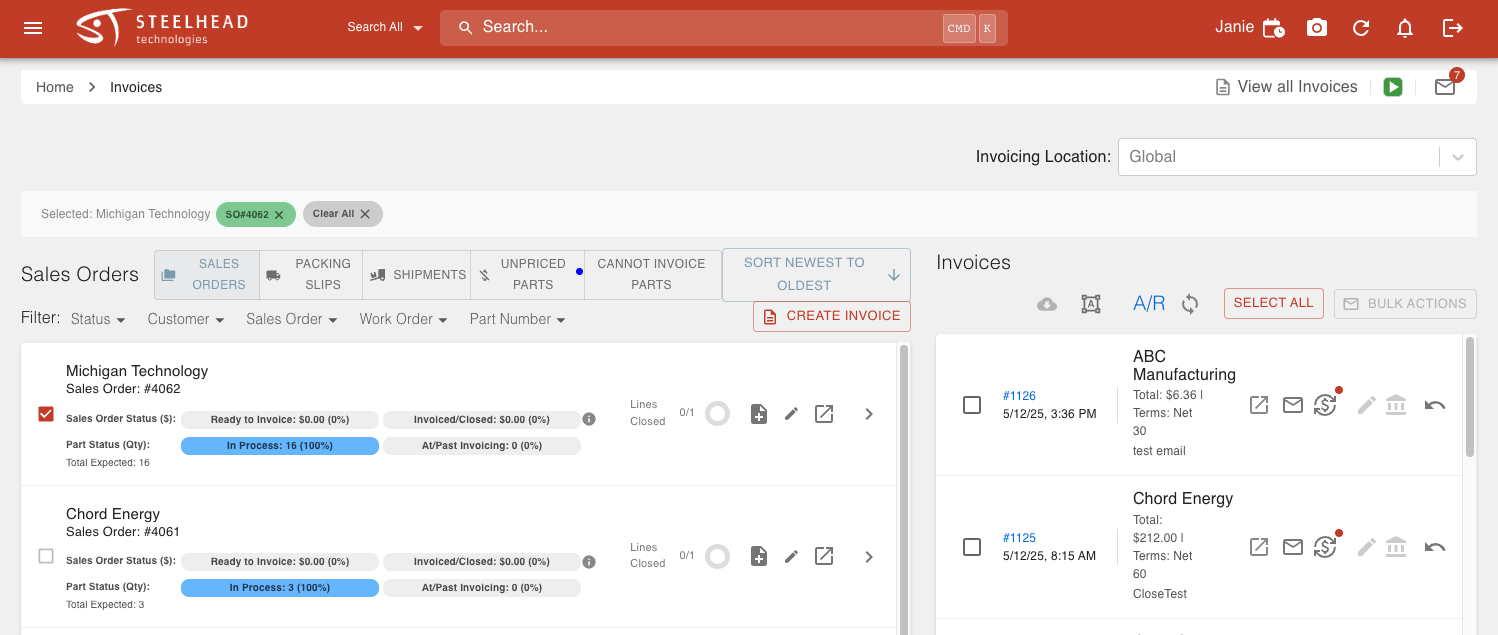
The left side of the page includes the following tabs:

- Sales Orders
- Packing Slips
- Shipments
- Unpriced Parts
- Cannot Invoice Parts
The only tab that you can't create an Invoice from is the "Cannot Invoice Parts" tab.
Sales Orders Tab
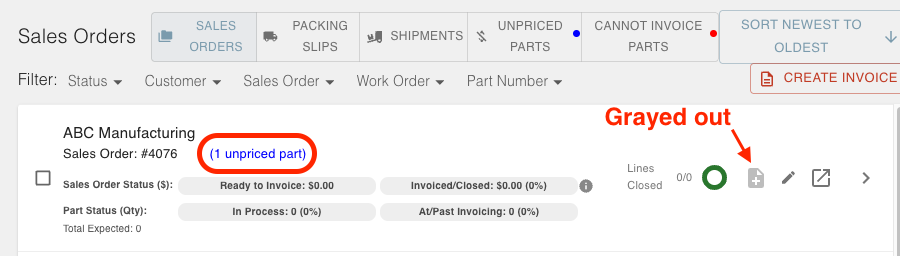
The Sales Orders tab in the Invoicing Dashboard displays a list of all the active Sales Orders in your shop with the default order of "Newest to Oldest".
From this page you can:
View a list of all active Sales Orders and their statuses, add Invoice, and edit and open each Sales Order.

Select one Sales Order or multiple Sales Orders from the same Customer.
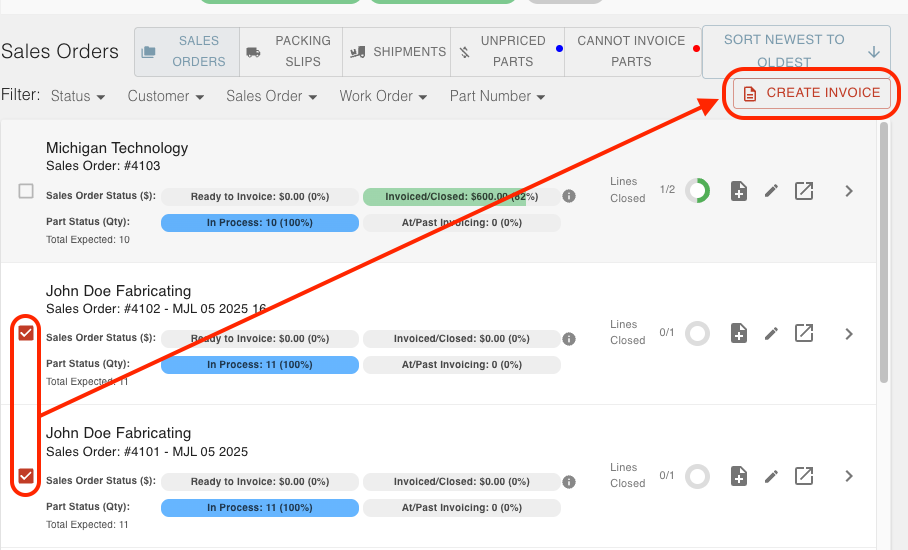
Use filters to sort the Sales Orders.

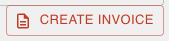
Use CREATE INVOICE button.
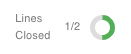
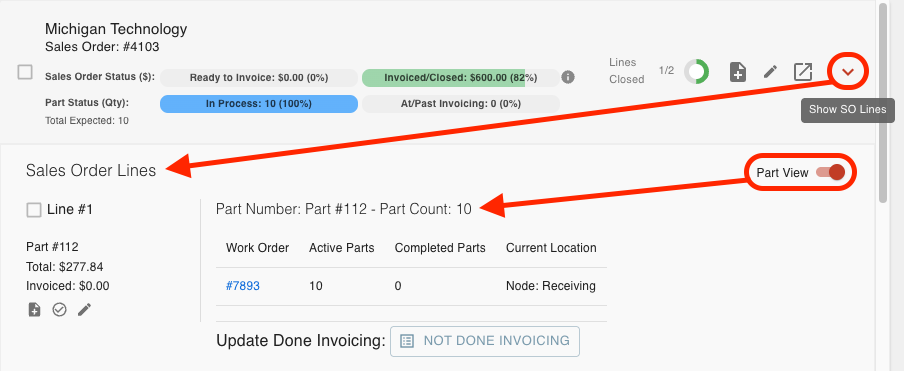
View Lines Closed status
- Lines Closed means that lines were invoiced and do not need any additional Invoices.
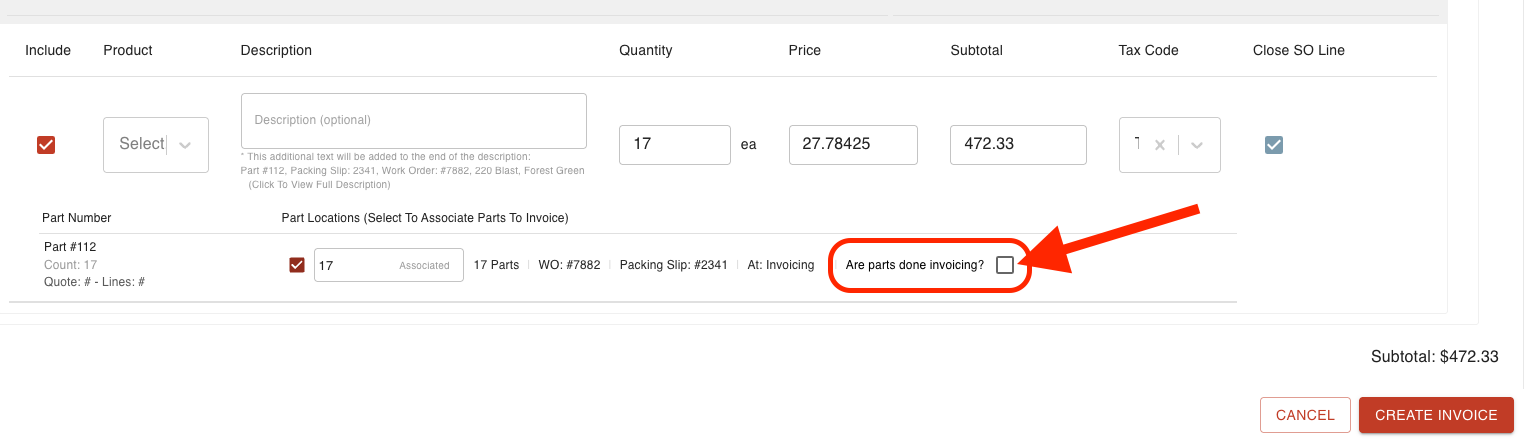
- If you leave a Sales Order Line open by unchecking the box "Are parts done invoicing?" at Invoice creation, you can create another Invoice for the same line.
- For example, if you invoiced for a Sales Order that had 10 parts, but you only invoiced for five of them, the line would still be considered open until all 10 parts have been invoiced for.
Use Drop-down Arrow icon
- Allows you to see the Sales Order Lines and descriptions.
- This drop-down includes a switch to toggle on Part View which displays all the Parts that still need to be invoiced.
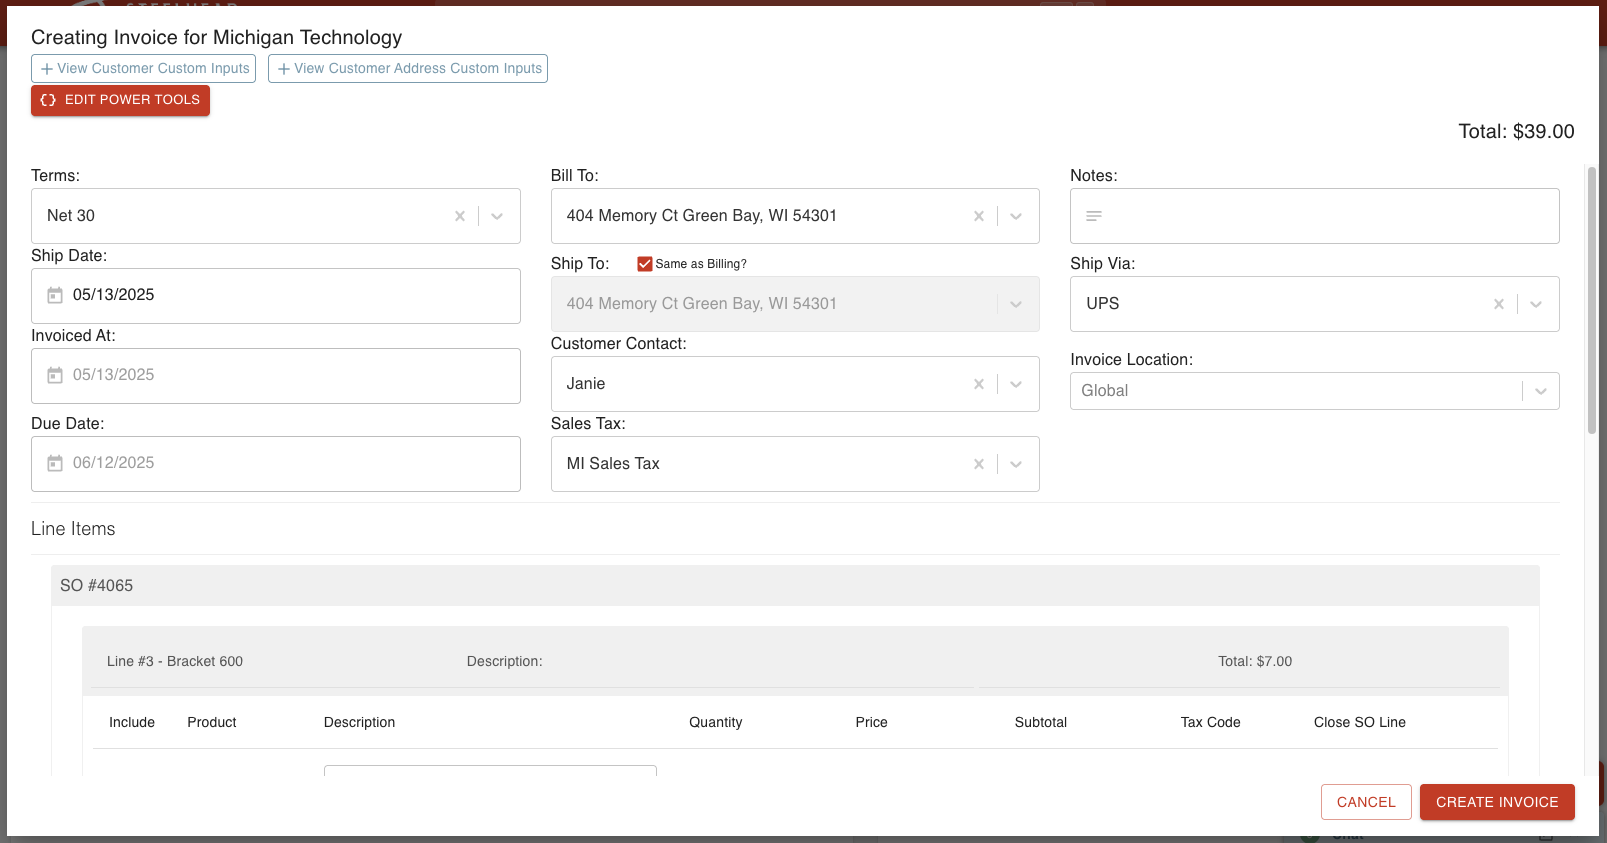
Edit Line at Invoicing:
Users can edit a Sales Order line item at time of invoicing.
- Open Invoicing.
- Click the edit pen on the Sales Order Line.
- You will be able to edit the items within that Sales Order.
- Unit conversion suggestions are shown when editing a Sales Order at Invoicing.

Packing Slips Tab
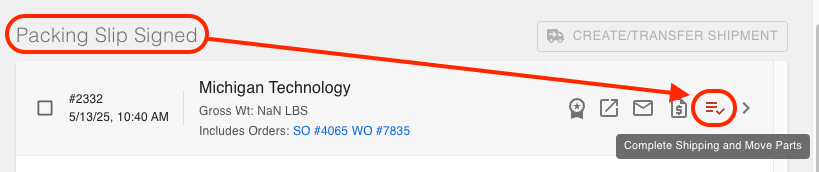
The Packing Slips tab in the Invoicing Dashboard shows all completed Packing Slips. This means that for Packing Slips to populate here you must create, finalize, and sign a Packing Slip and click the "Complete Shipping and Move Parts" icon.
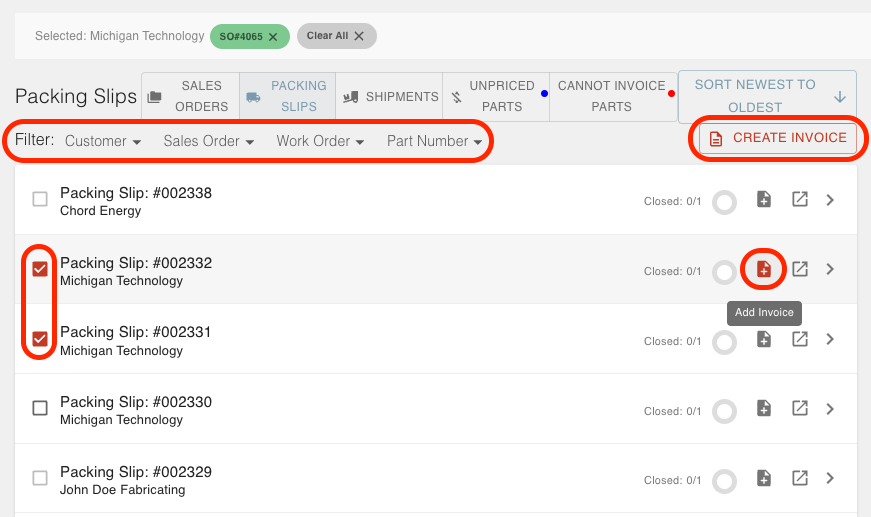
From the Packing Slips Tab in Invoicing you can:
- View a list of all completed Packing Slips.
- Select one Packing Slip or multiple Packing Slips from the same Customer.
- View closed status.
- Click the Invoice icon on an individual Packing Slip to make an Invoice for that Slip.
- Open Packing Slip.
- Use filters to sort the Packing Slips.
- Use CREATE INVOICE button.
Shipments Tab
The Shipments tab displays a list of all scheduled shipments that need invoicing. To populate Shipments in the Invoicing Dashboard, you need to schedule a Shipment from the Shipping Dashboard. Select a Packing Slip to and click CREATE/TRANSFER SHIPMENT to schedule a Shipment with Parts associated with it. After you schedule the Shipment, click the "Complete Shipping and Move Parts" icon to move the Shipment to the Invoicing Dashboard.
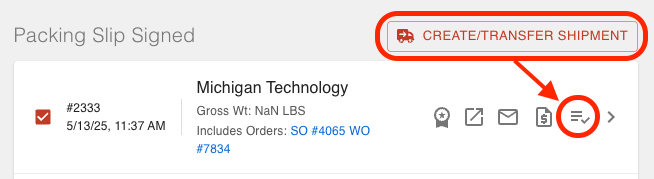
From the Shipments tab in Invoicing you can:
- View a list of shipments to invoice.
- Select a Customer or Packing Slip to create an Invoice.
- View lines closed status.
- Click the Invoice icon on an individual Packing Slip to make an Invoice for that Slip.
- Use filters to sort the Packing Slips.
- Use CREATE INVOICE button.

Unpriced Parts Tab
The Unpriced Parts Tab shows a list of Parts that have not been priced so they cannot be invoiced. When there are Parts in the Unpriced Parts tab, a blue indicator appears on the tab to notify you.
From this page you can:
- Price parts
- Quote parts
- Open Sales Orders
- Use filters to sort the Packing Slips.
- Use CREATE INVOICE button.
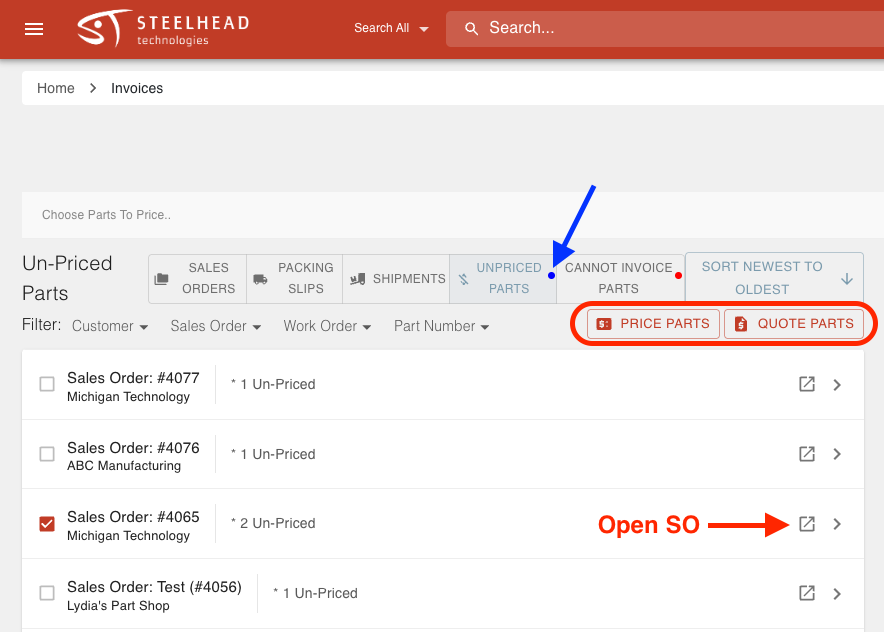
To price unpriced parts:
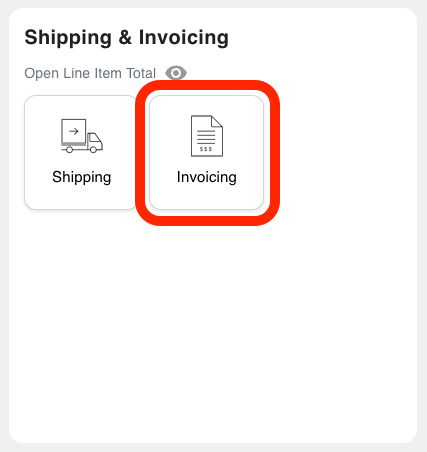
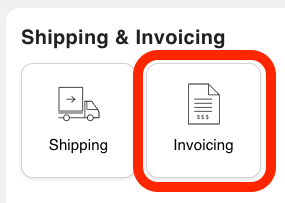
Navigate to the Invoicing Tile from the "Shipping & Invoicing" section of the Steelhead homescreen.
Click the UNPRICED PARTS tab to view the parts that need prices before invoicing.
Select the desired Sales Order or Part.
Click the PRICE PARTS button.

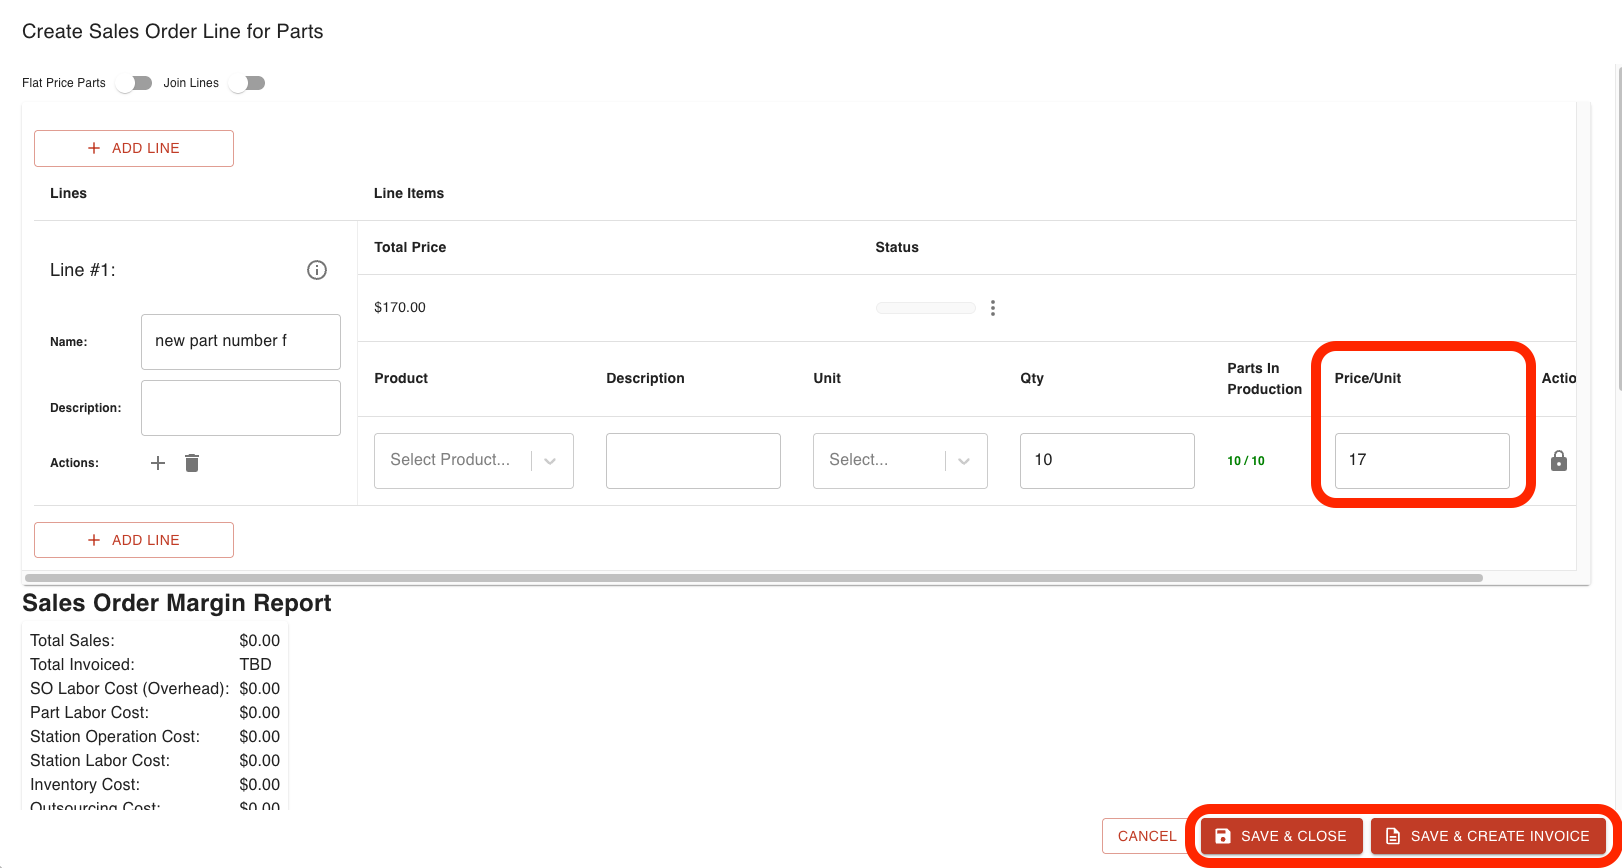
This opens up a Sales Order dialog for the Parts where you can input a price/unit and view the Margin report.
Either click SAVE & CLOSE to simply price the parts,
Or click SAVE & CREATE INVOICE to price the parts and create an Invoice.
- Review and adjust the Invoice information, if applicable.
- Click CREATE INVOICE, if applicable.
All unpriced parts are still listed with their associated Sales Order in the Sales Order tab, but you will see a blue warning that the Sales Order contains an unpriced part and it will prevent you from creating an Invoice until you price the Parts.
Cannot Invoice Parts Tab
The Cannot Invoice Parts tab displays a list of all Sales Orders that, for various reasons, cannot be invoiced but are at the Invoicing Node. When there are orders in the Cannot Invoice Parts tab, a red indicator appears on the tab to notify you. If you move an order to the Invoicing Node and they don't appear in the Sales Order tab on the Invoing Dashboard, check the Cannot Invoice Parts tab to identify the reason.
From this page you can:
- View all Sales Orders unable to be invoiced.
- Use drop-down arrow to view more information about why a Sales Order can't be invoiced.
- Open each Sales Order.
- Use filters to sort the Sales Orders.
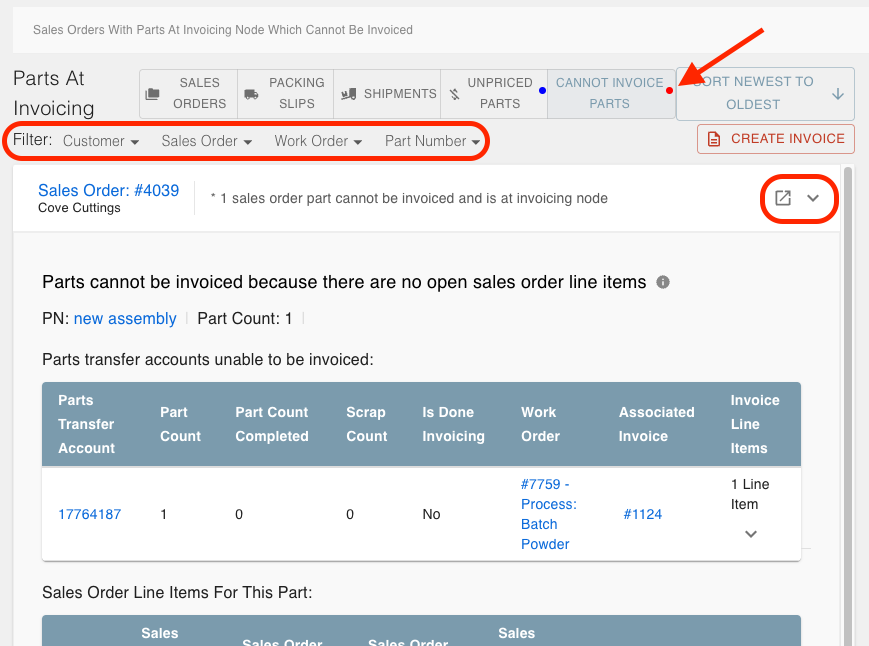
This page lists the parts that are stuck at Invoicing, but doesn't have much other functionality. Because there are numerous reasons why a Part cannot be invoiced, this page gives you an explanation why the Parts are stuck. To fix the problem, you typically will have to enter into the Sales Order/Work Order to edit or complete the Parts.

"Parts Cannot be Invoiced" video
Invoices
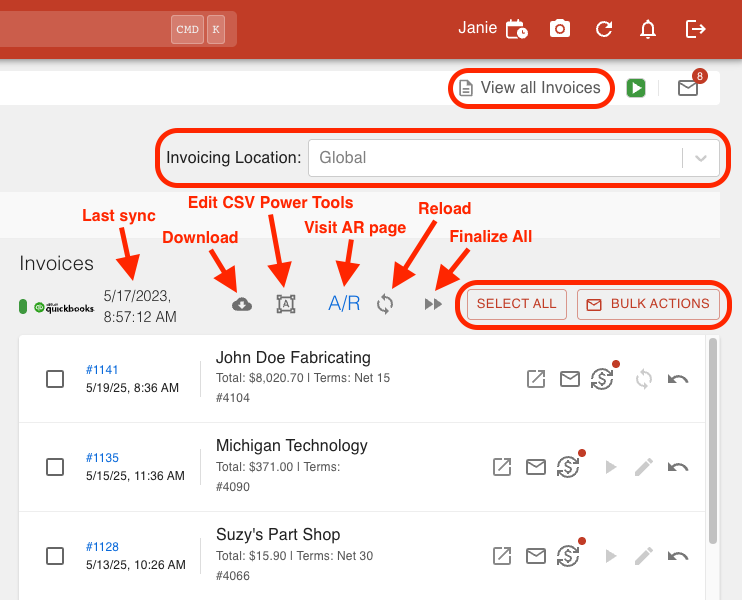
The right side of the Invoicing Dashboard is a list of all active Invoices, sorted from Most Recent. Note: This page may look slightly different depending on your accounting integration or if you use Steelhead Accounting.
From this section you can:
- Click "View all Invoices" to enter the All Invoices Page.
- Change the Invoicing Location.
- View the date/time stamp of the most recent accounting sync (for accounting integrations).
- Download CSV of selected Invoices.
- Edit CSV Invoice Power Tool.
- Use A/R link to visit the "Accounts Receivable" Page (for Steelhead Accounting).
- Use the Refresh icon to reload all Invoices.
- Use the Finalize All icon to finalize all Invoices and sync them with accounting, if applicable.
- Click SELECT ALL button to select all Invoices.
- Use the BULK ACTIONS button to download or send multiple Invoices from the same Customer.
Relevant Domain settings:
- "Enable Invoicing By Location" for the Invoicing Location drop-down to appear on the Invoicing Dashboard.

- "Show CSV Export On Invoice Page" for the Download icon and CSV Edit Power Tools icon to appear on the Invoicing Dashboard.

Individual Invoice actions:

Open Invoice

- View PDF, upload files, and send the Invoice.
Send Invoice

- Review and edit the default message information, save the draft, and send the Invoice.
Create Journal Entries (for Steelhead Accounting)

- Select an AR Account, Income Account, and click FINALIZE to create a journal entry for Steelhead Accounting.
- Go to the Accounting Tile and select "Journal Entries" to view all entries created here.
Finalize Invoice

- When your Invoice is finished and you're done editing, use the Finalize icon to finalize the Invoice and sync it with accounting, if applicable.
- Once finalized, the Edit pencil icon and the Finalize icon will disappear and replaced with either the "Not yet recorded in accounting" icon
 or the "Synced" icon
  .
.
Edit Invoice

- Select Invoice PDF, if applicable.
- Edit the Invoice as desired and click SAVE.
Void/archive Invoice

- To undo and void an Invoice, click this button and click YES.
- For more information about how to void an Invoice, see also the article "Creating and Voiding Invoices".
All Invoices
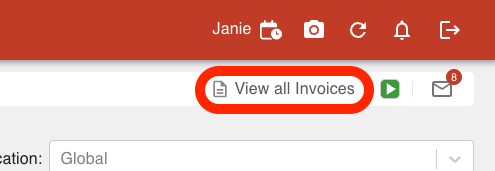
Steelhead keeps records of all past Invoices in case they are needed later on. To visit the All Invoices page, click the "View all Invoices" button at the top right of the Invoicing Dashboard.
From this page you can:
- View the Invoice Table View.
- Use the search, sort, and filter capabilities.
- Use the EXPORT CSV button to download the table.
- Use the VIEW ARCHIVED INVOICES button to view voided/archived Invoices.
- Click the Settings icon at the top right to configure Invoice Input Schema.
- Use the "Invoice Terms" button at the top right of the page to view the Invoice Terms.
- Click the Table icon at the top right to edit the Table View columns.

Sending Invoices
You can send singular Invoices to a Customer from the Invoicing Dashboard and from the All Invoices page, and you can send numerous Invoices to one Customer from the Invoicing Dashboard.
To email a single Invoice to a Customer:
Navigate to the Invoicing Tile from the "Shipping & Invoicing" section of the Steelhead homescreen.
Find the desired Invoice on the Invoicing Dashboard or the All Invoices page and click the Mail icon:
 .
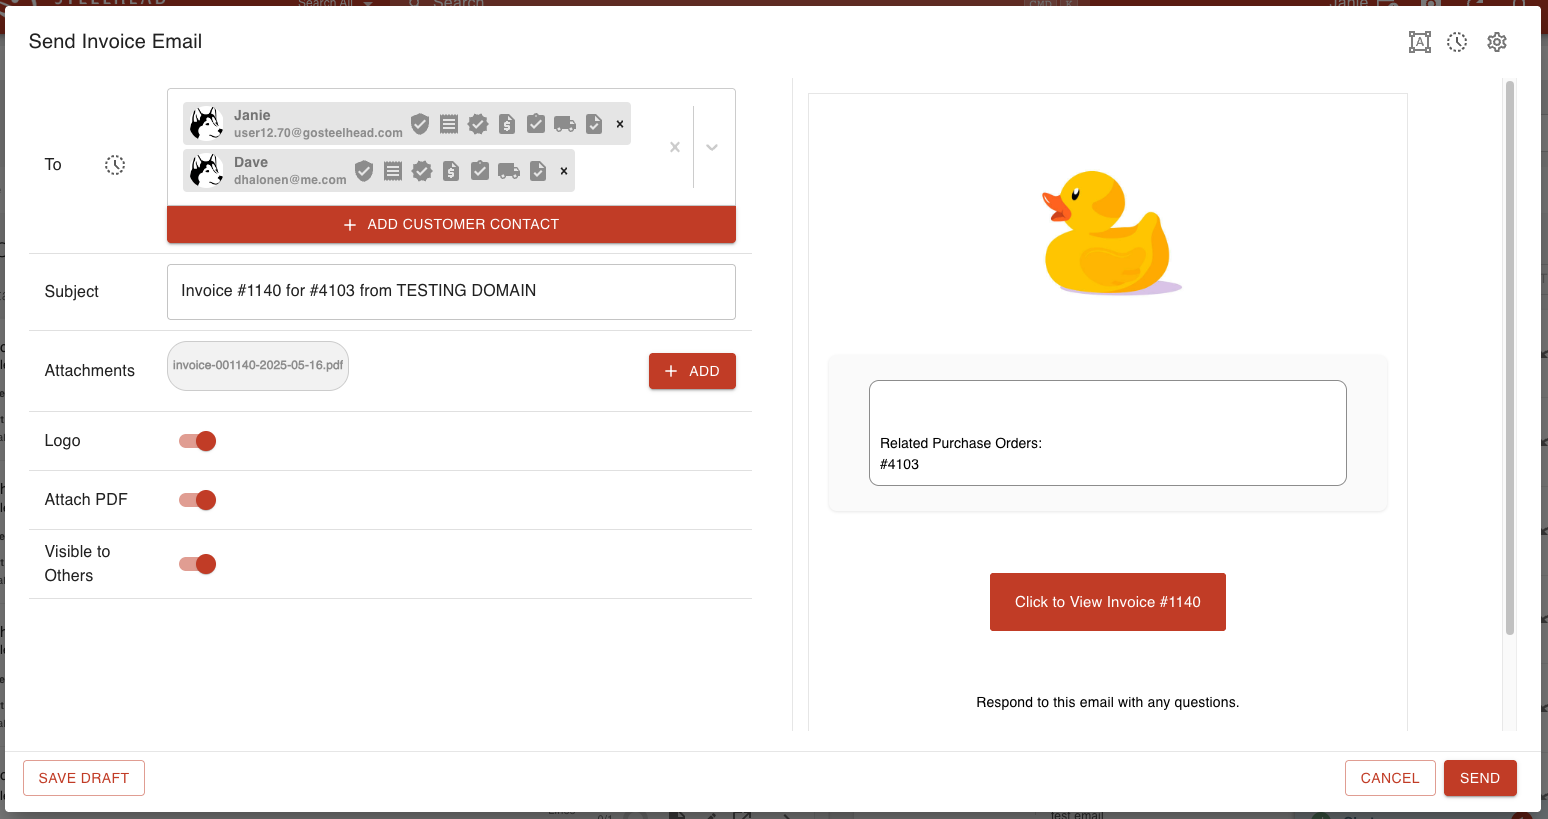
.Review the auto-populated information:
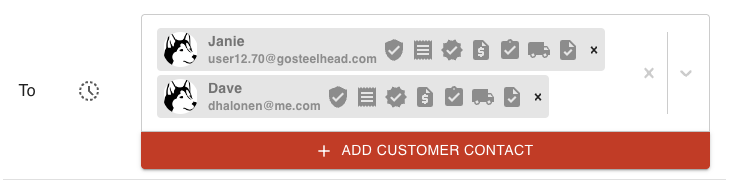
To: Has default contacts that will receive the Invoice and can add more Customer contacts.
Subject: Edit the subject, if desired.

Attachments: Invoice is automatically attached and can add more files.

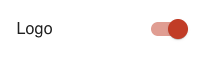
Logo: Toggle off to remove your logo
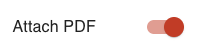
Attach PDF: Toggle off to remove Invoice PDF.
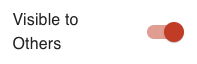
Visible to Others: Toggle off to remove visibility from Users in your Domain who have access to Invoices.
Use Configure icon:
 in the top right corner to edit the PDF.
Use Clock icon:
 in the top right corner to use the settings from the last Invoice you sent.
Use Settings icon:
 in the top right corner to visit Steelhead Email settings.
Click SEND to send Invoice now or SAVE DRAFT to send later.
To send multiple Invoices:
Navigate to the Invoicing Tile from the "Shipping & Invoicing" section of the Steelhead homescreen.
Select multiple Invoices that belong to the same Customer.
Click BULK ACTIONS.

Click SEND [selected number of] INVOICES.
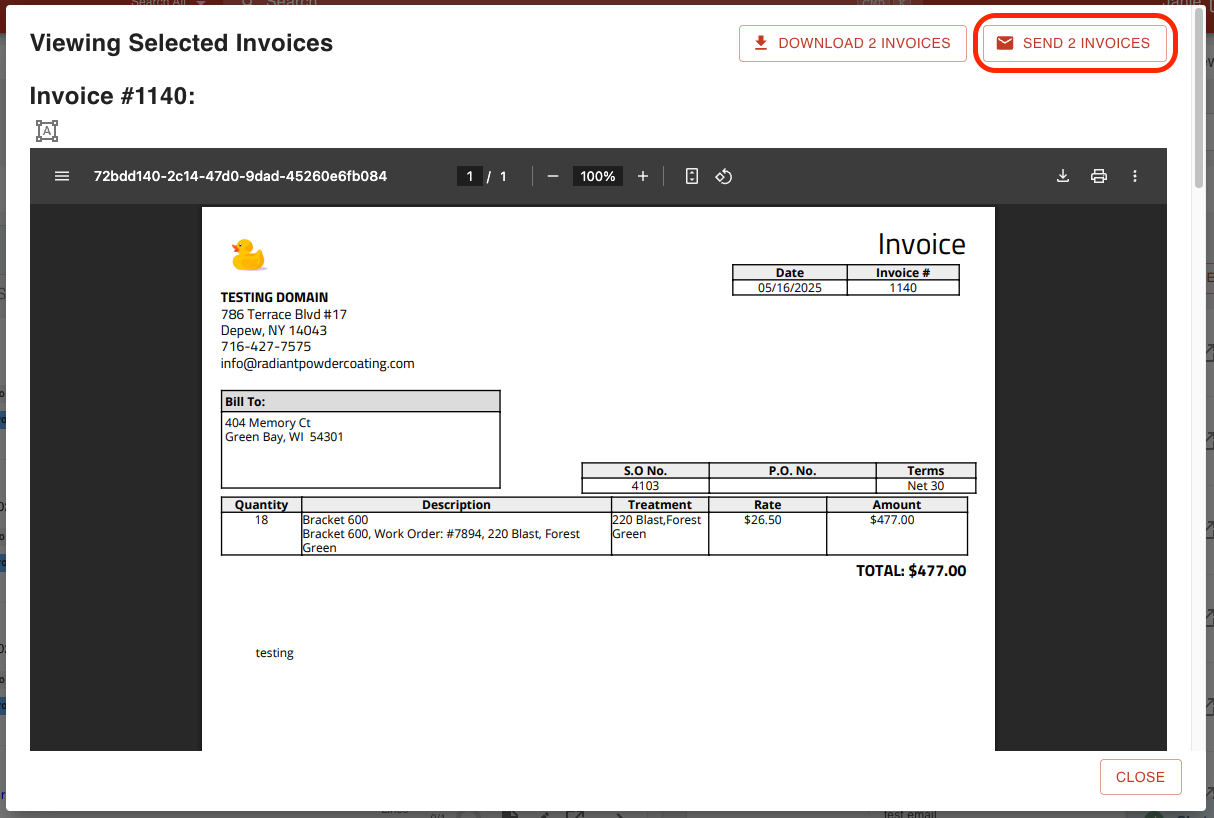
This will take you to the Send Invoice dialog. See the steps "To email a single Invoice to a Customer" from above to finish sending the Invoices.
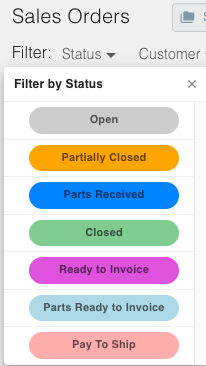
Filtering Invoices
The Status filter in Invoicing is based on the Sales Order status. The statuses currently used in the Invoicing menu are:
- Open
- The order has no Lines closed and is still considered an active order.
- Partially Closed
- The order has at least one Line closed.
- Parts Received
- Parts included on the order are received.
- Closed
- All of the Lines on the order are closed so the Sales Order is closed.
- Ready to Invoice
- The order has Line Items that are not associated with a Part, they will always have a status 'ready to Invoice', and /or Parts on the order are at the Invoicing Node.
- Parts Ready to Invoice
- Parts on the order are at the Invoicing Node.
- Pay to Ship
- All orders that are set up to require payment prior to shipping, this is set on the Sales Order.
Note: the biggest difference between "Ready to Invoice" & "Parts Ready to Invoice" is "Ready to Invoice" includes line items not associated with parts and "Parts Ready to Invoice" refers to parts in the Invoicing Node
Was this article helpful?