Customer Portal
- Print
Customer Portal
- Print
Article summary
Did you find this summary helpful?
Thank you for your feedback!
Customer Portal Overview
The Steelhead Customer Portal is a customizable, secure viewing window that gives you the opportunity to share job statuses, forms, and announcements with your Customers without needing to respond to each individual request for information as it comes in.
Related Video: Customer Portal Walkthrough
This Customer Portal Overview includes instructions to:
- Customize the appearance
- Invite Customers; approve or deny access
- Set viewing permissions
- Post your company news and announcements
- Viewing Customer Portals
The Portal provides an opportunity to advertise your business with a polished customer interface. It can boost your Customers' satisfaction by providing instant updates, and save your staff time spent answering their calls. It provides added security by requiring every Customer who uses it to log in with their own username and password, and gives you full control over what, if anything, each of your Customers is permitted to view.
Steelhead Login for Customer Portal User Management
Customer Portal management will not function properly with PIN Login or Fast Login. To manage the Customer Portal, always log in with your email and password.
Customize the Appearance
In the Customer Portal you can input your company's brand colors to display in concert with your logo every time your customer logs in.
From the Steelhead Homepage, in the Sales Section, click the Customers Tile. Go to Settings and click on Configure Default Customer Portal.

From here, you can click on the Primary Color bar to select, or enter the Hex # of, your company's primary brand color. Do the same for the secondary color. After each change, click the Save (floppy disc) icon. You can also click the circular arrow icon to revert to the default colors.

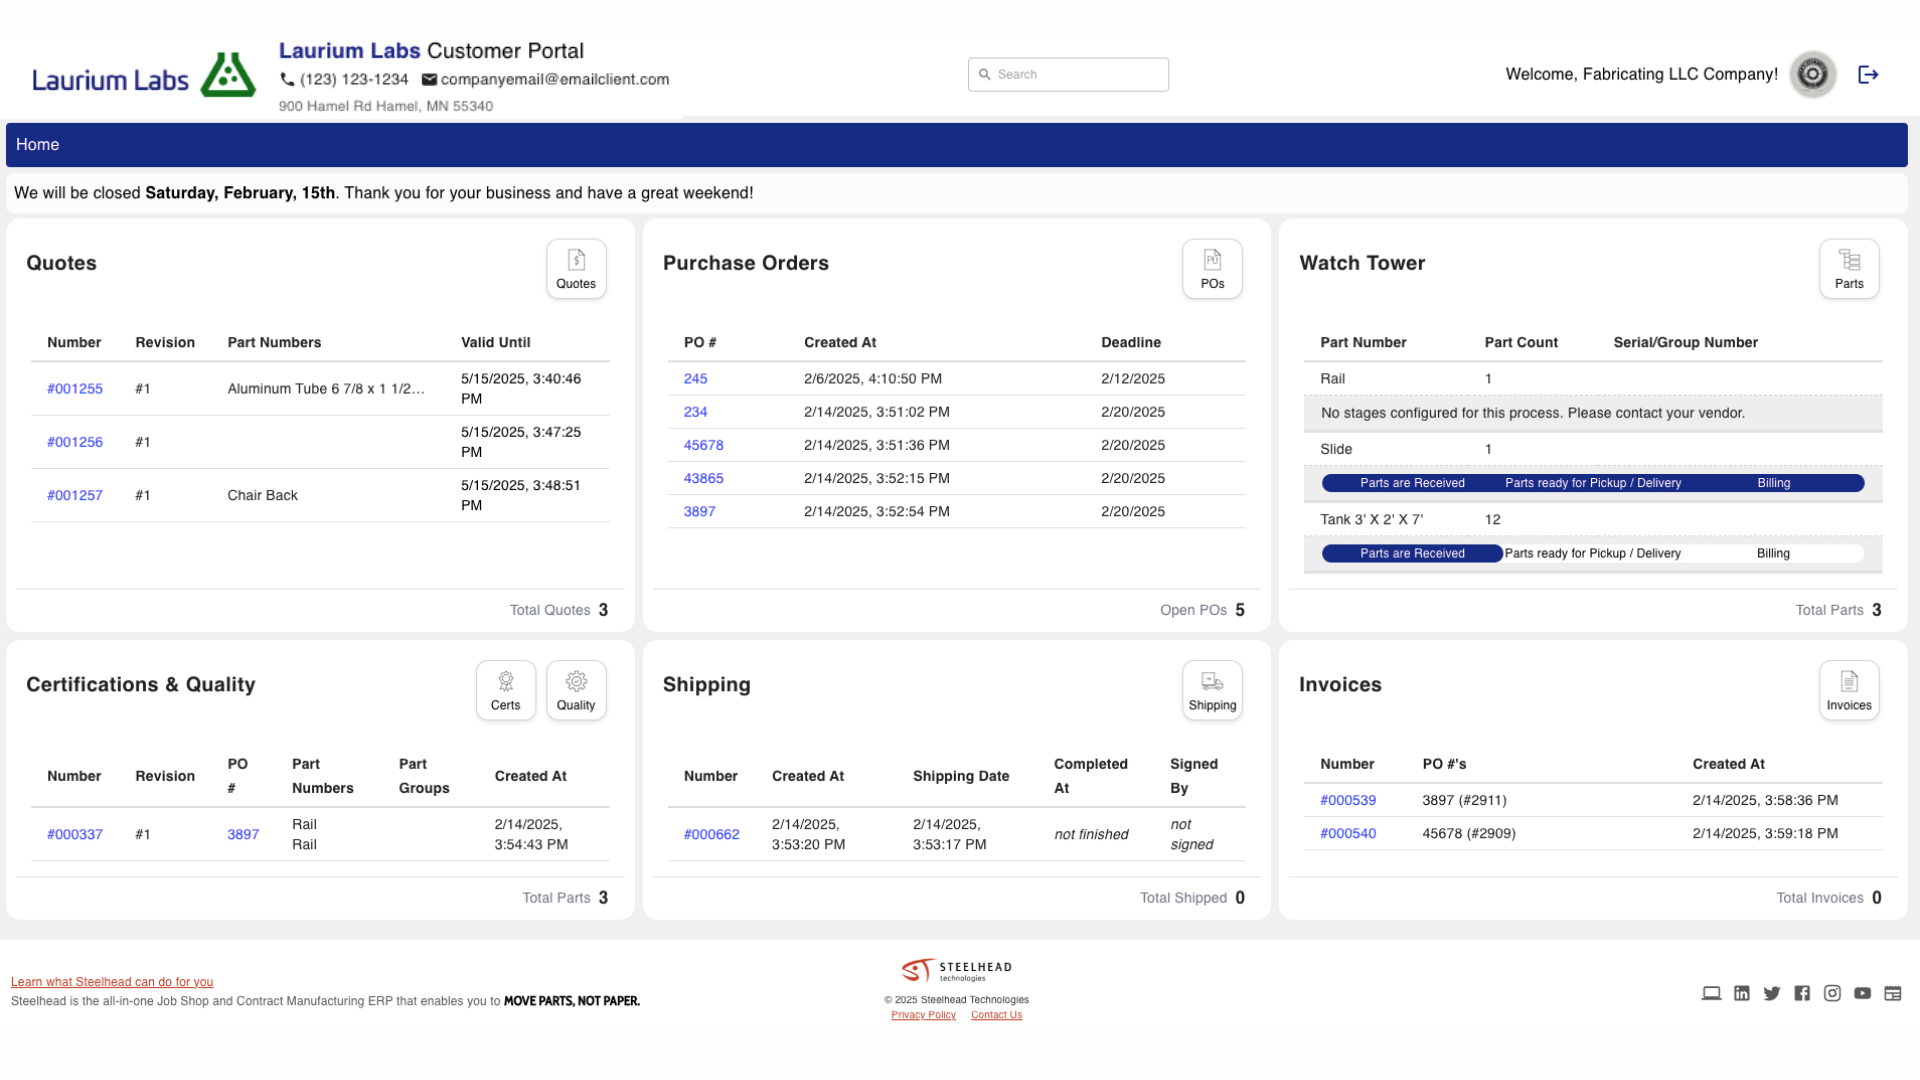
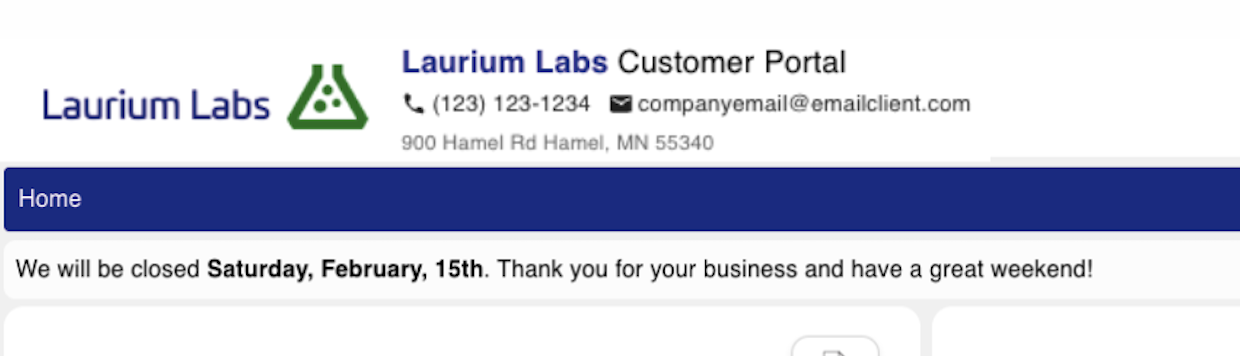
When you click Save, the colors you've selected will be displayed in concert with your Company logo and contact information every time your Customer views the Customer Portal:
Set Viewing Permissions
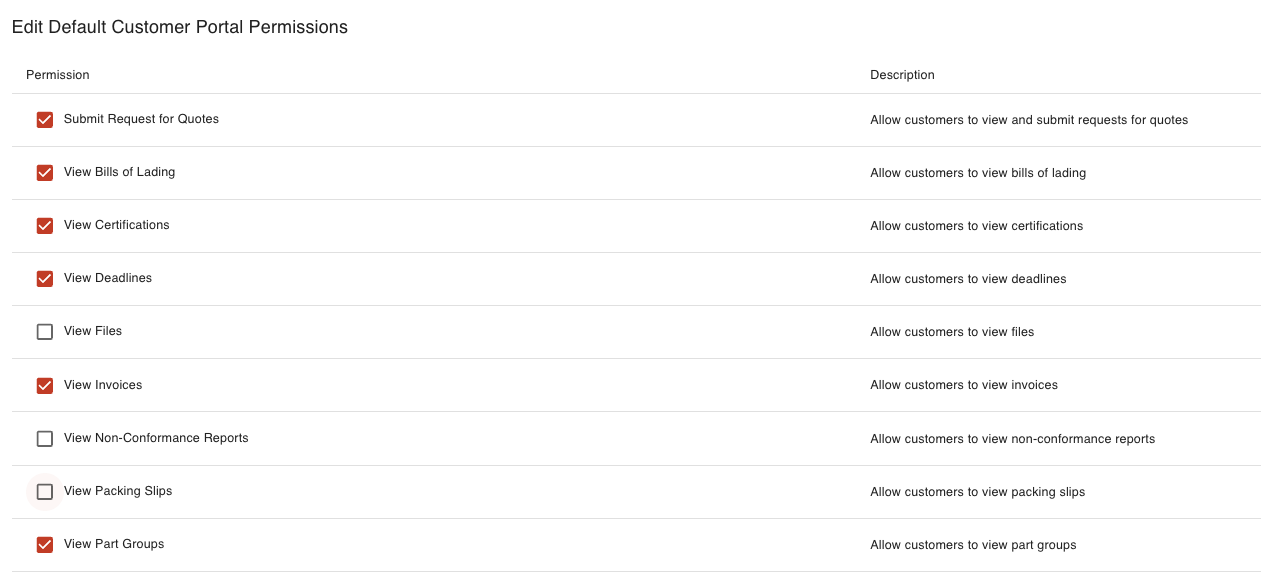
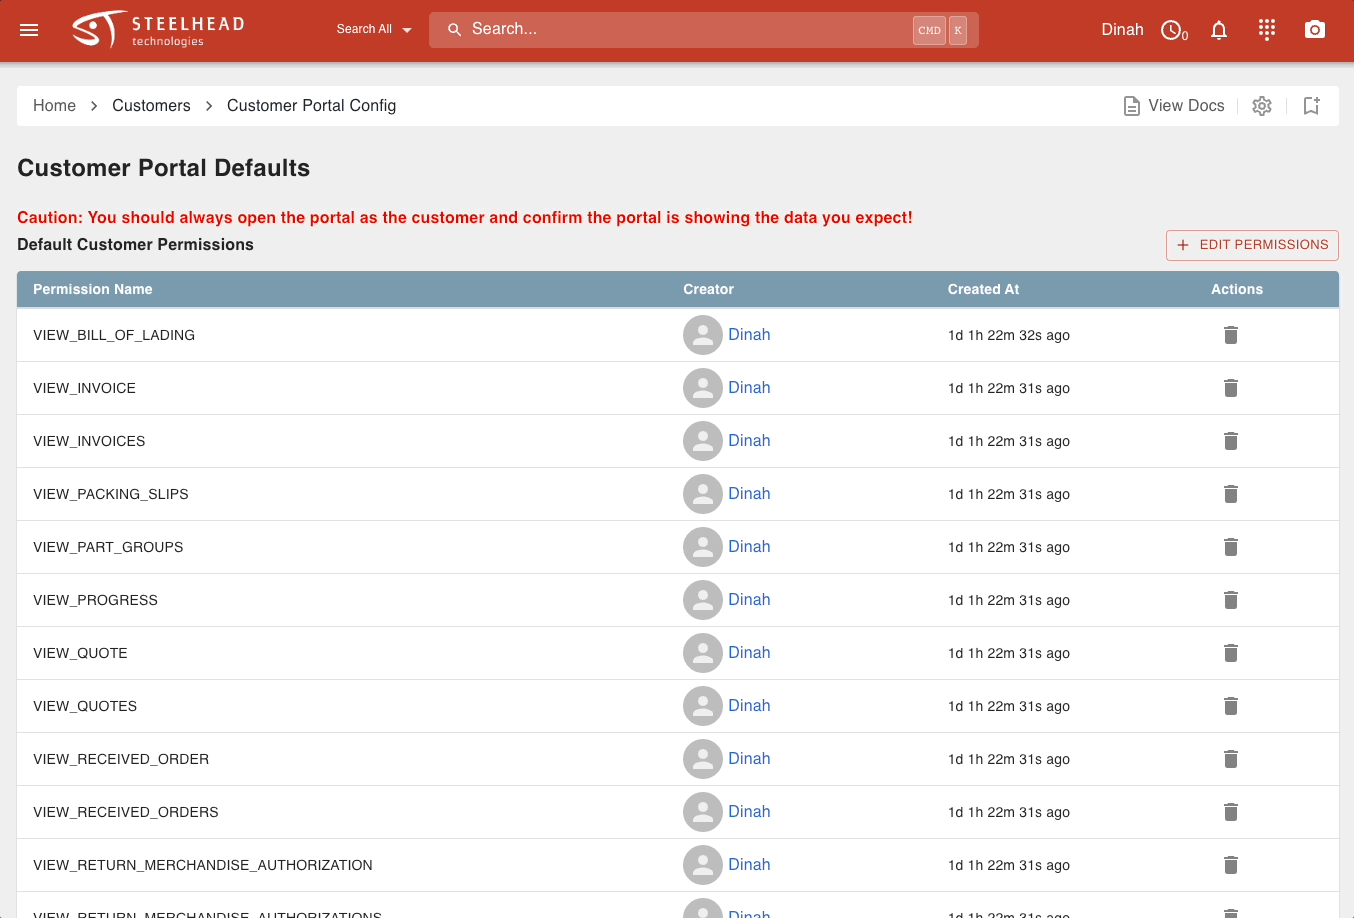
From the Customer Dashboard, click on Configure Default Customer Portal. From here you can click "+EDIT PERMISSIONS" to change the default settings.
Select which information fields your Customers might receive your permission to view. Click "CONFIRM".
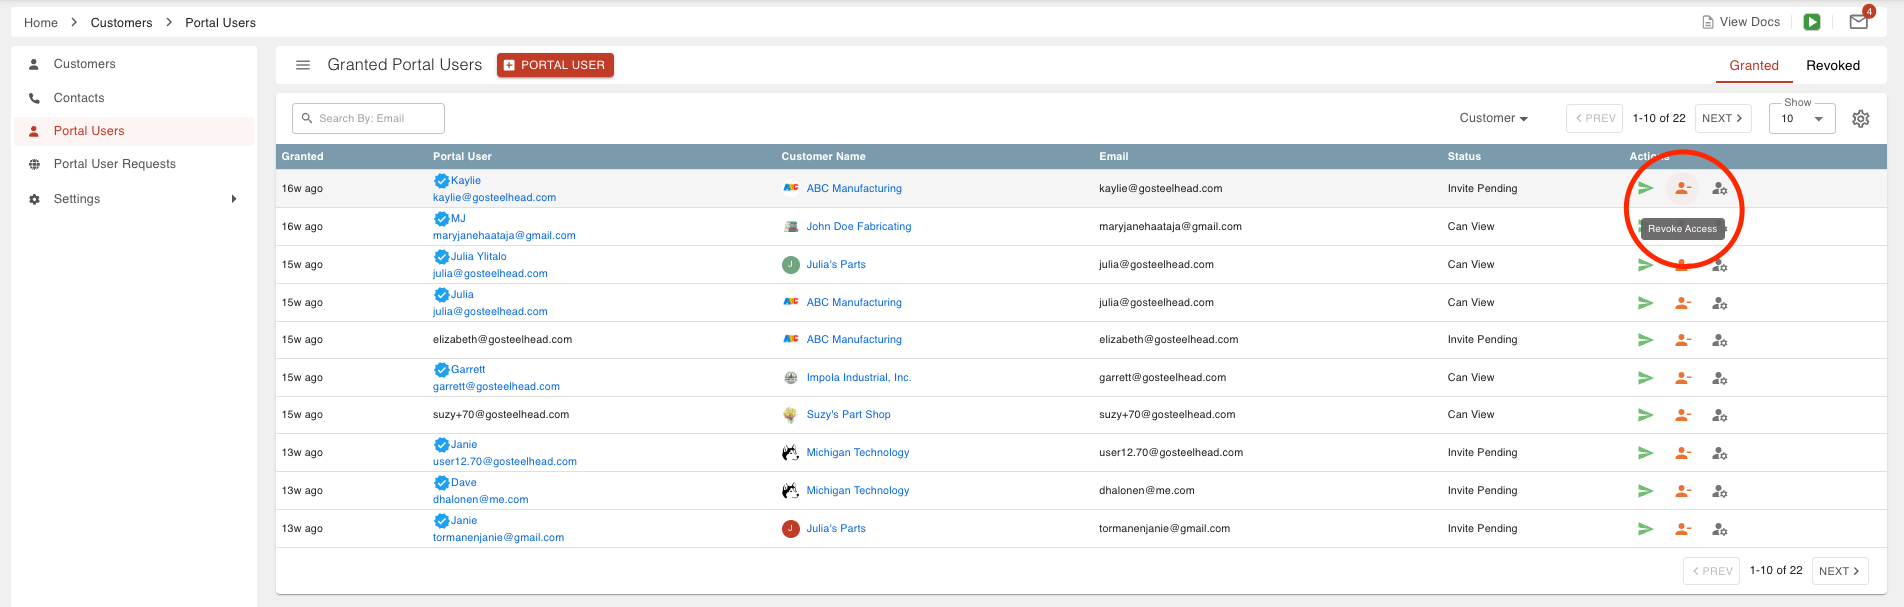
Then from the Portal Users sidebar menu, click on the man with a gear icon to the right of one Customer Contact.
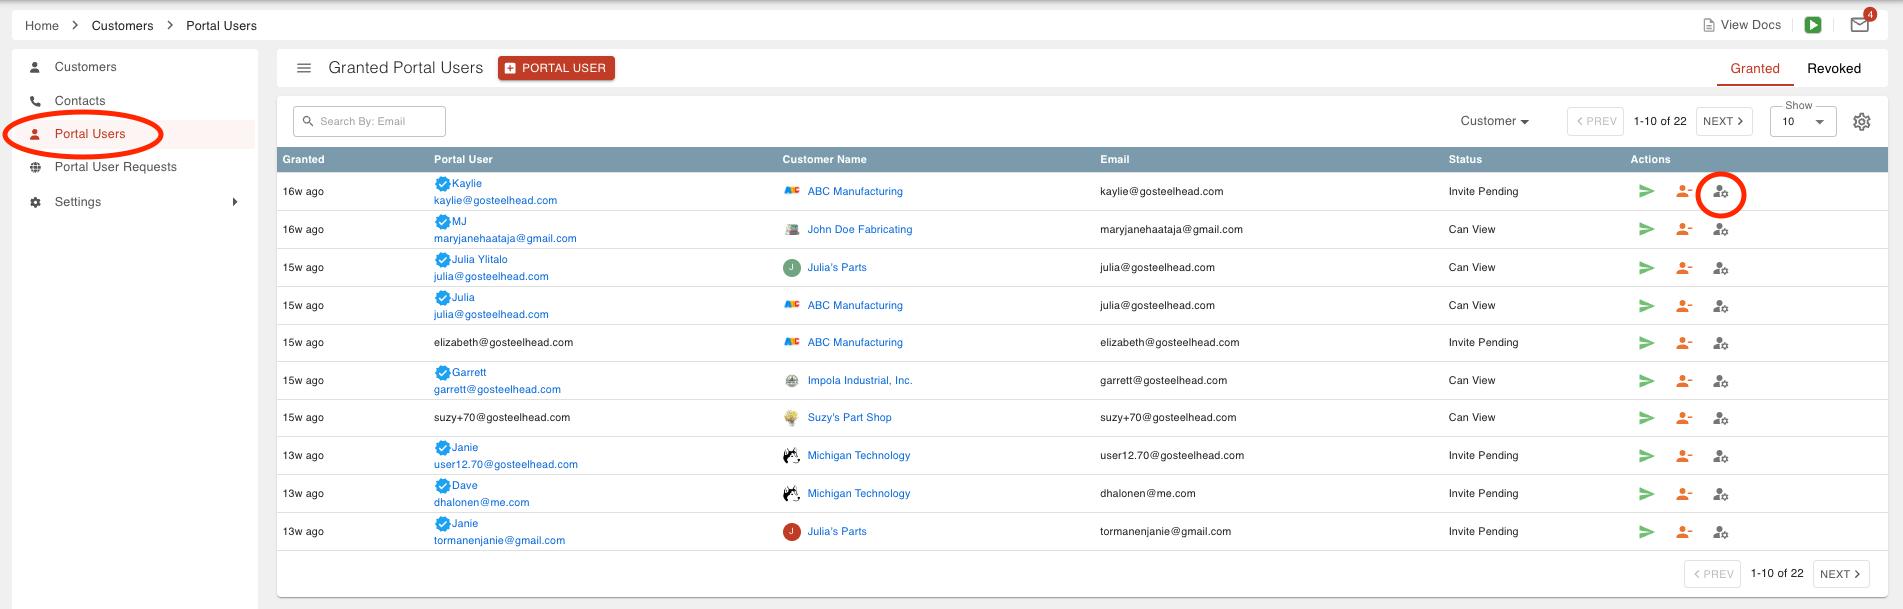
This allows you to allow or deny access to certain information, for that one Customer.
Also in the Portal Users page, you can also block access to any Company, at any time, by clicking the Revoke Access User icon in the "Actions" column:
Editing Permissions
You can also edit Customer Portal access permissions from your Customer Dashboard. Open one Customer's page, and click on Configure Customer Portal. Here you can click on "+EDIT PERMISSIONS" to allow or block access to any information showing from the default settings.
Post News and Announcements
You can post announcements you'd like to share with your Customers, such as expanded operations or business milestones, within the Portal for all to see.
From the Steelhead Homepage, in the Sales Section, click the Customers Tile. In Customer Settings, click on Configure Default Customer Portal, then click the pencil icon next to Portal Announcement.

This will bring you to a text box where you can create announcements using the text formatting tools (Headlines, bold, italics, etc.) reviewed in the Markdown Cheat Sheet, which is accessible through the clickable icon on the right.

When you click "SAVE", the announcement you've created will be visible to every one of your Customers who views their portal:
Invite Customers to View their Portal
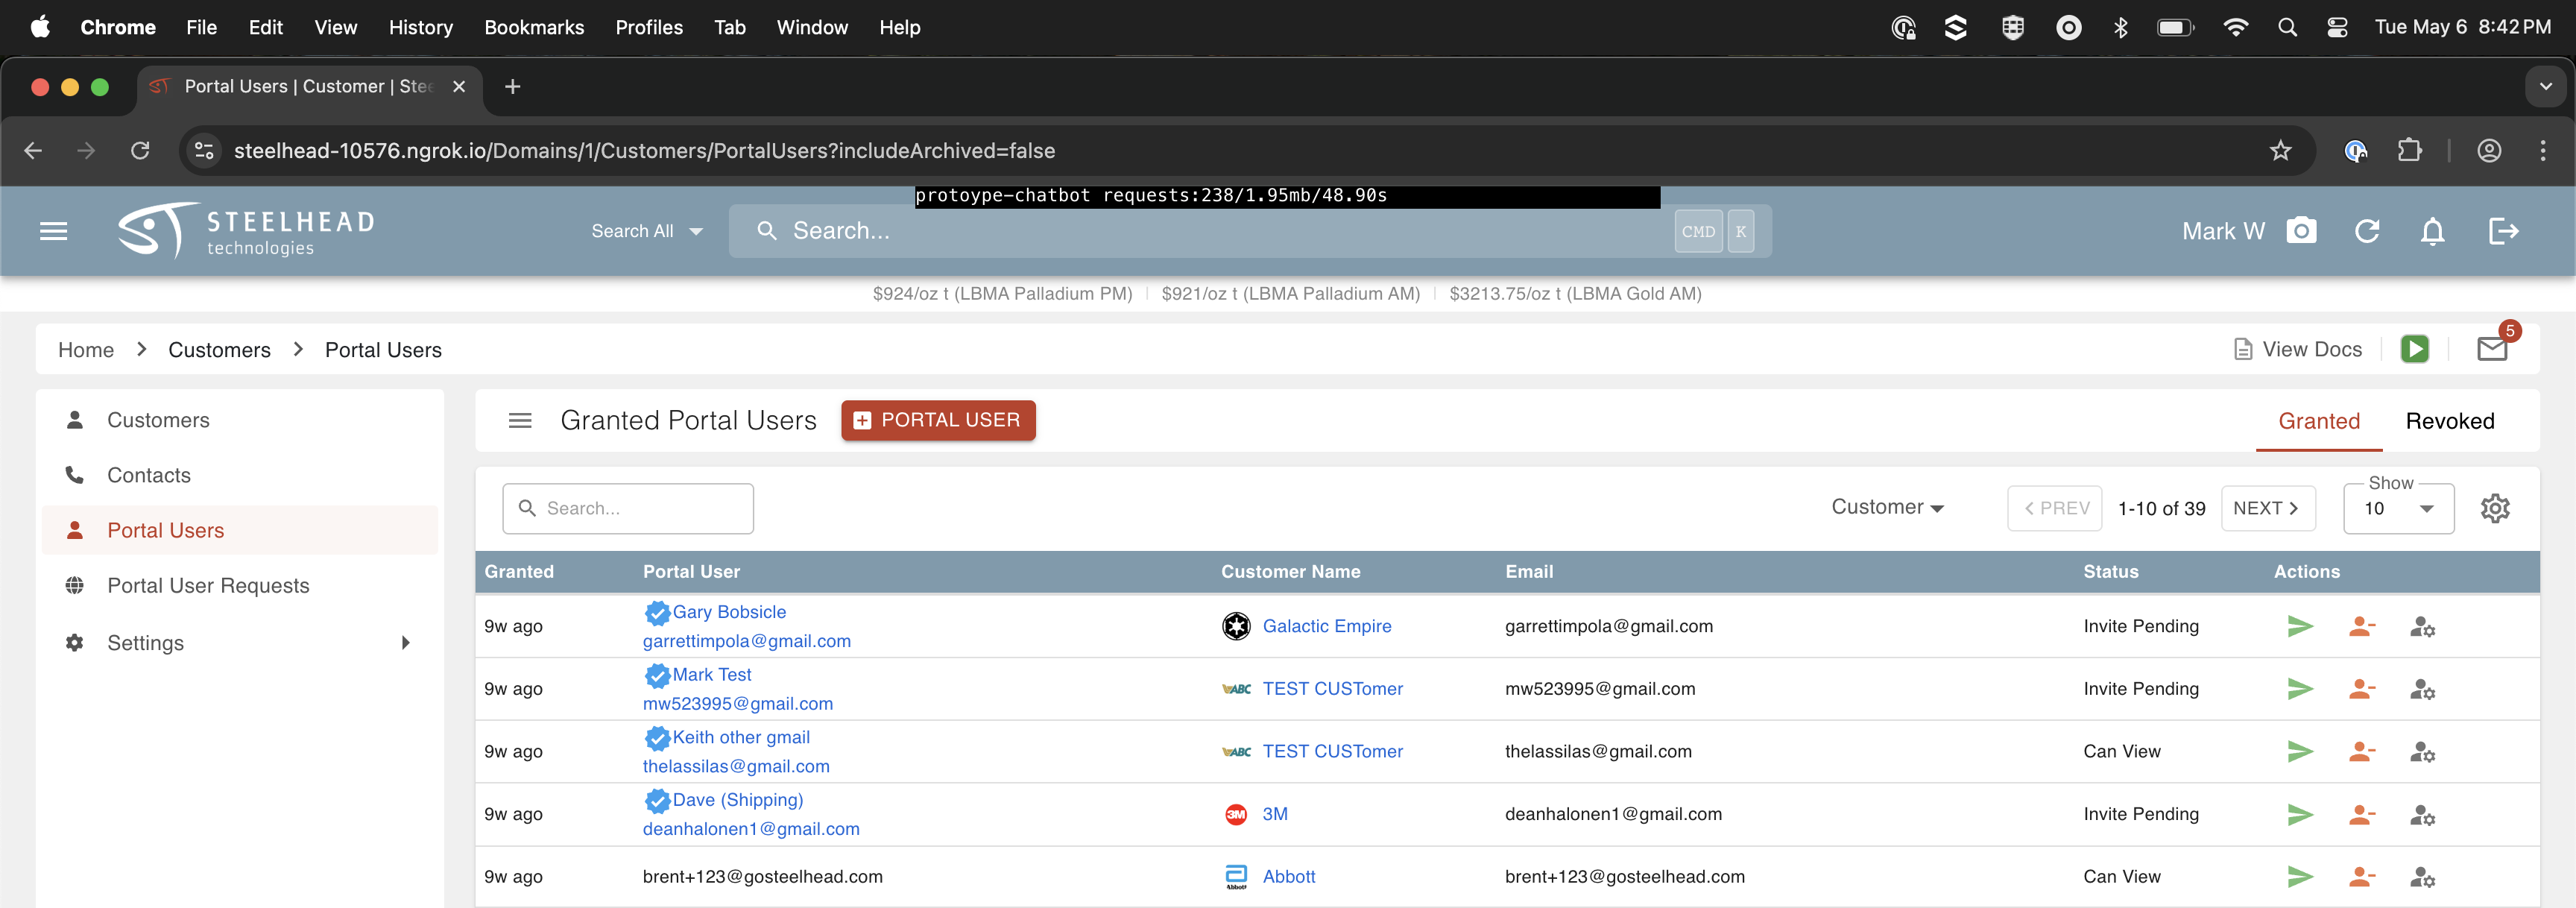
In the Customers Dashboard, click on Portal Users in the sidebar menu. Then click "+PORTAL USER".

From the drop-down list, select or type in the name of the Customer you'd like to give access to.

Select the checkbox next to the name of every individual Contact you'd like to invite, and add the email addresses of others at that Company who you'd like to add as well. Click ADD.
A "Customer" in Steelhead is typically a company you do business with, not an individual contact person. When a Customer (company) is granted access to the Customer Portal, every individual contact you add for that Customer will have access to the same information. The information you make available can be customized per Customer, but not per individual User.

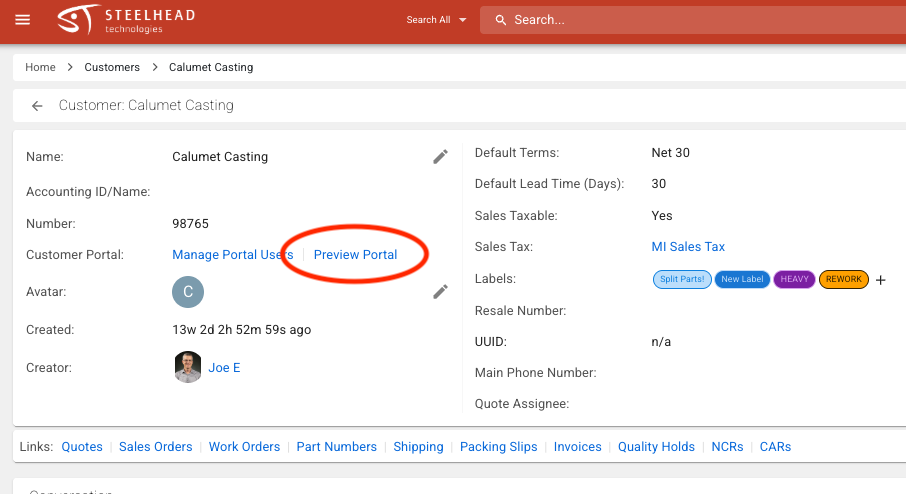
From your Customers Dashboard, click on any Customer, and click Preview Portal, to view the Portal from their point of view. This link will not work for someone who isn't logged in under their own approved username and password.
Customer Portal Access Link Expiration
In Domain Settings, under Management, is a place to enter the number of days after which Customer Portal access links will expire. The default setting is 120 days. If this is set to zero or left blank, temporary access links will not work unless the User is logged in to an active account.
When your Customer accepts the invitation to view their Portal, you will receive a notification in the Customers Tile, and you will still have the options to revoke access or edit permissions to view the information, in the Actions column to the right:
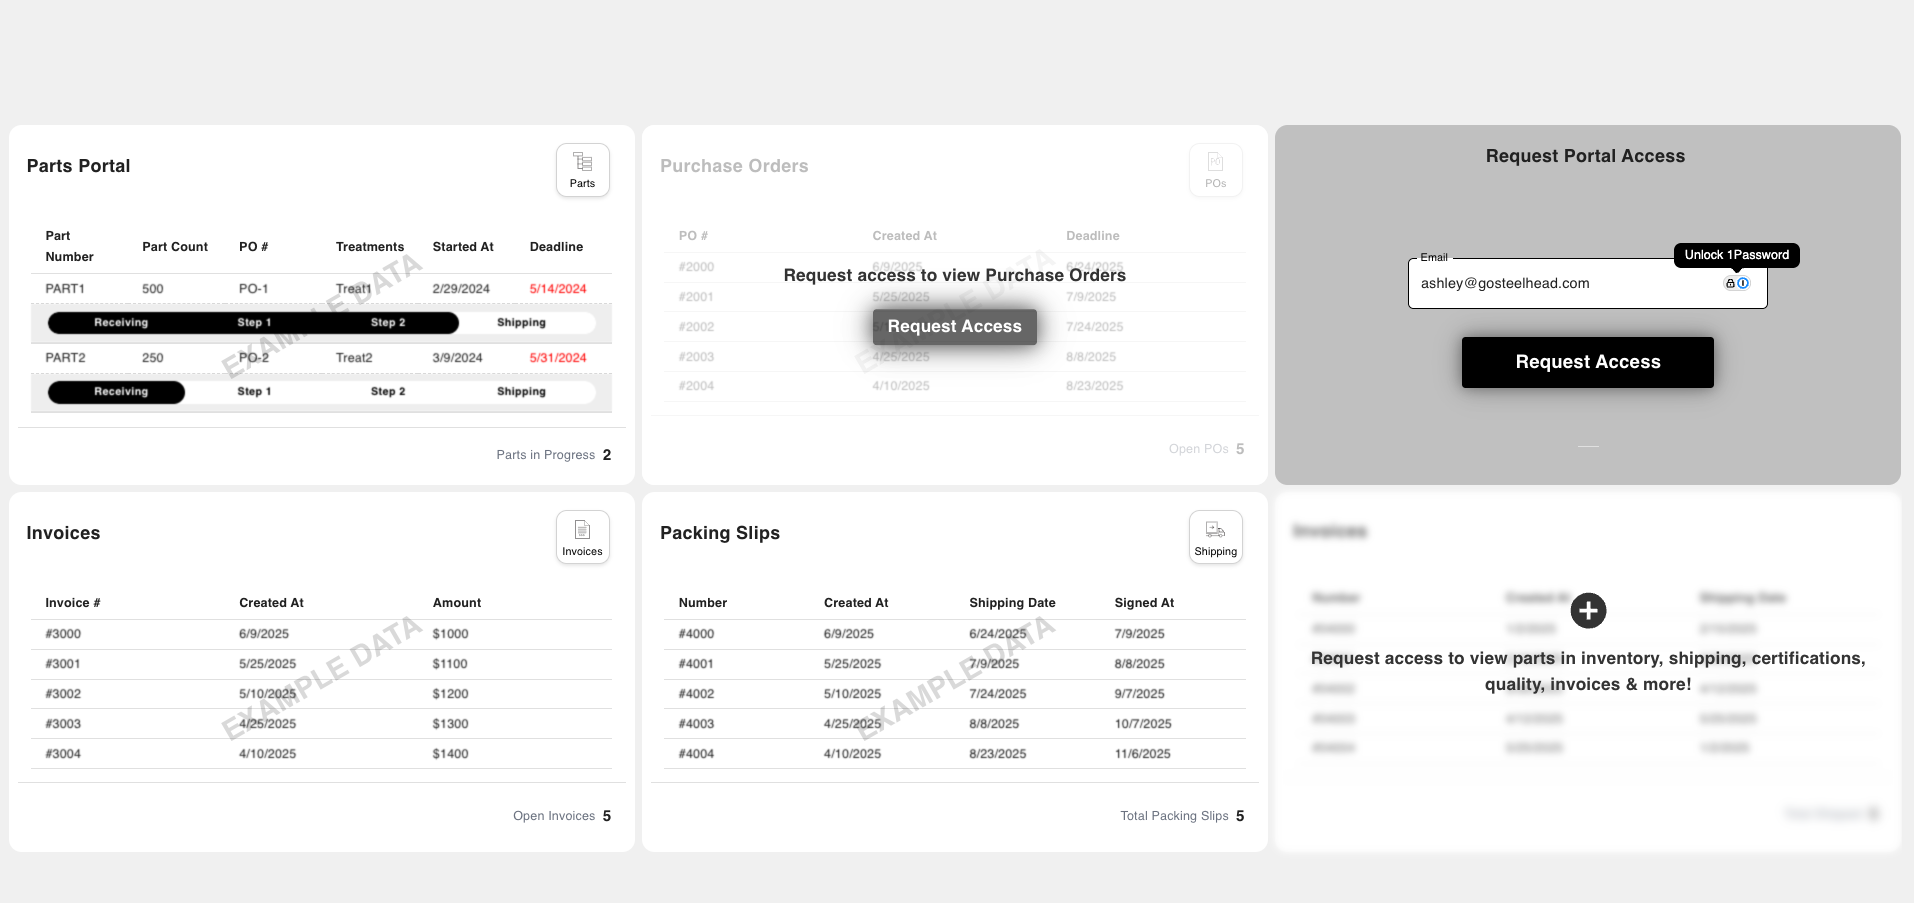
Another Way You Can Receive Requests to View the Portal
A customer can also send a request to view the portal if they receive a pdf through email, and select anywhere in the portal other than the pdf.
This is an invoice and the customer is trying to view the Purchase Order related but after selecting Purchase Orders it will bring them to a blurred preview version of the portal home page and request access buttons.

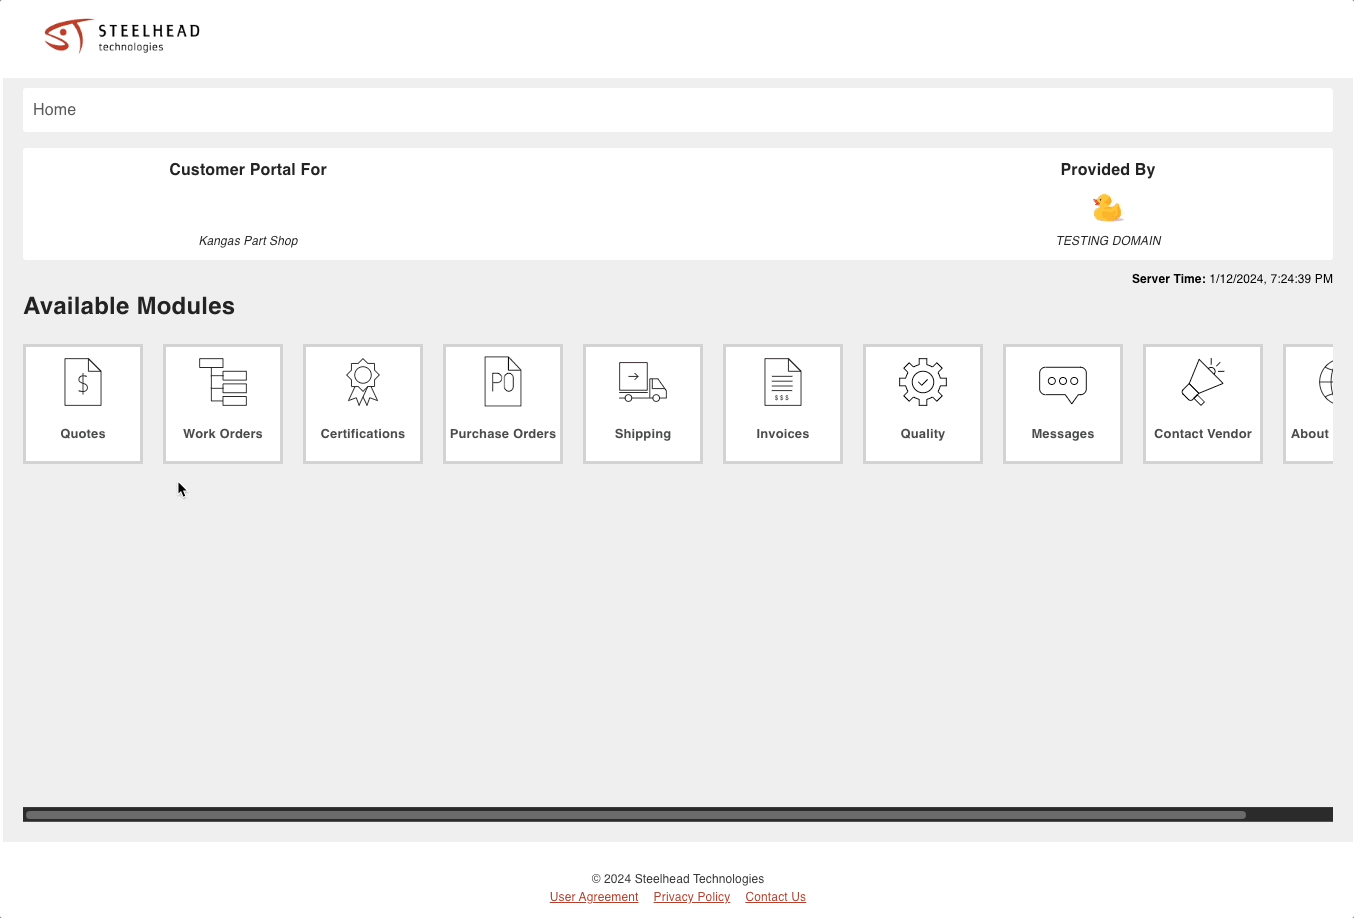
With all Permissions enabled, the Customer Portal has 10 modules:
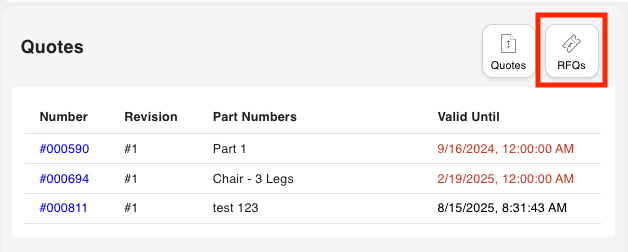
Quotes
This is a list of all the Quotes associated with this Customer. In order for a Quote to be listed it must first be sent through email.
RFQs (Request for Quote)
Customers can view and send RFQs right from the customer portal within the Quotes section.
Just select the RFQ Icon
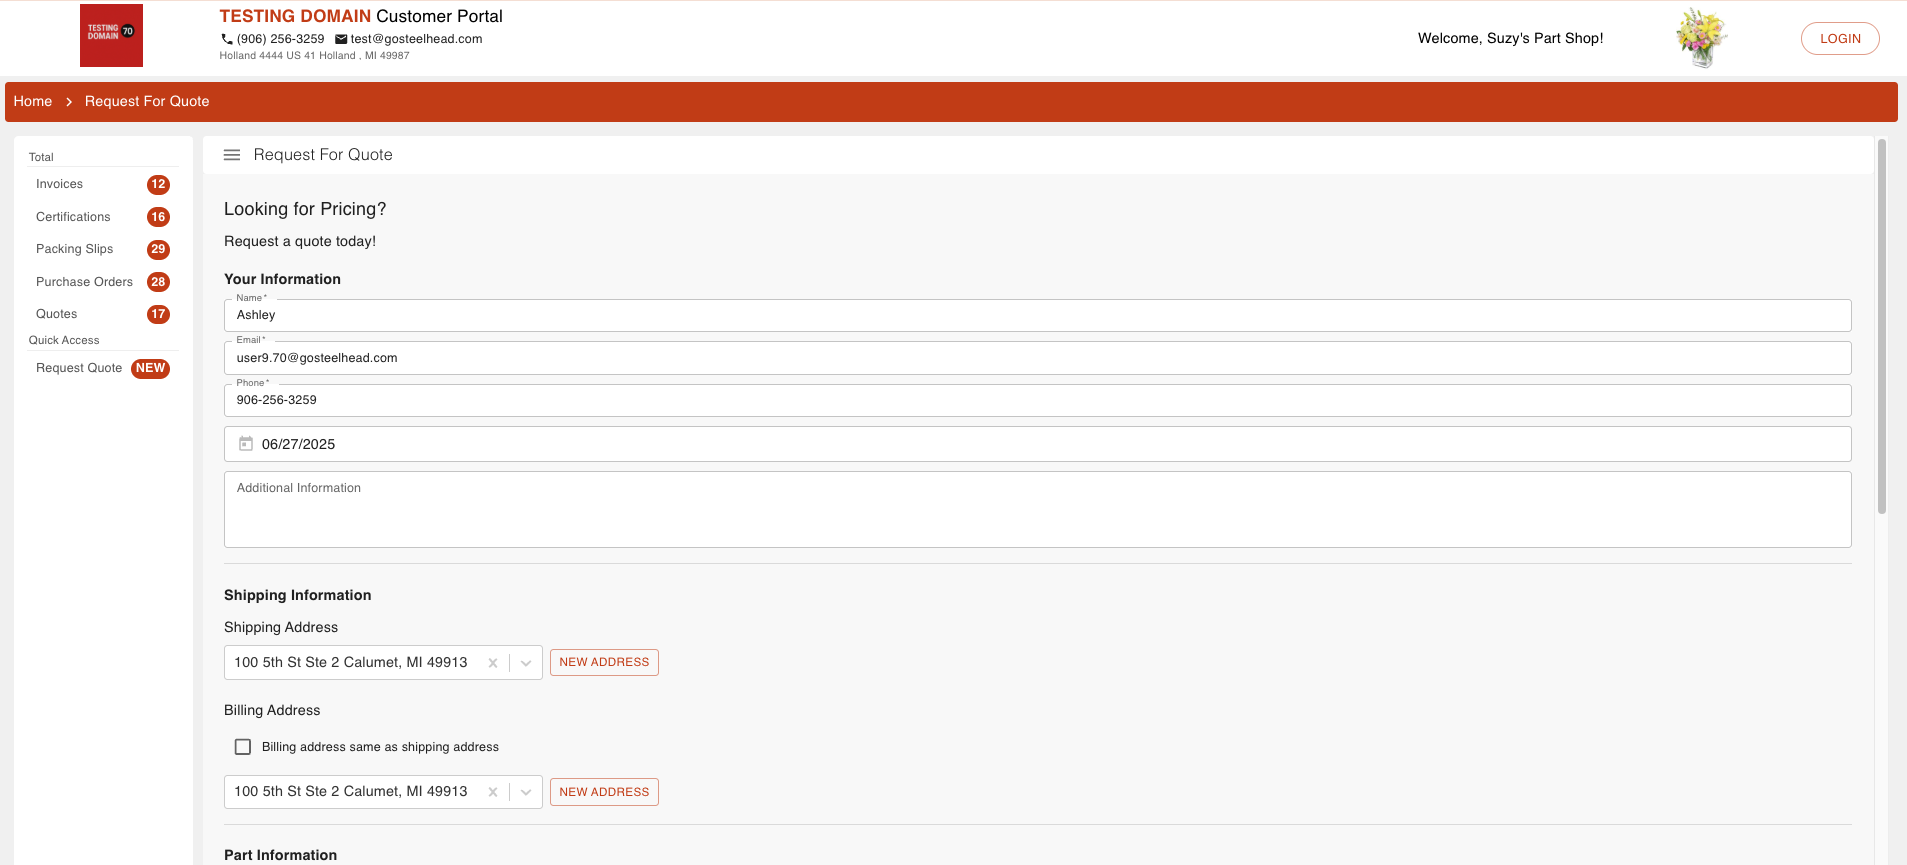
+New RFQ
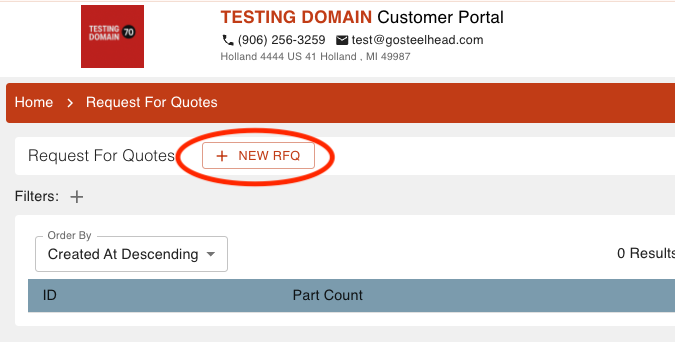
Fill out the required information and select save!
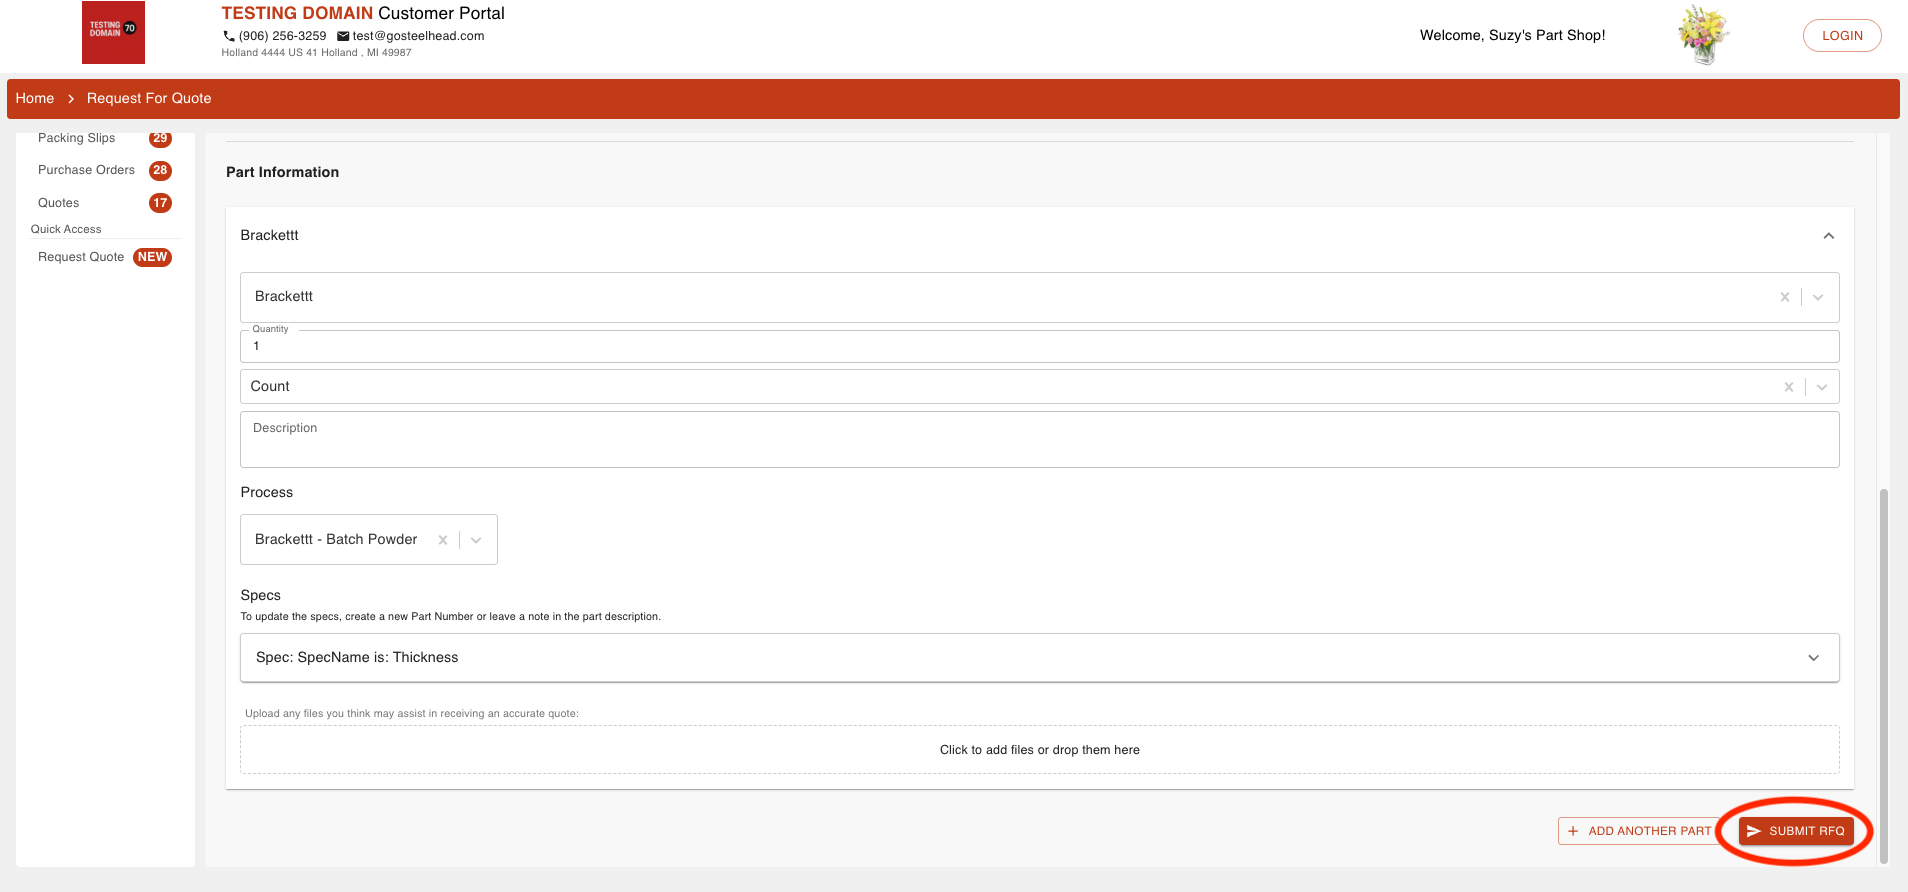
This request will get sent straight to your Active RFQ Submissions where you can view the details to decline the request or to create the request into a quote!

Work Orders
This is a list of all the active Work Orders associated with the Customer. Completed Work Orders can be viewed using the "View Completed Work Orders" link in the top right corner of the page.
Individual Work Orders can be set to show the progress of Parts:

To set up Part progress bars:
- Set Tags on Process Nodes that you would like to be included in the process bar.
- Navigate to Configure Default Customer Portal or Configure Customer Portal (shown in the Set Up section above).
- In the Default Customer Parts Stages or Customer Parts Stages section, select "+ ADD STAGE".
- Select the Tag you would like to make a Stage. Name the Stage. Select or don't select the Show Multiple check box.
Portal Checkboxes
Show Multiple:
If the Show Multiple box is checked, the progress bar will show the Stage name for each node given the Tag. Example: If three nodes are assigned the same Tag, the Stage name will show up three times in the progress bar. If it is not selected, the Stage name will show up only once in the progress bar.
Node Visibility:
To configure node visibility in the Customer Portal, go to the Process node (NOT the Recipe node) that you want to show or hide. On the Process Node page, you can uncheck the "Customer Can See Name" box to hide it in the Customer Portal.
- Click the "CONFIRM" button to save Stage.
- The Work Orders list on the Customer Portal to be quickly switched back and forth between "Active" and "Completed" Work Orders.
- This will allow you to quickly keep track of their order status.
Certs
This is a list of all the Certifications (Certs) associated with a Customer, along with related information. In order for a cert to appear here it must first be sent through email.
Purchase Orders
This is a list of all the active Sales Orders associated with a Customer, along with related information.
Shipping
This is a list of all the Packing Slips associated with a Customer, along with related information. Also in this module are Bills of Lading. Click "View Bills of Lading" in the top right corner to access them. In order for Packing Slips and Bills of Lading to appear in this module, they must first be sent through email.
Invoices
This is a list of all the Invoices associated with a Customer. In order for an Invoice to appear listed it must first be sent through email.
Email Usefulness
Emailing customers is the only built-in way to notify Customers about order information, which will then be automatically saved in other places like Insights and can be viewed in the Customer Portal.
Quality
This is a list of all the Quality Management System (QMS) reports associated with a Customer, currently limited to:
- Non-Conformance Reports (NCRs)
- Return Merchandise Authorizations (RMAs)
In order for a QMS document to appear listed, it must first be sent through email.
Messages
This is a Chat window where you can leave messages for the Customer. The Customer cannot currently send messages in return. To send a message to the Customer, open the Customer in Steelhead, enter a message in the Customer Portal Messages field and click the "INSERT" button. That message can now be viewed in the Messages module.
Contact Vendor
This is the contact information for the Vendor, the company who runs the Steelhead account. This information pulls from Company Contact Info found in Domain Settings.
About Steelhead
This is some more information about Steelhead Technologies that your Customer will be able to view easily.
PDFs
PDFs are accessed by clicking the "OPEN PDF" button in the top right corner of an item on one of the many lists in the Customer Portal.
Here are the PDFs accessible by Customers once sent by email:
- Quotes
- Certs
- Packing Slips
- Bills of Lading
- Invoices
- Quality Hold Documents
- Non-Conformance Reports
- Return Merchandise Authorizations
- Sales Order Acknowledgements
Note on PDFs:
- If details of a PDF are updated in Steelhead, an email must be sent again in order for the PDF to update within the Customer Portal.
- Packing Slip Draft PDFs will not appear in Customer Portal if the email does not have the PDF attached.
- NCR PDFs will not appear in Customer Portal if the email does not have the PDF attached.
Was this article helpful?