Specs Configuration
- Print
Specs Configuration
- Print
Article summary
Did you find this summary helpful?
Thank you for your feedback!
Specs Configuration is the process of entering the data in Steelhead which digitally links Parts and Treatments to Specs and Certs via Spec Fields, Parameters, and Equipment.
When you're first introduced to Steelhead, understanding how to use the Specs Dashboard may seem daunting. But with an investment of time in proper configuration, using the powerful capabilities of the Steelhead Specs and Certs modules will free up your time later on, and help you present polished digital Certifications for exceptional customer service.
Related Documents
Specifications (Specs) Overview
Spec-driven Processing
Specs Management
Specs from Sensors
Certifications
Specs and Certs Troubleshooting
Contents
Creating New Specs
Creating New Spec Fields
Auto-Apply Sensors
Minimum Effective Parameter Range
Non-linear Sampling Rate
Adding Params to Spec Field Assignments
Assigning Specs
Assigning a Spec to a Part Number
Adding a Spec to a Process Node
Spec Summary Dialog
Creating New Specs
To create a new Spec:
On the Specs Dashboard (available from the Quality & Compliance Section of the Steelhead Homepage), click the +NEW SPEC button.
Enter the Spec Name in the "Create Spec" dialog box. The other fields are optional, but the more information you make available here, the more functionality the Spec will have.
- Any External Description will become available to be shown on Certs.
- Setting a Default Process will drive the Process selection for a Part Number where the Spec is applied.
Click SAVE.
- Clicking on a Spec name from the main Spec table will open a page that displays Part Numbers, Treatments, Spec Process Setup, and many other details related to the open Spec. Read further sections of this article for details to build these links.
Move along to create Spec Fields and Params. See information below to do so.
From the Specs Dashboard, on the right of the line showing your newly added Spec, you will see clickable icons to Edit, Archive, Copy, or Revise the Spec, or view a Spec Summary sheet of all available information. When you click into one Spec, you will see all information about the Spec, as well as a button to SUPERSEDE SPEC in the upper right.
Editing allows you to change the name, labels, external description, Default Process, and more. It also allows for a new Revision to be created with the changes.
Copying helps to create a new Spec that might share several attributes with one already stored and in use. A Copy can also be assigned a Revision Number along with updated requirements if appropriate. The name of a copied Spec will end with "- COPY" when created, which can be adjusted. A Spec and its Copy can be assigned to different Processes/Parts.
Revising allows optional Supersession of an outdated Spec, if the box Supersedes Spec is checked along with a new Revision. If not, the Revision is saved with your active Specs with a new Revision Number, similar to a copied Spec.
Superseding allows a Spec to take the place of an outdated Spec.
To supersede a Spec:
Copy or revise the outdated Spec, or create a new Spec.
Revising the outdated Spec may be the quickest route. It will allow you to copy, rename, and supersede it (select the Supersedes Spec checkbox to do so) in a few steps.
- Open the new Spec and make any adjustments.
- Open the outdated Spec and then the Part Numbers and Treatments tabs to see all that are connected.
- Click the Resolve Supersession magic wand icon under Actions. This will create a new copy of the Part Number or Treatment, archive the old, and replace the outdated spec with the new one. This can also be done from the Part Number or Treatment, and a User will be warned if they are using a Part Number with a revised Spec.
Copying or creating a new Spec both require the same procedure to supersede the outdated Spec.
- To do so, open the outdated Spec.
- Click the SUPERSEDE SPEC button in the top right corner, which brings up a dialog that prompts you to select a Spec from a drop-down list.
- Choose the Spec that should take the place of the outdated Spec.
- Adjust any param supersessions.
Configure Spec Locations
Specs may be linked to specific plant Locations and Part Numbers to avoid mistaken assignment. If "Configure Spec Locations" is not visible in the Spec creation dialog, contact Customer Support to have it activated for your Domain.
Spec Locations can also be added at the bottom of a Spec Page. These locations are also displayed in the Spec Summary.
When assigned to one Location, Specs are also available for assignment at all its Parent and Child Locations.
To make Location-specific Specs available for assignment to Part Numbers, the Part Number must be assigned to the same Location:
- In the "Manage Locations" section while creating or editing a Part Number, add the Location assignment before adding Specs to the Part Number.
- Locations for Part Numbers can also be managed in Process Composer.
- Then when you add a Spec, only Specs that match the Part Number Location, or are Global, will be available for selection.
Creating New Spec Fields
See also: Specifications (Specs) Overview
To create a new Spec Field:
- From the Specs Dashboard, enter the Spec Fields page from the sidebar menu. Spec Fields can also be created directly from a Spec.
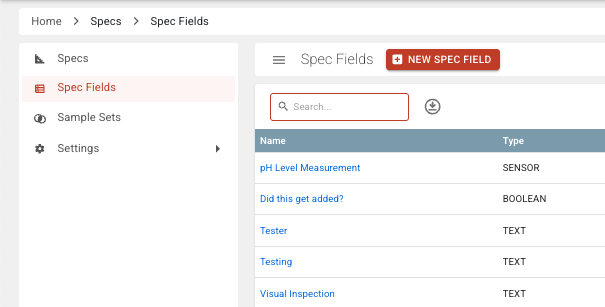
Click the +NEW SPEC FIELD button.
Name the Spec Field, and assign a Type. Depending on the Type, there will be additional characteristics to enter. For example, for a NUMBER Spec Field, you will be asked for a Minimum Effective Parameter Range (to prevent incompatibility while racking and processing different Parts together), a "yes" or "no" to whether you'd like the Spec Field to be available for controlling Schedules, and a selection list for a Referenced Spec (see Specs Management for more on this).
Click SAVE, and the new Spec Field will be added to the Spec Fields table. Click on the Spec Field name from the list to open its Spec Field Page.
In the Spec Field Page you can edit it, add a Description, view Spec Field Assignments (Specs to which the Spec Field is assigned), and Process Node assignments - prescribing the times and places that the associated data is to be collected.
Adding Spec Fields to Specs
Spec Fields must be added to a Spec in order for measurements to be recorded. Once a Spec Field is added to a Spec, the type of measurement is defined, and Params can be created to specify more details about the measurement to be taken. To tie them together.
- Open the Spec Page you'd like to link to a Spec Field, and click on +ADD SPEC FIELD.
From the drop-down list, select the Spec Field you've created, or create a new one, and fill in your selections for the Spec Field Assignment:
- A Spec Field Assignment (sometimes called a "Spec Field Spec") is unique to the Spec, and links a Spec Field and a Spec together for the purpose of setting Parameters.
You may import Params from another Spec, if available.
A Spec Field Assignment can be Generic or non-generic (specific), depending on your needs:
Generic vs. Specific Spec Field Assignment Params
Generic Spec Field Params signify the nature of the Spec Field Assignment and any changes/updates cascade to all Treatments and Part Numbers which are given that Spec Field Assignment.
Specific Spec Field Params are copied individually to Spec Field Assignments, thus when updated on a Treatment or Part Number, the update is specific to that Treatment or Part Number.
The "Requires Geometry Type" checkbox controls the possibilities for selecting the Spec Field Assignment from Part Number pages. If the box is checked, then the associated Part Number must also have a Geometry Type selected in order to use that Spec Field Assignment. See Part Numbers for an explanation of Geometry Types, and see Specs Management for information on using geometries to track dimensional changes of Parts through processing.
The "Is External" checkbox, in part, controls what Specs will appear by default on Certifications:
Internal Specs can only be assigned Internal Spec Fields.
External Specs can be assigned both Internal and External Spec Fields.
Only External Spec Fields are defaulted to appear on Certs. Internal Spec Fields may be added.
Adding Spec Fields to Process Nodes
Spec Fields must be tied to Process Nodes in order to show up where they need to. There are a few ways to tie them together:
- Click the + PROCESS NODE button on the Spec Field and add the particular Node.
OR
- If a default Process is set on the Spec, select any Nodes using the icon to the right of the of the Spec Field on the Spec.
OR
- Navigate to the Processes Dashboard > Process Tree > Process Node > Spec Fields section, and add click the +ADD SPEC FIELDS.
Auto-Apply Sensors
See Auto-Apply Toggle in "Specs from Sensors."
Minimum Effective Parameter Range
When you create a Spec Field with "Type" designated as a Number, Sensor/Number, or Timer, you are able to specify a Minimum Effective Parameter Range. This setting should be the total effective "tolerance" of the spec field measurement. After you set and edit Params (outlined below), you will be prevented from racking Parts together if the Spec Params are not set with ranges which overlap widely enough to accommodate the minimum effective range.
Non-Linear Sampling Rate
You may set custom non-linear Sampling rates for Params, based on Batch sizes.
In the Specs Dashboard, click on SAMPLING in the top row of links. You can create a Sample Set and enter the ranges of how many Parts will be tested from among any number of Batch size ranges:
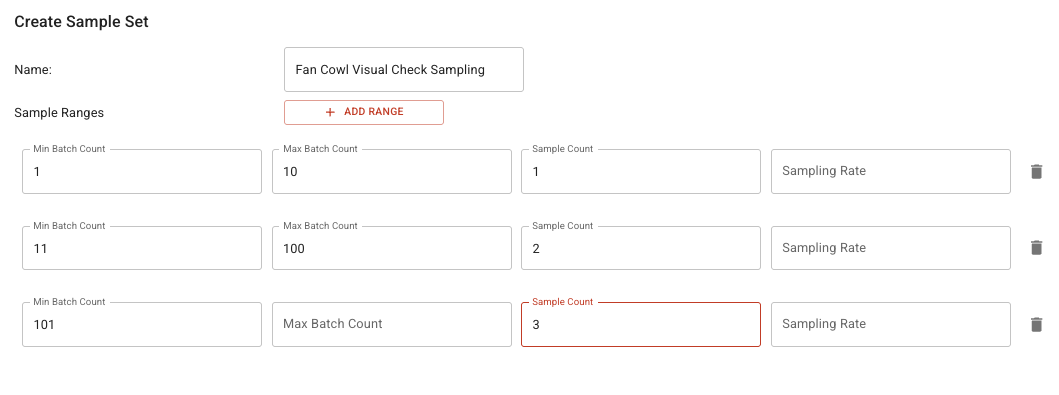
The Sample set you create and save will be available to be chosen when you apply Params to Spec Fields.
The assumption is that no matter how many Parts are treated in one batch, they will all be treated the same; so there is diminishing value in measuring the same property on individual Parts of the same Batch, unless required.
See the "Sample Sets" article for more information.
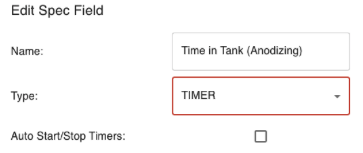
Automatically Start and Stop Timers
For a Timer Type Spec Field, you can elect to use automatic start and stop. By doing so, the Timer will start when the parts are moved into the Node associated with the Spec Field, and the time they are moved out will be recorded as the stop time. In the associated Workboard, the time will show as a countdown to the minimum acceptable time according to the set Parameter, and then count up to the maximum time allowed. This helps guide operators for such actions as dip time or drying time.
- If two time records are needed in the same Spec Field, you can create two Spec Field Parameters with Timers in the same Process Node. After parts are moved into the process node with Timers, the Timers can be stopped individually.
- If the Spec Field is set as a MANUAL_TIMER, time will simply be entered by the operator according to some other reference such as a wall clock. To use a Manual Timer Spec Field, first find Manual Timer Settings in your Domain Settings, and toggle on the units (hours, minutes, seconds) which you'd like to be entered and recorded for reporting.
Adding Params to Spec Field Assignments
Spec Field Params set limits & requirements on a Spec Field that allow measurements to be taken. These are the Parameters on the values that you are collecting and certifying. A Param is unique to a Spec Field Assignment (That Spec Field applied to that Spec) and cannot be added to a Spec without a Spec Field, or to a Spec Field that isn't assigned to a Spec.
To add a Param to a Spec:
From the Specs Dashboard, open a Spec.
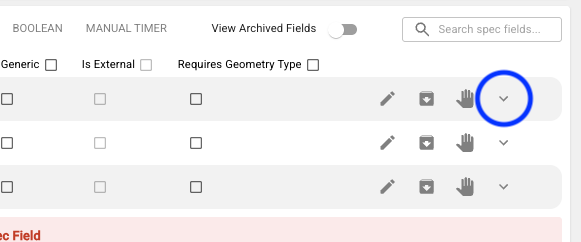
Add a Spec Field, which creates a Spec Field Assignment on that Spec. Expand the details of an existing Spec Field with the drop-down arrow icon on the right:
Import Params used elsewhere (highlighted blue), or +CREATE DEFAULT SPEC FIELD PARAMS (highlighted red).

- This button adds a Param, and opens the dialog to Name it, provide a description, and set input and sampling requirements along with specific Param limits. SAVE your inputs.
Default Param values can also be established via the Part Number page of any Part.
- Click on the Part Number Name hyperlink in the Part Numbers Dashboard.
- Scroll down find the related Spec.
- Open the Spec in a new tab by clicking the expanding window icon, and make any adjustments there:

1. If the new Param is replacing an old one, navigate to the Spec Field Assignment page, Part Numbers tab, select the Part Numbers to be updated, select the Param to replace the old, and set the selected. Skip steps 5 and 6.
4. Once a new Param has been added, refresh the Part Number.
5. Click the Add Spec Field Parameter plus icon.
6. Select the newly created Param, and the Node at which it should show up, if applicable.
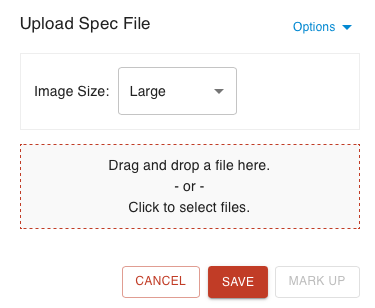
Spec File Uploads
Not to be confused with a Spec's global files. When Request Document is selected on a param, and the param is being recorded, users will be prompted to upload a file, like so:
Assigning Specs
- Any number of Specs can be assigned to Treatments or to Part Numbers.
- Treatments:
- If a Treatment is attached to a recipe, the assigned Spec, Spec Field Assignments, and Parameters are pulled in to the specified Node(s).
- Part numbers:
- Specs, Spec Field Assignments, and Parameters can be assigned in Quoting, at order entry, or in the Part Number profile. There is a Manage Specs section in the Create/Edit Part Number dialog, and a Specs section on a Part Number page.
- Treatments:
- Specs can be deleted from Treatments or Part Numbers only if there is no previous data collection.
- Specs can be archived if there is Spec data already collected.
- One Parameter per Spec Field Assignment (the default Param) is selected when a Spec is assigned to a Part Number or Process Node.
Changing Specs on a Part Number
Once Specs are set on Part Numbers, updating the Spec does not change the Specs on the Part Number. This is for tracking historical Spec compliance. To update the Specs on a Part Number, create a new Part Number using the COPY PART button. By default this will copy the applications of Specs and Processes along with the Part Number, and then they can be edited more freely for use on upcoming jobs.
Reminder, if you create a copy of a Part Number:
- Select Show Advanced before saving to optionally enter a new Accounting ID/Name, and verify whether you are copying the GL Account.
Adding Specs to Part Numbers vs Work Orders
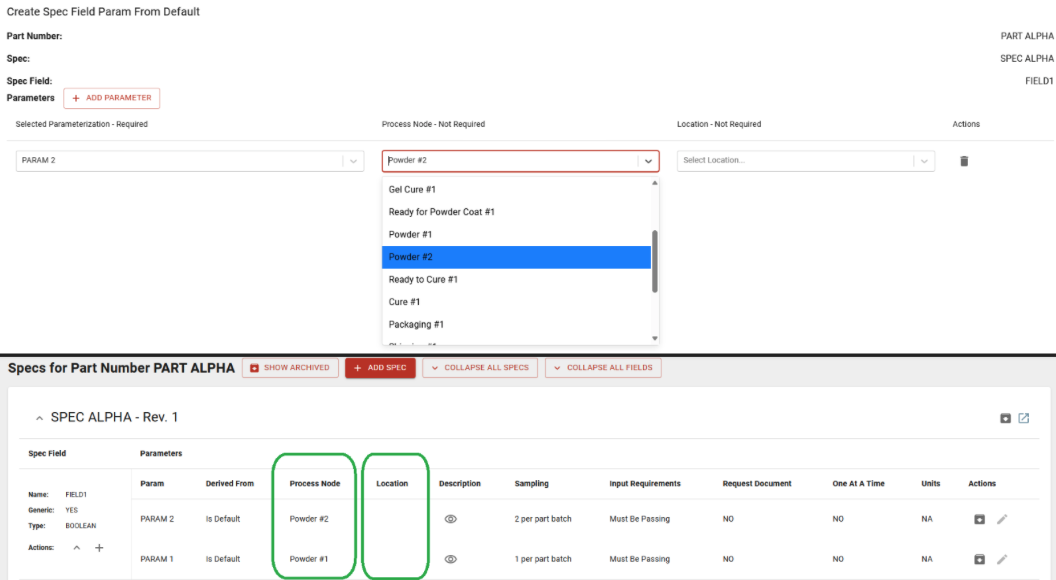
When adding or changing a Spec Field Param on a Part Number: if a new Process Node (different to what is already assigned) is added, the Spec Field Param will default to that Node for all future orders which include that Spec Field Assignment.
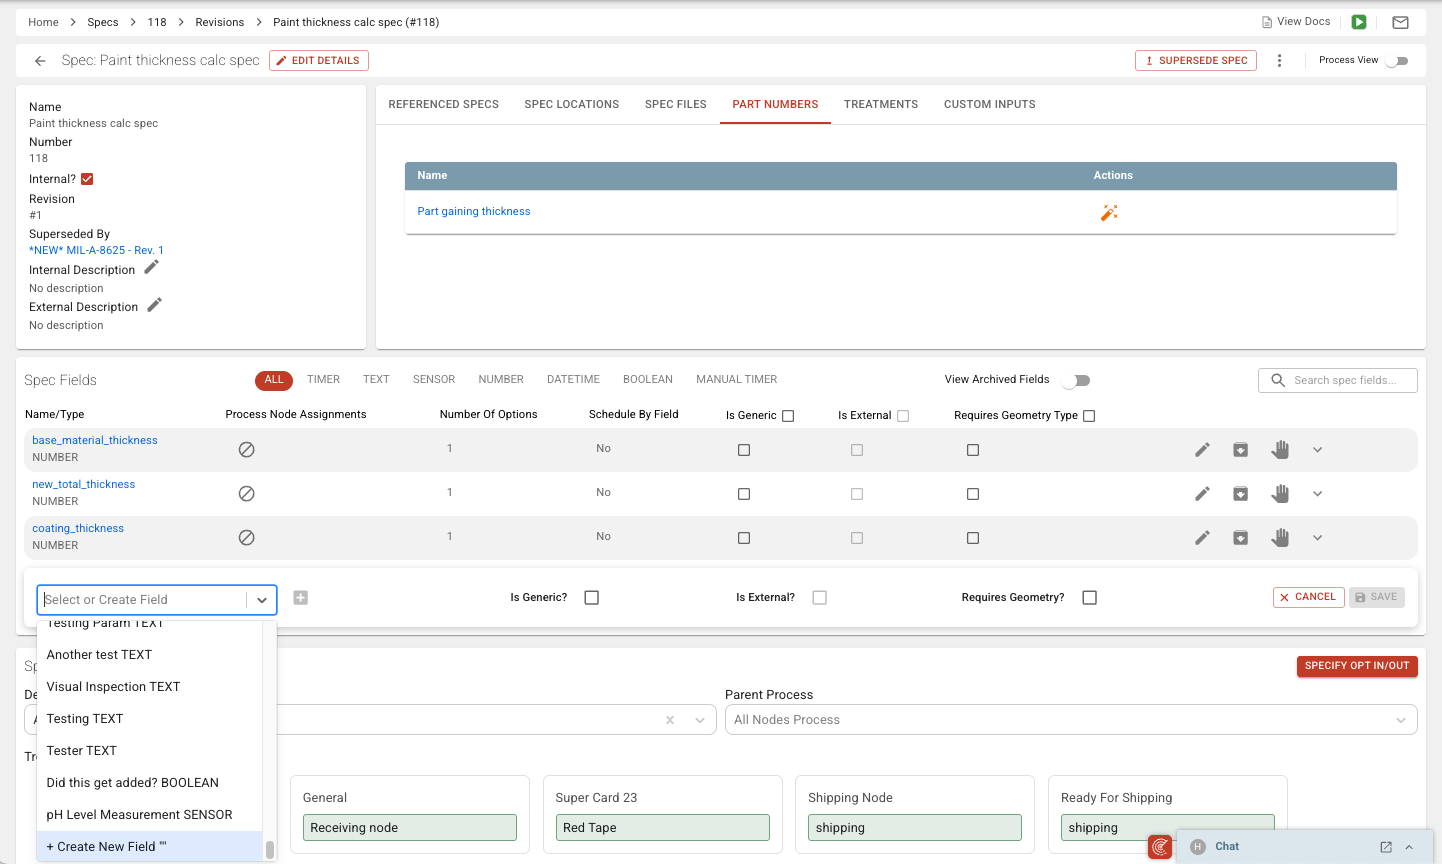
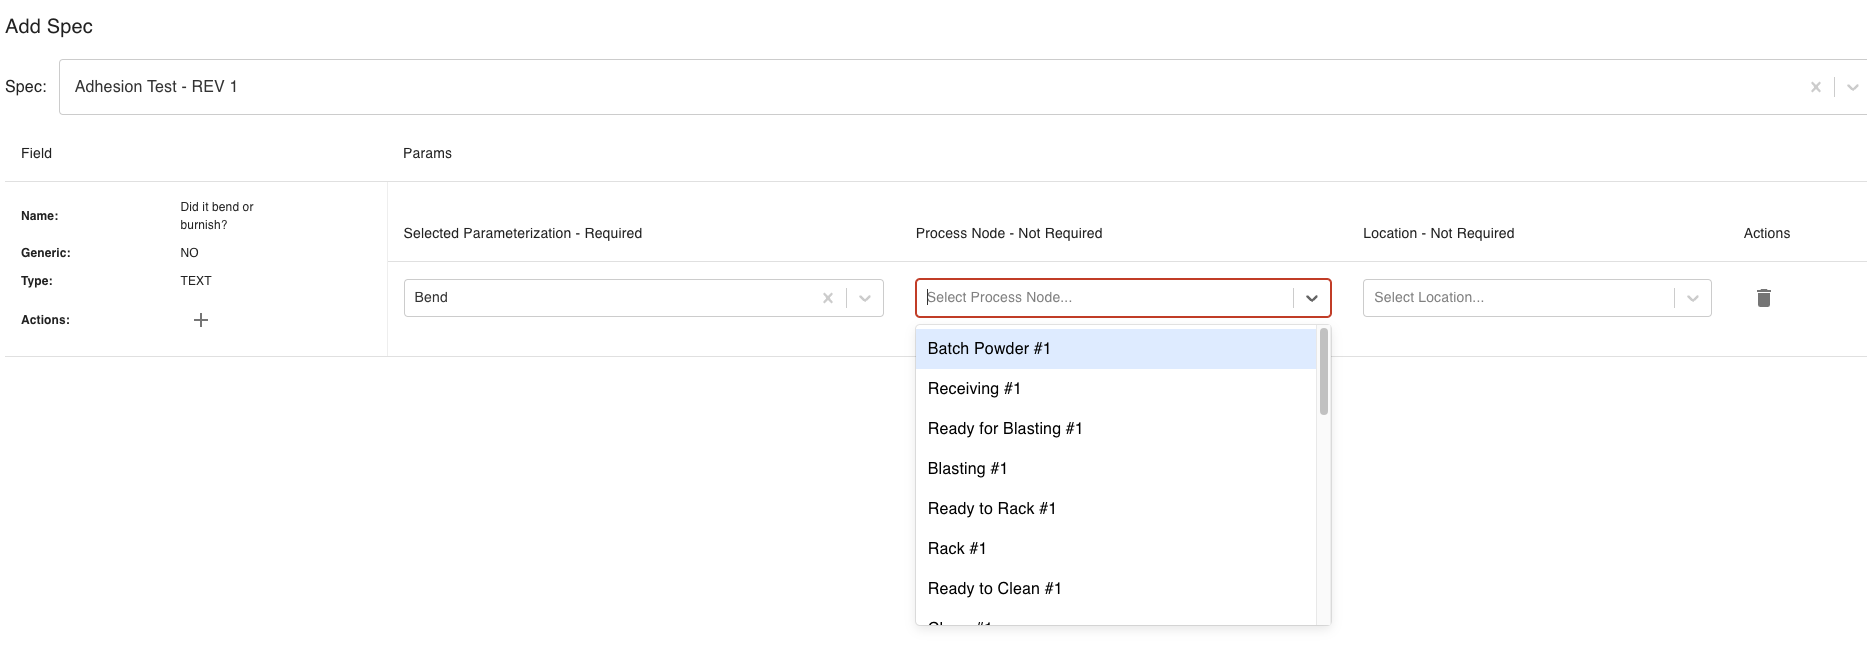
- For example, below is the screen that comes up when you add a Spec to a Part Number.
- When you select the Param you also can select the Process Node (as seen in the drop-down). The active Spec Field Assignment appears in red on the list.
- If a different Node than what the Param is already assigned to is selected, Steelhead will link that Spec Field Param to that Process Node - there is no limit to the number of Process Nodes where the same Spec Field may be linked.
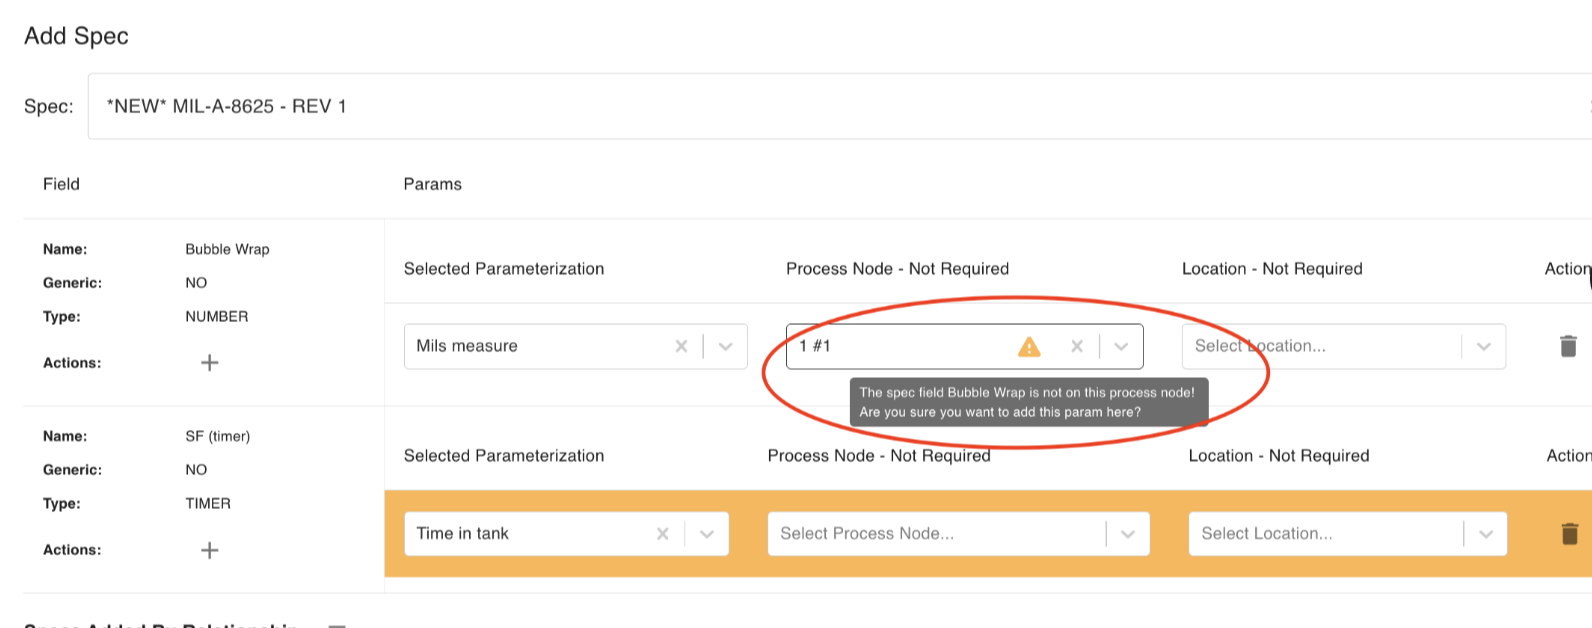
When a Param is added to a Recipe Node on a Work Order, if a non-default Process Node is selected, a warning will pop up.
- If you override the warning for the new Node, the Param will only be added to the Recipe Node for the specific Work Order if you are editing.
Params per Process Node Occurrence
Spec Field Params are distinct per Process Node occurrence, making differing Params on shared Nodes possible by using duplicate Nodes (with differing Spec Field Params) on a Process, then assigning Parts to the Node occurrence matching their needs.
As explained in Process Nodes, repeated Process Nodes may also be assigned different Treatments with opt-in/opt-out functionality per Part Number. For example, several optional "Spray Paint" Nodes could be individually assigned Treatments called "Blue", "Red", "Green", and so on, within the same parent Process. The Treatments may be assigned different Specs for Spec-Driven Processing.
Spec Labels
Users may associate Labels with a list of entities. This includes the ability to add Labels to Specs. Spec Labels will appear in multiple places throughout Steelhead, and can be used to display any important notes about the Spec.
- All available multi-use Labels can be seen, ordered, and edited from your Domain Settings. Click the Domain Tile on the Homepage, and search for, or scroll down to, the Go to Labels button in the Part Numbers, Processes, & Treatments section.
- When you open a Label for editing with the pencil icon, Associated Entities appear in the editing dialog. You may add or remove entities such as "Spec" from the selected Label.
- Note: Removing an entity from a label will not remove the label from any objects, instead it will simply not be available to add anymore.

You can add or edit the Labels associated with Specs in the Specs Dashboard.
Spec Summary Dialog
Users are able to see a summary overview for an individual Spec, including all the most relevant information, in one screen. The Spec Summary button icon is displayed in multiple places throughout Steelhead, typically next to the name of the Spec:
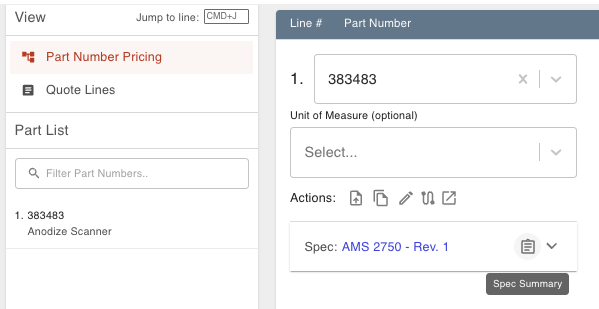
The Spec Summary compiles Spec details on a single dialog, for easy viewing.
Information displayed in this dialog includes:
- Spec Name, Revision #
- Active or archived
- External description
- Internal or external Type
- Custom inputs
- Internal description
- Associated Treatments
- Associated Part Numbers
- Process definition:
- Opt-in/Opt-outs
- Associated Spec Fields
- Associated Spec Params
- Associated Process definitions
Users are able to edit the max, target, and min times for Params on the Spec Summary dialog:
- View Spec Summary dialog that has a param of a Spec Field type associated with number values.
- Scroll and expand the Param.
- View/edit the associated min, target, and max times.
--
Was this article helpful?