Received Batches
- Print
Received Batches
- Print
Article summary
Did you find this summary helpful?
Thank you for your feedback!
Received Batches are sorting categories for incoming Parts. They are listed in the Receiving Dashboard and can be added to their respective Part Number Inventories at the push of a button. They can also have different statuses applied to them as needed.
Listed here is the breakdown for how/why a new Received Batch is created:
- Different Part Numbers/Inventory Items cannot be part of the same Received Batch.
- Through receiving, if the same Part Number/Inventory is entered on different rows, a new Received Batch will be created.
Receive the Batches
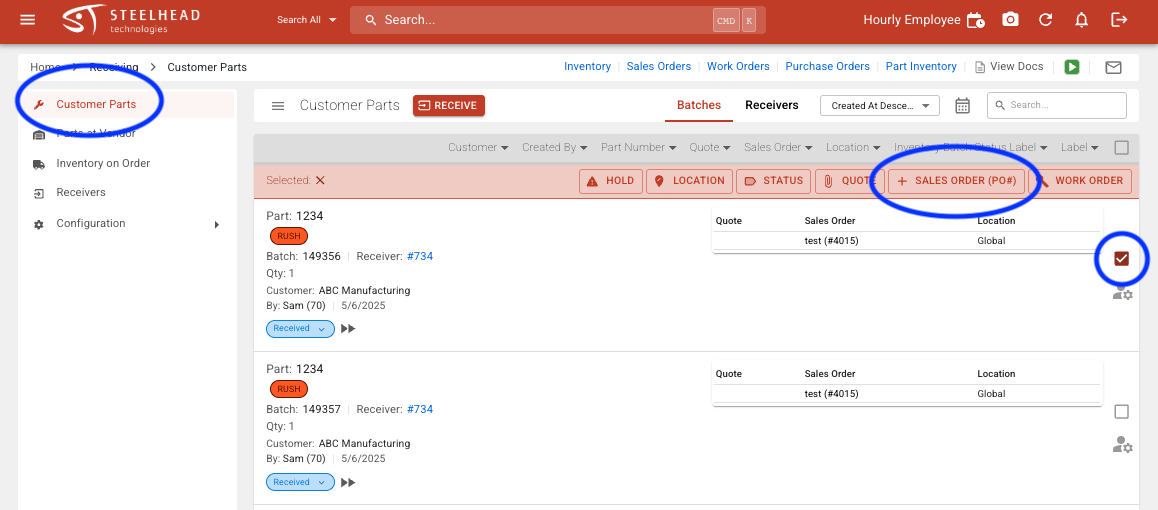
Enter the Receiving Dashboard from the Production Section of the Homepage. Customer Parts is the top menu selection on the left. To create a Sales Order from a Received Batch, simply select the checkboxes next to the listed batches you are receiving. Then press the button that appears which reads +SALES ORDER (PO#):
You can choose an existing Sales Order, or create a new one:

Quoting
If you haven't selected a Quote for this Batch, a notifier will appear that says "This Part Number Has No Quote Information! Please attach or create a Quote for this part before adding to a work order!" A Quote is not necessary to proceed. To fix this, please see our page about Quoting, and follow the steps in the matching shortcut menu that appears when you press the "Quote" option in the Receiving Dashboard.
- In addition, note that the receiving status of a Quote will be shown just under its title:

Mark Received Batches on Invoices
Received Batches can be shown in the descriptions for Invoice Line Items:
- Turn on the Domain Setting called “Include Batch on Invoice By Default”.
- Create an Invoice for a Sales Order Line Item that has Part Numbers with Batch associations.
- This way, if there are Batch associations they will be included.
- You can see the edit screen by clicking on the grey pencil icon.
Serialize Multiple Parts at Receiving
Serialize multiple Parts when Parts are being received.
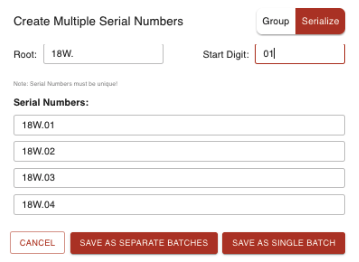
- Use the Root field for any letters, numbers, or special characters that come at the beginning of all the desired serial numbers.
- Use the Start Digit field for the sequential digits that come after the root of the serial numbers.
- SAVE AS SEPARATE BATCHES button will split all serialized Parts into a Batch of their own.
- SAVE AS ONE BATCH button will create one Batch for all serialized Parts.
Options for Split Received Batch:
From the “Split Received Batch” screen you may:
- Select/Use template Part Numbers
- Edit Part Numbers
- See Specs on Part Numbers
If Parts are not serialized upon receiving, it can be done afterwards.
- Click the Work Parts icon on the received Parts.
- Click the Change Group" pencil icon on the Batch Account.
- Click the Create Multiple Serial Numbers icon on the popup menu.
- Select the Serialize tab.
- Enter in the Serial Number details and save.
If you try to go over the limit, you will see a message like this one:

Serialize parts tutorial video
Video: More tips on serializing
Associated Domain Settings:
- When enabled, “Skip Pass Through Dialog In Receiving Work Flow” will auto-select the first matching Quote Line when Parts are assigned to a Quote with multiple Quote Lines.
- When enabled, “Default Serial-Type Part Groups To Internal” will assign Parts Groups to the Customers.
- When enabled, “Place Each Received Batch On Its Own Work Order By Default” will automatically place each Received Batch on separate Work Orders for better traceability.
- When enabled, “Place Each Received Batch On Its Own Sales Order Line By Default” will place each Received Batch on separate Sales Order Lines for individual pricing.
Was this article helpful?