- Print
Edit Customer Profile
- Print
Customer Profiles contain some useful points specific to their preference information, contact information, and more. Open the Customers tile on the Homepage to see the list of Customers in your Steelhead domain. Click on the Customer's name to view/edit that Customer.
Customer Data Card
The first section you will see on a Customer's page is the main Customer data. This includes basic and financial information about a Customer, and will be editable to anyone authorized.
Click the pencil to the right of the Customer name to edit these sections:
- Name
- Accounting ID/Name
- Number
- Default Order Type
- Default Terms
- Default Lead Time
- Default Shipping Method
- Sales Taxable (Yes/No)
- Sales Tax
- Resale Number
- Main Phone Number
Accounting ID
- Accounting ID/Name is for Steelhead users who Invoice based on Part Number instead of invoicing on Process - so when the Part Number is synced to Accounting Software, the software fills in the accounting ID/Name.
- The Accounting ID/name can be changed in Steelhead if this part has not synced over to your accounting software yet.
- If it has synced over it will need to be edited in in accounting software, and that change will flow to Steelhead at the next integration sync.
- If needed, follow these steps for properly editing items in Quickbooks Software:
- Select Lists, then select Item List (for Windows) or Items (for Mac).
- Double-click the item you want to change.
- Edit the info for the item.
- Select OK.
- The build-to-stock order type is what indicates the parts, when finished will not be shipped or invoiced immediately but instead will be held in inventory.
- Creating a new Process for “mold to stock” and omitting shipping and invoicing from the process will work.
- No changes to the Workboard will be needed if existing nodes are used to create the Process.
- In this example, the build-to-stock order type will still need to be selected for the finished parts to hit inventory.
- A SO can be created without assigning a Customer.
- A SO can be assigned as a Make-to-stock type.
- This removes Shipping and Invoice nodes from the Process Tree.
- An order that is completed without shipping or invoicing will be added to the Part Number inventory in Steelhead.
Default Terms
Payment Terms can be set to provide a discount for early payments, payment deadlines, and so on. When you click on the Default Terms text box, and type the name of terms which have not been applied before (e.g., "2 10 Net 30"), the option to "Create 2 10 Net 30" appears in the drop-down list:

Selecting your new Terms entry will open the "Create Invoice Terms" dialog, where you can enter the length of time invoices remain open for payment, the discount percentage for early payment, the number of days during which the discount applies, and checkboxes for requiring payment for shipping or prepayment of the order:

For more information on the the Customer's Portal Access Link, see Configure Customer Portal.
Click the pencil to the right of Avatar in order to add a file for the avatar image. The Customer's Avatar is displayed in many places throughout Steelhead.
These pieces of information are not able to be edited on this page:
- Customer Created Date
- Creator
- UUID
Click the pencil to the right of Custom Inputs to fill out the custom inputs form.
Click the pencil to the right of Finances to check the Credit Limit and Balance for this customer, and to also freeze the account. Freezing the account will display warnings throughout Steelhead for this customer.
Links
This list of Steelhead Interactions hyperlinks will allow you to quickly reach other pages, filtered with the customer name. These hyperlinks include Quotes, Sales Orders, Work Orders, Part Numbers, Shipping, Packing Slips, Invoices, Quality Holds, NCRs, and CARs.
Conversation Window
This is a messaging system used for discussion and questions about this Customer between workplace employees, but not with the end-user Customers themselves. Everyone's messages are viewable by all, and you are able to delete only your messages. To post a message, type the message in the field and insert.
The conversation box would most likely be efficient for note taking, all employees that have an account in Steelhead for your company can see the messages in it, and they can be easily deleted once done with use.
Customer Portal Messages
This is where messages can be posted for the Customer to view in the Customer Portal. It is helpful for in-app communication especially on devices where email has been turned off. To post a message, type the message in the field and insert. Customers are not able to respond through the Customer Portal.

Addresses
The Addresses table will show locations at which the Customer can be found. It contains columns for Address, Sales Taxable, Sales Tax, Skip Verification checkbox, Use for Billing checkbox, Use for Shipping checkbox, is Default Bill To, is Default Ship To, Actions, and Identifier. Under Actions, you can edit or delete an address.
Above the addresses table is where you can add a new address. Click the "+ NEW ADDRESS" button and fill out the necessary fields.
- The "Identifier" field is useful for searching through many addresses when come time to selecting an address in invoicing.
- "Skip Verification" check box is used to override the fact that the address is unverified in accounting .
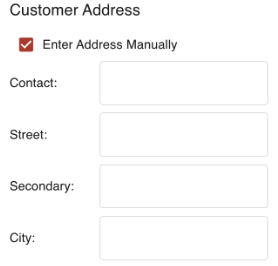
If an address is not searchable, use the "Enter Address Manually" check box to manually enter in the address details.
To edit the address you will start by clicking the edit pencil button next to the address. From there click on "Enter Address Manually".

Once you have clicked that check box it will have you reenter the Customer address, leaving out the Customer name.

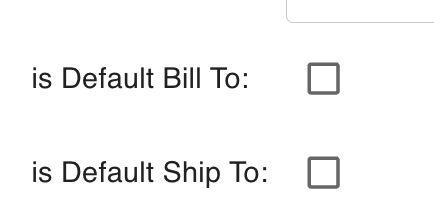
Another option would be to click on "+ New Address". From there you will manually enter the address leaving out the Customer name. Then you will have to set this address as the default for "Bill to" and "Ship to".

If you choose to add a new address, you will have to take the default settings off of the first address.
Contacts
This is the table for Customer contact information. The table columns are Number, Name, Job Title, Email, Phone, Contact Department, Address, and Actions. The Actions column allows you to edit or delete a contact.
The data is drawn from Customer Contacts page. You can also add contacts by clicking the "+ NEW CONTACT" button.
From some menus in Steelhead, you can configure all of your table columns with this gear icon. You will then be able to arrange all of them in whichever order is best:

Freight Carriers
This table lists Shipping Carriers in contact with the Customer. It has columns like Name, Carrier Number, Address, Account Number, Third Party Freight Charges, and Actions. The Action column allows you to edit or delete the freight carrier.
Click the "+ NEW CUSTOMER CARRIER" button to add a new carrier.
Freight Carriers can also be added to Customers through the Carriers tile.
Customer Files
Here you can upload files or images that should be associated with this Customer for any reason.
- Intended for easily storing of associating a file with any given Customer.
Access Link Views
This table shows the time and IP location of people visiting the Customer Portal. IP Addresses are sensitive information, so do not share these unless authorized!
Prices
This tables shows the Price Name, Creation Date, and Creator of prices used by this Customer.


