Creating New Part Numbers
- Print
Creating New Part Numbers
- Print
Article summary
Did you find this summary helpful?
Thank you for your feedback!
Creating New Part Numbers
A Part Number is a unique text identifier for an item which may be entered on Quotes, Sales Orders, and so on. It designates a product or component.
Part Numbers serve as short descriptions. It's helpful to include enough information in Part Numbers to find them again when you search them to Quote or run a similar job. For example, a Part Number of "AceSprocket304SS" is more useful than "221586."
To add a new Part Number for a Customer, it is best to make sure you aren't registering a Part that's already there:
- First, click the Sales Orders button on the Homepage.
- Select or create a Sales Order.
- Press the button that says ADD PARTS (TABLE) or SAVE + ADD PARTS.
- On the Add Parts screen, type the Part Number into the entry field.
- This will search for matching Part Numbers, and you can select the Part if it's there.

"New Part Number" Dialog
In the dialog to create a new Part Number, you will find several drop-down menus and entry fields for specifying information about the Part. The page is divided into three columns:
General Data & Pricing Column
Process Data Column
Measurement Data Column

General Data & Pricing Column
Name
The Name of the Part is the unique alphanumeric Part Number field described above. As mentioned, it's helpful if the Part Number/Name is as descriptive as possible.
Accounting ID/Name
This is the technical name for your Part. It should be spelled out in full to avoid confusion with similarly named parts. This is the name that the Part is Invoiced and Purchased under. In certain cases it must match the requirements of synced accounting software for length and character restrictions.
Notes on Accounting ID:
- Part Number Accounting ID/Name is for Steelhead users who invoice based off of Part Number instead of invoicing on Process - so when the Part Number is synced to Accounting Software, the software fills in the accounting ID/Name.
- The accounting ID/name can be changed in Steelhead if this part has not synced over to your accounting software yet.
- If it has synced over it will need to be edited in the accounting software, and that change will flow to Steelhead at the next integration sync.
- If needed, follow these steps for properly editing items in Quickbooks Software:
- Select Lists, then select Item List (for Windows) or Items (for Mac).
- Double-click the item you want to change.
- Edit the info for the item.
- Select OK.
Customer
This is the owner of the Part. You can search for an existing Customer or register a new one if no matches are found.
- Wherever you search for Customers, you can use either their name or their accounting ID, this may be useful when there are multiple Customers with identical names but different accounting IDs.
- This feature is available anywhere there is a Customer select dropdown (e.g. Create New Quote).
- Customers will appear if their accounting ID or name matches the search term.
- The search term text will be highlighted in each of the results.

Search for Customer by WO Number:
The only way to search by your Customer's Work Order numbers is match the name of your Work Order to the name they provided with the order. You can select the edit pencil icon next to the Work Order Number to edit pre-existing Work Orders.

You cannot name a Work Order when it's created by adding parts to a Sales Order. If necessary, the name can be changed after the Work Order has been created.
If you create a Work Order from the Work Order page, the first input box, called "Number", is where you enter the Work Order name.

Part Number Group
This is the User-created category that the Part Number will belong to. See the Part Number Groups article for more information.
Source Operation
"Source Operation" is used for converting Parts from raw materials.
CUT = Raw Cut shape (pre-machined cut "blank")
CAST = Raw Cast shape (pre-machined cast "blank")
Use the "create blank" option for either to create a pre-machined "blank" for the current Part Number if the current Part Number is machined from a "blank."Refer to Fabrication (Cutting, Casting, Assemblies) Articles for more information.
"Is Cut Stock?" Checkbox
To be checked if the Part Number is Cut Stock (i.e., it will be cut directly into other Parts). See also the article on Cutting.
Material
Categorize the Part by its substrate. See also the articles on Fabrication.
Geometry Type
Select or create a Geometry Type in order to attach dimensional Specs. See also the articles on Specifications.
Labels
Labels are used to categorize Part Numbers for sorting tasks according to your needs. Selected Labels appear in Quoting, Sales Orders, Work Orders, Workboards, Shipping, and Invoicing.
See the article on Work Order Labels for more information.
Description
Here you can enter any details or notes about the Part. Anything that might be helpful to other workers should be recorded here.
Part Number Description
The Part Number description you enter will be shown every time that Part is run going forward. Information entered here adjusts the global Part Number Description.
If you want to enter instructions that are specific to a Work Order, use Work Order Comments instead.
Customer Facing Description
This is a space to enter a Customer-facing Part Number Description that your Customers can view in their Customer Portal.

Tax Code
Here you may select the Tax Code that your company will use for this Part.
Taxes are established from your Domain Settings under Integrations & Downloads. See the Tax articles for more information.

GL Account
Here you may assign the General Ledger Account that should pay for and collect for this Part.
- Add the GL Account to the Part Number, and when the Part is processed and syncs to your accounting software it will link to the Account created there (if already created).
- If they have not been created in your accounting software, it will create them once added to the Part.
Cert PDF Template
Here you may select the Certification PDF template that your company will use for this part.
Cert PDFs on a Part Number should not be confused with a Part Number's own specific PDF. This file can be seen and downloaded from the Part Number Page:

When a PDF is opened, its template can be edited by clicking the edit PDF icon at the top of the window: 
Template Part Numbers
- Select “Is Template Part Number” on the creation dialog to make that Part Number a Template for creating other Part Numbers.
- Adding a Template Part Number to a Quote, Sales Order, Work Order, etc. creates a copy, and edits to these copies will not affect the Template.
- Quickly create & price a new Part Number on order entry & receiving.
Is one-off Part (Checkbox)
One-off Part Numbers will not populate drop-down lists for future Quotes and data entry. Rather, they will be automatically archived upon completion.
Is Coupon (Checkbox)
A Coupon is a material sample used for Quality Control. See the article on Specs Managment for more information.
Is Purchasable (Checkboox)
Commonly checked if the Part Number is raw stock, purchased from a vendor, to be used in Fabrication.
Low Stock Alert Threshold:
If the Part Number is kept in stock as an Inventory Item (see related articles), you may set a quantity below which you will be notified that more may need to be ordered.
Process Data Column
Compose Default Process
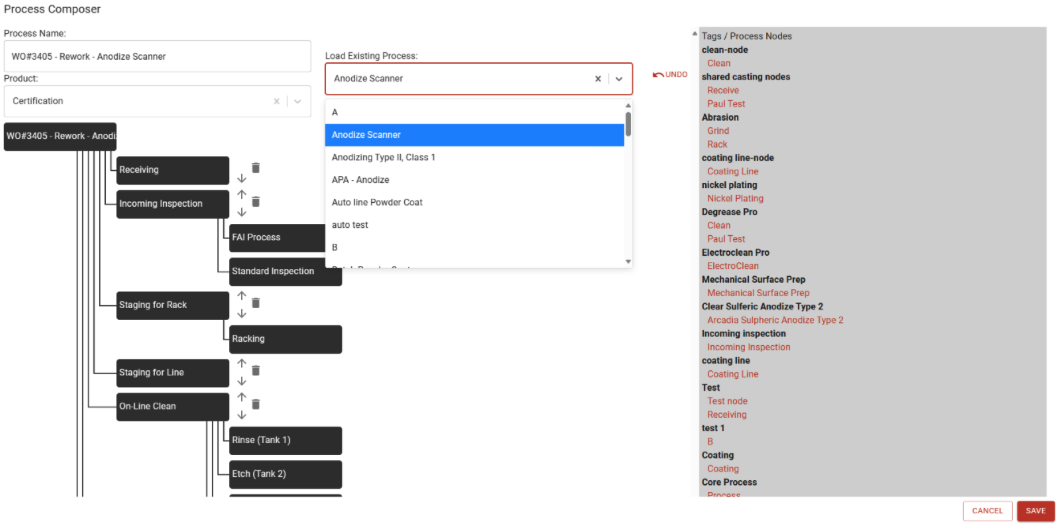
The COMPOSE button in the "Edit Part Number" dialog opens a Process Composer menu that allows you to specify details about Processes to tie to the new Part Number:

You can add Process Nodes to the assigned Part Number Process by clicking red-tagged Nodes to the right of the Composer. By clicking the page+pencil icon next to any Node, you can add Part Number instructions to be shown at that Node during production:

When you finish composing a Process and click SAVE, the Process you've created will be available to select from the "Load Existing Process" drop-down list in the Composer (as long as the toggle "Showing Composed Processes" is turned on).
The saved Composed Process is now also available to view from the Processes Dashboard, if the "View Composed" toggle is turned on.
Make Recipes during Rework:
If you like, you can use the Process Composer when creating a Rework Work Order to create an entirely new Recipe, and then the Generate Recipe option From the Process menu can make it clear what is selected:
Create Rework Work Order and use Process Composer to determine Process.
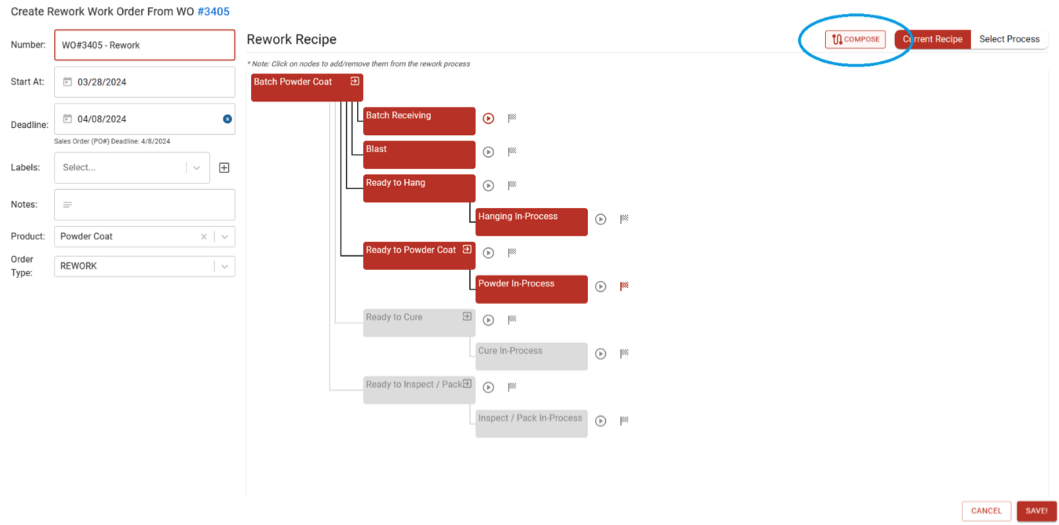
From the Generate Recipe screen use the newly created Process to determine Work Order Recipe.


Select Process
Here you should select the Process that your company will use most often for this part. Unlike for Part Numbers and Customers, this drop-down does not allow you to make new Processes (this must be done in the Processes module).
If the Part is assigned to a Process which repeats the same Node more than once, you may enter Part Number instructions which only display at the instance of the repeated Node to which they are assigned. These differing instructions may be entered by Process Node when you create a new Part Number or edit an existing Part Number, and may be selected when you add a part to a Sales Order, by clicking the three-line icon to the right of the Process/Treatments field.

Navigation Tip: Editing the Process Node Instructions
When you are in the Edit Part Number Instructions dialog, you can scroll through the instructions for the different Process Nodes by holding CMD and using the Up or Down arrow key.
Configure Opt-In/Opt-Out
Here will be a list of Node types in the selected Process that you may opt in and out of. This may include options like Package, Ready to Clean, and Contract Review.
Opt in/Opt out info video: https://www.loom.com/share/c4c3479d22674176be12ebcc560e3707
Predictive Inventory Usage Per Part
See "Predictive Inventory" and related articles.
Default Treatment Selections
Here will be listed some drop-down menus for selecting desired Treatments within the Process.
Pricing
If you click the "+" sign icon next to "Pricing", this dialog box will open:

- Enter Price Name, Set as the Default Price, Enable Low Code, adjust Process/Treatments, or add Custom Inputs, if desired.
- By clicking the "+" sign icon under "Actions", you can combine Price Builder Line Items from different categories into a total price for the Part.
- You can enter a Description, or populate the Description with the Part Number Description.
- You can upload files such as photos of the Part.
- Click SAVE.
Mass Update Part Number Prices
Mass Update not advised for Power Tools pricing Users
We advise you not to "Mass Update Prices" if you may use Power Tools to adjust prices in the future, as this data may be lost.
On the Part Numbers Dashboard, there is a button labeled "MASS UPDATE PRICES" with a pencil icon which will allow quick updates to any combination of Part Number Prices.
- Use the filters in the blue header to select Part Numbers by Name, Group, Customer, Material, or any other category.
- Click on MASS UPDATE PRICES.

Enter a formula script to adjust the prices in the entire filtered set (note that an example script is shown):

Click MASS UPDATE.
Note: Wait for the script to run and for this dialog to close on its own. If the window is manually closed, the price changes may be interrupted before they are complete.
Measurement Data Column
Custom inputs
These vary between Steelhead Domains and allow you to include any information relevant to that Part. Your custom Input Schema can be edited from the gear icon on the top right of the Part Numbers main view. See the Custom Inputs article for more information.
ft/Part, lbs/Part, sq ft/Part
Per Part Count Unit Definitions
Different Types of Parts:
Setting a pre-determined type on a Part Number that will automatically update in your accounting software is currently not a supported feature. Here are some alternative options:
- Modify the type of the newly created Part Number in accounting software from a Service to a Product.
- Create the Part Number first in accounting software with the type determined.
Part Number Files
When you have saved a new Part Number, you may add photos or other relevant documents on the Part Number Page, by clicking UPLOAD FILE under the Part Number Files section.
Here you may add an image that your company will use for this Part Number. This will be displayed whenever possible, such as the Part Number page, Work Parts page, Work Order page, and on PDFs associated with that Part Number. If you would like to see all images and PDFs that have been uploaded to Steelhead, visit the File Management page.
Mobile Friendly
If you are using a phone or tablet, you can take a picture of the Part and add it to the Part Number. Just take the picture and upload the file!
By default, your chosen Part Number image will also appear on Workboard cards, as shown below:

Copying an Existing Part Number
You can copy an existing Part Number in Steelhead by selecting the the box icon with the dotted line behind it, on the Part Numbers Dashboard.

- By creating a Copy, you can assign or omit many of the variables of an existing Part to a new Part Number (even if the visible Part Number is duplicated), such as assigning it to another Customer.
- When created in the Part Number Dashboard, the copy will be Archived upon creation if "Is One Off" is checked. To assign it to an order or edit the details, it must be unarchived first.
- If "Archive Copied Part Number" is checked, the original will be archived:

Was this article helpful?